Category Meat

Soy & Ginger Shin of Beef

S

hin of beef is so cheap and versatile and as long as you have a little bit of time on your hands to sit back, do nothing and watch and smell it turning into heavenly supper then you’re in for a treat. You can make many stews with shin of beef, traditional mushroom and bacon with some crunchy dumplings or an Asian themed dinner with some soy!

Adapted from River Cottage

Serves 4

  • 1-1.5kg shin beef (cut into chunks or big pieces)\
  • 1 red onion, chopped
  • 6 garlic cloves, sliced
  • 2 thumb sized piece fresh ginger, sliced
  • 3 tbsp tart jam e.g. redcurrant or plum
  • 150ml soy sauce
  • 350-500ml apple juice
  • 2 tbsp cider vinegar
  • 2 dried chillis
  • Rice to serve
  • Lime
  • Coriander chopped
  1. Preheat the oven to 140 degrees.
  2. Heat a heavy cast-iron casserola pan over a medium high heat and add a splash of sunflower oil. Season he chunks of meat and add these to the pan to brown well on all sides.
  3. Once browned, remove and set aside on a plate.
  4. Reduce the heat of the pan to medium and add the onion and cook gently until starting to soften. Add the garlic and ginger and continue to cook for a few minutes until everything is starting to brown slightly (but not burn).
  5. Next return the meat to the pan and stir to combine.
  6. Add the jam and stir, followed by the soy sauce.
  7. Add enough apple juice to cover the meat but not drown it.
  8. Finally add the vinegar and the chillis.
  9. Cover with a lid and place in the oven for about 2 1/2 – 3 hours, checking a few times along the way.
  10. Before serving, sort out your rice recipe! I cooked some brown rice, squeezed in some lime and chopped coriander.
  11. Remove the lid of the casserole after about 2 1/2 hours and turn up the heat to about 200 to brown the top of the meat (if you like).
  12. When ready to serve, spoon on top of the rice and serve with a wedge of lime and some fresh steamed green vegetables.

Hugh serves his with noodles…but I’ve never been a fan. I think this works far better with some zesty lime rice.

Guinness Lamb Shanks

I

‘ll start by admitting that this is a trusty Jamie O recipe that I’ve adapted. I think quite rightly adapted, by adding a lot more Guinness than his recipe suggests. Seeing as it’s in the title, I felt a good pint minus a few motivating sips should be involved. You can basically slow cook lamb shanks in any liquid with some stock –  ale, cider, wine etc, so this was screaming for the booze.

Jamie O is both the reason I started cooking when I was younger and my constant inspiration. He is my go-to for tasty and reliable recipes when lacking ideas. I also love lamb shank. Forever a crowd pleaser and a winner when cooked slowly. I’ve a number of tasty lamb shank recipes on the blog but February 14th was calling for something with an indulgent difference. If you’ve read last weeks post you’ll know that my lucky date polished off a cleansing Peruvian sea bass cerviche before enrolling in Guinness lamb shank. He had no choice.

What did I get in return you might wonder? Only the luckiest of men would get his own menu I hear you say. And little did I know that a mere 22 hours after serving this Irish inspired delight, that I’d be whisked away on a plane to none other than…Dublin!!! For a surprise weekend away! Only the luckiest of ladies would be treated to such adventures. Too close a coincidence some might say…but little did I know that I’d be standing over Dublin sipping a Guinness in the Guinness factory panoramic bar a day later. Cheers to Dublin and Guinness. Enjoy this recipe.

Serves 4

  • 4 lamb shanks
  • 2 red onions, chopped
  • 1 large garlic clove, chopped
  • Handful raisins
  • 1 heaped tbsp red onion marmalade
  • 1 tbsp tomato sauce
  • 1 tbsp Worcester sauce
  • 1 can Guinness
  • Few sticks rosemary, leaves picked and chopped
  • 1 litre hot beef/lamb stock

Mint oil

  • Bunch fresh mint, leaves picked
  • 1 lemon
  • Good quality extra virgin olive oil
  • Salt
  1. Preheat the oven to 150°C. 
  2. Heat a large casserole dish, large enough to hold the lamb shanks, on the hob on a medium heat and add a splash of oil. Seasons the shanks then brown them to caramelise the edges and develop some flavour. Do this for 5-8 minutes or so, just to brown the main end and sides, don’t be too fussy, it’ll brown fully later. Set aside on a plate.
  3. Add a touch more oil to the casserole and reduce the heat to gently soften the onions for about 8 minutes.
  4. Add the garlic and cook for a few more minutes. Add the rosemary and stir to combine. Season.
  5. Add the marmalade, raisins, ketchup and W sauce and stir to combine. Turn the heat up a touch and add the Guinness.
  6. Add the lamb shanks back to the pan and top up with enough stock to bring the liquid about 1/2 way up the sides so its submerged but not drowning. 
  7. Now you can leave it alone in the oven with a lid on. Leave to cook for about 2 hours. After this time, remove the lid and increase the temperature to 180°C. This will enable the juices to reduce and the mixture to thicken. Leave this for about an hour but after it has been in for 2 & 1/2 hours in total, its really up to you and your timings. I left mine for about 3 hours total and really reduced and thickened the sauce and browned the shanks to a dark ale colour. You can play with the temperature to achieve your style. Careful not to dry the sauce though.
  8. Once cooked, remove from the oven. Serve with creamy mash, polenta, creamy beans and leeks or whatever your heart desires. Top with mint oil.

Mint oil

  1. bash the min leaves in a pestle and mortar with some flaky salt. Add a very small touch of oil and mash until the desired consistency.
  2. You don’t want to add too much oil and lamb is notoriously oil and fatty so this should freshen rather than cloy the pallet.

BBQ Pork Ribs

W

ith busy week schedules and weekends packed full of entertainment and fun, its often hard to find the time needed to invest in a long slow cooked dish (if you’re without a slow cooker that is…I’ve still not invested in one. Must I?) Whilst there is often some precious time for a quick casserole or slow cooked curry, dishes that need that extra bit of TLC on the timer often get cast aside. Left only as a dreamy thought on the horizon of menus and craved all too late in the day. Pork ribs for example. Covered in a sticky BBQ glaze. Marinated and slow slow cooked for hours until the bones can be plucked effortlessly from the tender pork handcuffs.

So, with that much valued time on the clock, a craving for these juicy ribs and a bowl of avocado and corn awaiting, it seemed like time to bring out my favourite BBQ marinade. I’ve used this recipe on many occasions to be slathered on nearly any meat – barbecued or oven roasted. See here for my Mexican/BBQ chicken for example. These ribs need a good marinade and then can be easily left to surrender to the oven, tightly wrapped in foil on a low heat for a good 3 hours. Basting once or twice if you can.

I served mine with some pureed sweetcorn and crispy lettuce leaves and avocado salad dressed simply in lemon juice.

Serves 2-3

Ribs

  • 2 racks pork ribs
  • 1 heaped tsp cumin seeds
  • 2 tbsp fennel seeds
  • 5 cloves
  • bunch of fresh thyme, leaves picked
  • bunch of fresh rosemary, leaves picked
  • zest and juice of 1 orange
  • 4-5 cloves garlic, crushed
  • 4 heaped tsp sweet smoked paprika
  • 6 tbsp balsamic vinegar
  • 130ml tomato ketchup
  • 8 tbsp olive oil
  • 10 bay leaves
  • Salt and pepper

Sweetcorn puree

  • 400g sweetcorn
  • Large knob butter
  • 1 lime
  • Bunch coriander
  • (Salad and lemon to serve)
  1. Combine all the ingredients for the marinade in a large mixing bowl big enough to hold the ribs and stir thoroughly. Add the pork ribs (cutting in two if needed) and coat fully in the mixture. Leave to marinade for a few hours if possible. This recipe works best if the pork ribs are left to marinade for some time. But worry not, 20 minutes is better than nothing if you’ve limited time.
  2. Preheat the oven to 150°C when ready to cook. Line a deep roasting tray in non stick baking parchment or similar and spoon over a little marinade to cover the base of the dish. Pile in your pork ribs ensuring all the marinade is slathered over the top and around.
  3. Cover with foil tightly to allow the steam to remain inside but allow for some circulation.
  4. Cook for 2 1/2 – 3 hours, basting the ribs in their juicy marinade from time to time if possible.
  5. Just before you’re ready to eat, simmer the sweetcorn for 2-3 minutes. Drain and transfer quickly to a food processor. Add the butter, lime and coriander and a good pinch of salt and pepper. Blend until you have a chunky but smooth looking mixture. Keep warm.
  6. Serve the ribs with a spoonful of the sweetcorn, a jug of any left over marinade in the base of the baking tray and a simple green salad dressed liberally with lemon juice, salt, pepper and avocado if you feel the need. (I always feel the need).
  7. Devour with plenty of napkins.


Hoisin, Soy and Ginger Meatballs

U

ntil this recipe, I’d really underestimated minced pork. I like pork. I appreciate a good sausage (…ahem..) and I would fight you greedily for the crackling on a hog roast but I rarely cook with it. However my love of Asian-fusion recipes, the need for a warming Autumnal meal and some timely inspiration resulted in this tasty, moreish and speedy meatball dish.

It was an intense weekend. In training for 15km run round Lake Garda in October, it was decided that a smaller practice run was on the Saturday morning agenda. Two hours of enthusiastic and competitive running later, we’d clocked up 13 miles, some sore joints and a feisty appetite. So Sunday welcomed warm showers, relaxation and calorie replacement. And this recipe did a fine job.

Warming, comforting, firey, hoisin-sweet and punching in flavour, it was like an Asian hug in a bowl after a hectic weekend. It also makes a super speedy mid week meal and fantastic leftovers. I’m eating them as I write and they are just as good the second time round on a bowl of vegetable stir fry or raw courgette.

Rice – serve on your rice of choice. I’d recommend a jasmine or a sticky rice to avoid too many flavours. I do however like to squeeze a generous lime into the rice once cooked to add some contrast to the sweet hoisin here.

Serve 4

Meatballs

  • 600g minced pork
  • 30 self raising flour
  • 2 1/2 tbsp soy sauce
  • 1 tbsp hoisin sauce
  • 2 tbsp grated fresh ginger
  • 2 garlic gloves, grated
  • 1 small red chilli (as hot as you like)

Sauce

  • 1 bunch spring onions, chopped
  • 1 tbsp grated fresh ginger
  • 1 garlic clove, grated
  • 2 tbsp hoisin sauce
  • 1 tbsp soy sauce
  • 125ml chicken stock

To serve

  • Steamed pak choy, broccoli,/any green vege
  • Bunch coriander, chopped
  • Steamed coconut/jasmine/brown/sticky rice (of choice)
  • 1 lime
  1. Start by combining all the meatball ingredients in a large bowl. Use your (clean) hands, combine the mixture together so that everything is mixed well. Don’t overwork and pound the meat or it’ll give you rubbery meatballs. Chill for about 15 minutes.
  2. Once a little chilled, heat your oven to 240°C.
  3. Start cooking your rice now.
  4. Roll your pork into meatballs – golf balls size (about 16)
  5. Get a large frying pan on a high heat and add a splash of sunflower oil. (I like to fry mine to give a crispy outside then finish them off in the oven. Alternatively you can avoid this step and jump straight to the oven). Flash fry your meatballs for a few minutes until they form a dark golden crust on the outside. Place into a lined baking dish and add to the oven for about 10 minutes to finish cooking.
  6. Meanwhile make your sauce. Add a splash more oil to your frying pan and fry the spring onions on a medium heat to soften slightly. Add the ginger and garlic and fry for another minute.
  7. Add the hoisin and the soy and stir well. Finally add the stock and simmer gently until the sauce thickens slightly.
  8. Remove your meatballs from the oven and add them to the frying pan and coat them liberally in the sauce.
  9. Add a good squeeze of lime to the cooked rice if appropriate and serve about 4 meatballs per person on top of this. Spoon over some of the excess sauce.
  10. Scatter with coriander and a squeeze of lime if needed.
  11. Serve alongside your fresh greens.


Duck & Watermelon Salad

I

‘ve a list of recipes that just catch my eye for one reason or another that I immediately add to my ‘to cook’ list. Those reasons could be the choice of ingredients, the vibrant colours or just a mood and craving but all contribute to the creation of this list. Shamefully the list has been growing faster than it has even had a chance to be depleted this summer! However an easy Tuesday this week called for this vibrant and fuss free salad. Not much cooking here – just a lot of chopping and fancy scattering. Studded with pomegranate gems, hidden with crispy morsels of duck supported by a solid foundation of juicy watermelon bricks.

Having just this week returned from a bootcamp-esque paradise holiday in Greece filled with wake boarding, yoga, volleyball (I could go on), this recipe offered the perfect balance to continue the health kick while fantasising about being back in the turquoise oceans and white sands of my much beloved Greece.

It has been adapted by a recipe from ‘The Londoner’. Adapted with an alternate dressing more heavy on the lime and some extra hidden gems – roasted peanuts in any dish are rarely a bad thing. But what we do share is our appreciation for the hot duck – cold melon combo that is just so refreshing and de-wicious.

*[Alex and Alice – if you’re reading (which I hope you are), put this on your ‘to cook’ list too before summer is completely over!]

Serves 2

  • 1/2 large watermelon, chopped into chunks
  • 2 duck legs
  • 4 spring onions, chopped
  • 1 red chilli, finely diced
  • Bunch of mint, leaves picked and chopped
  • Bunch coriander, chopped
  • Handful of salted, roasted peanuts
  • Handful pomegranate seeds
  • 1-2 limes, zest and juice
  • 1 tbsp soy sauce
  • 1 tsp sesame oil
  • Extra Virgin olive oil
  1. Preheat the oven to 180°C. Season the duck and roast in a tray for an hour.
  2. While the duck is cooking, chop your watermelon into big chunks and add to a large salad bowl big enough to contain the whole salad.
  3. Add the chopped spring onions, red chilli and chopped herbs.
  4. Add the peanuts and pomegranate seeds (as many as you wish to balance the rest of the salad) and combine well.
  5. Combine the juice of 1-2 limes (depending on how juicy they are!) and the zest in a jam jar. Add almost the same measure of extra virgin olive oil, but a touch under so its more ‘limey’.
  6. Add the soy, sesame and some seasoning. Place the lid on the jam jar and shake well to combine. Taste and adjust to your liking. The last thing you want to do is add a bad dressing to your wonderful salad!
  7. When the duck is ready, quickly shred the meat and crispy skin. It cools quickly so in order to maintain the hot/cold vibe you’re trying to create here, pop it back in the oven for a final blast of heat to warm.
  8. Once hot, add the shredded duck quickly to the salad bowl and coat the salad and duck liberally in the dressing and combine well.
  9. Serve immediately!

I served mine with a nice fresh rocket and cucumber salad and some homemade coconut flatbreads. But this is still a good and healthy meal in itself. A few chunky roasted croutons would not go a miss here however. Just sayin.

Lahmacun Meatballs

L

ahmacun is like a Turkish meat pizza which I’ve sampled in my many escapades to my favourite middle eastern restaurants and holiday destinations. Pizza you say? In a very loose sense. A thin dough topped with a layer of spiced minced meat and a scattering of tasty salad. However, I’ve been experimenting with textures and I decided to turn mine into meatballs – maintaining the spices and flavours of a traditional Lahmacun serving them on a warm pillowy nigella seed flecked flatbread and topped with a fresh crunchy raw salad.

This would make an excellent dinner party starter in a mini version or a light meal or lunch.

Serves 4 (Makes approx. 16 meatballs)

Meatballs

  • 500g minced beef
  • 1 small onion, diced finely
  • 1 small red chilli, diced
  • 1tsp (heaped) ground cumin, coriander, cinnamon, smoked paprika
  • 50g toasted pine nuts (dry fry in a hot pan until beginning to turn golden and release a nutty aroma!)
  • Handful flat leaf parsley, chopped

Nigella Seed Flatbreads

  • 250g self raising flour
  • 150ml warm water
  • 1 1/2tbsp nigella seeds
  • Salt and pepper

Salad

  • 1 bag radishes, thinly sliced
  • 1 small cucumber, cubed into 1cm dice
  • 1 small red onion, halved and thinly sliced into half moons
  • Small bunch flat leaf parsley, chopped
  • 2 little gem lettuces, chopped (optional)
  • 1/2 lemon
  • Tahini

You’ll need 3 large bowl, one for each component to get yourself started. A large frying pan and preheat the oven to 180°C.

  1. Start by making the meatballs. Mix all the ingredients in your first large bowl and combine with your hands, squeezing the mixture together to ensure all the flavours are dispersed. Don’t overwork or pound the meat however. Season well. Taking golf ball sized chunks, roll into meatballs and place on a plate. Continue until you’ve used up all the meat and you have around 16 meatballs. Cover the plate and chill in the fridge until needed.
  2. Next, make the flatbread dough. Combine the flours, salt and pepper and seeds in your second bowl. Pour in the water and mix with a fork. As it comes together, get your hands in and combine into a dough. It shouldn’t be dry but nor should it be sticky. Depending on the texture, add a tough more water/flour to enable you to roll into a smooth ball. Knead for 2-3 minutes on a clean floured worktop. Set aside in a floured bowl and cover with cling film and leave to rest for  about 20 minutes or so.
  3. Assemble the salad. Combine all ingredients in your final bowl except the tahini and lemon. Season and then set aside until ready to serve.
  4. Begin the cooking – remove the meatballs from the fridge! Heat a splash of vegetable or light olive oil in a frying pan over a high heat and fry the meatballs on all sides until they are golden and a nice crust has formed on the outside. Line a baking tray with foil and add the meatballs (the rest of the cooking can be done in the oven). Scrunch up the foil around them to keep them sealed ask they cook and stay moist. Place int he oven for 15 minutes.
  5. Meanwhile, fry your flatbreads. Heat a dry frying pan over a high heat (you will likely need your extractor fan on here)  Take your dough, divide into 4 balls. On a floured surface, use a rolling pin to roll out into a small saucer size about the thickness of a 10p piece. When the pan is hot, add one flatbread at a time and fry on both sides, turning when beginning to brown and char in places. The dough will ideally bubble up and create air pockets but it doesn’t matter if not.
  6. As you fry and complete each one, wrap them in a pile in a clean tea towel to keep them warm and soft until needed.
  7. Once the flatbreads are toasted and the meatballs are ready, remove them from the oven.
  8. Dress the salad with the lemon juice and toss to combine.
  9. To serve, top each flatbread with 3-4 meatballs. Add a large handful or salad over the top and drizzle with the tahini if you like.

(A lime and mint yoghurt would also go down well here instead of tahini if wanted)

Enjoy!


Sticky Asian Brisket (Coriander, Peanuts, Lime and Chilli)

O

nly a true occasion calls for the level of commitment that cooking a dinner requiring 5-6 hours plus additional prep time and a huge amount of will power and patience. And that occasion was, you guessed it, a Birthday. My sister’s birthday to be precise. Its a running joke (which is also true…and very much not a joke) that her Birthday is an (on average) 2 week occasion spanning the initial pre-brithday drinks followed by the Birthday eve event, the actual Birthday, the post Birthday dinner, the family occasion and finally a get together for those unfortunate enough to miss all the above.

So it was the family occasion when this recipe was summoned for a Sunday dinner with a twist. Sticky, slow cooked spiced beef marinated in soy and lime and scattered with fresh coriander and crunchy peanuts. As a fan of beef, brisket is a deep and meaty flavour that adapts perfectly to the slow cook. That and the Asian influence that my family adore, this recipe was a hit! The reduced soy based sauce at the end is particularly punchy, salty, deep and sticky so it would suit a refreshing simple crunchy salad or lightly flavoured rice to accompany.

Followed by a ginger cake (see here) with candles, singing, some more cake, and some ice cream for good measure it was a culinary Birthday I’ll have to try and top next year…

Serves 6 (Adapted from Delicious Magazine recipe see here)

Ingredients

  • 400g shallots, quartered
  • 5 garlic cloves, crushed
  • 500ml beef stock
  • 200ml runny honey
  • 2kg beef brisket
  • 250ml shaoxing rice wine (from the world food section of large supermarkets)
  • 70ml light soy sauce
  • 70ml dark soy sauce
  • 100g fresh ginger, finely chopped
  • 1 tbsp chinese five-spice powder
  • 2 large red chillies, halved

For serve

  • 150g unsalted peanuts, toasted and lightly crushed
  • 1 red chillies, sliced finely
  • Large bunch coriander, roughly chopped
  • 3-4 limes
  • Rice
  • Crunchy salad (Little gems, chicory, cucumber, spring onion, celery lemon juice etc)
  1. Preheat the oven to 140°C and get a deep roasting tray ready.
  2. Heat a splash of oil in a deep frying pan and add the quartered shallots and fry for about 5 minutes until they begin to brown. Add the garlic and cook for another minute before adding the beef stock and half the runny honey and stir and heat to combine.
  3. Add the rice wine, soy sauce, fresh ginger, five spice and red chills in a big jug.
  4. Lay the brisket in your deep roasting tin and pour over both the stock and shallot mixture and the sauce from the jug. Cover with a piece of parchment and then with a few layers of foil enough to cover the tray tightly folding the edges down. Place in the oven for 3 hours undisturbed.
  5. After this time, remove the foil and parchment and turn over the brisket and baste. Cover again and return to the oven for another 2 1/2 hours.
  6. After this time, remove from the oven and increase the heat to 220°C.
  7. Pour all the juices from the tray into a frying pan and set the brisket aside. Bubble the juices on a high heat on the hob for about 15 minutes to reduce the heat by about half. However check the seasoning as you do so. The soy is quite a salty mixture so if you reduce it too much it will be overpowering. Add a splash of boiling water if you do so. Season with pepper and salt if needed at the same time.
  8. Cover the brisket with just a few ladles of the sauce and then drizzle over the rest of the runny honey. Return to the hot oven for another 15 minutes to caramelise the brisket and crispy the outside.
  9. Once done, remove the brisket from the oven and serve on a large pre-warmed platter with any of the juices and shallots remaining from the tray. Scatter over the herbs, peanuts, chilli and squeeze over the juice of half a lime.
  10. Serve with the reduced sauce in a warmed jug on the side and a good juicy lime half for all your guests!
  11. Serve alongside rice, flatbreads, salad or any accompaniment you like.


‘Mini’ Chorizo Scotch Eggs

I

call these ‘mini’ as when referencing a Scotch egg these quail egg equivalent would be considered small which made them the perfect canapé for our New Years Eve party! After a long festive week of cooking for the family and indulging in experimenting in our family kitchen and fully stocked fridge, I was pleased to know that the dinner party I was to be a guest at required me to put down the oven gloves and simply bring a bottle of fizz! However it wasn’t long before I was tasted with canapés! I usually don’t bother with the faff but not one to let a challenge go, I wanted something that would get the guests excited!

I’ve also never jumped on the ‘gooey-in-the-middle’ Scotch egg band wagon. These days you can’t call yourself a Gastropub without proudly and confidently sitting a gooey scotch egg at the top of your bar snacks menu. But since I wanted to make a little extra effort I thought I’d give them a go! I know you won’t believe me when I say it but they are actually really simple to make! They do require some effort but what else was I to do on New Years eve day when the dinner was being prepare elsewhere?

Three simple steps and you’re done. I also made cheese and pineapple on sticks. No recipe required, and no ‘steps’….but caused equal excitement. Who knew?

Makes 12

  • 12 quails eggs (at room temperature)
  • 6 chorizo sausages
  • 2 eggs, beaten
  • 2 handfuls plain flour
  • 150g breadcrumbs
  • 1 litre vegetable oil.

Step 1 – Boil the eggs:

  1. Bring a large saucepan of water to the boil. Gently add the quails eggs and boil for exactly 2 minutes. Drain and run under cold water immediately until the shells are cool to touch.
  2. Tap each egg to break the shell (you can be rougher than you think with these but don’t be too heavy handed) and remove the shell. This can be easier under running water. TIP – when you remove the shell, there is a thin clear membrane beneath the covers the white. If you can get under this, the shell can be removed much easier, sometimes in one go!

Step 2 – Coat the eggs:

  1. Remove the meat from the sausages skins and combine in a large bowl.
  2. Take golf ball sized portions (or divide your meat by 12) and flatten on the palm of your hand into a large disc about 6 cm wide. Place one of your eggs in the middle and wrap the meat around it. This can be fiddly but just ensure its covering the egg. Once wrapped around you can mould it in your hand.
  3. Repeat with all the eggs, setting aside on a plate when done.
  4. Place the flour, beaten eggs and breadcrumbs each in their own bowl.
  5. One at a time, roll the eggs in flour then egg, and finally a good coating of breadcrumbs, moulding in your hand (you can be rougher here) until coated well.
  6. Repeat to finish and set aside on a plate and refrigerate until needed.

Step 3 – Cooking the Scotch eggs:

  1. Preheat the oven to 180°C.
  2. Take a large saucepan and add the oil. Heat on a high heat until hot. Test it by adding a piece of cubed bread. If it sizzles and begins to turn golden, the oil is ready. You’re aiming for 180°C so if you have a thermometer use this. (Alternatively if you have a deep fat fryer, heat to 180)
  3. In bathes of 3-4 (depending on your pan size) lower the eggs into the oil and fry for about 4 minutes by which time your egg should be golden and cooked through. TIP: If you can’t gauge the temperature of your oil and they turn golden too fast before the meat is cooked (like mine) remove from the oil when golden and place in a baking tray and finsih cooking in the oven for about 15minutes.
  4. Drain each egg on kitchen towel to absorb any oil and leave to cool

When ready to serve, scatter with sea salt, slice in two if you wish or if you can manage, each whole dunking into some decedent lemon mayonnaise before hand!


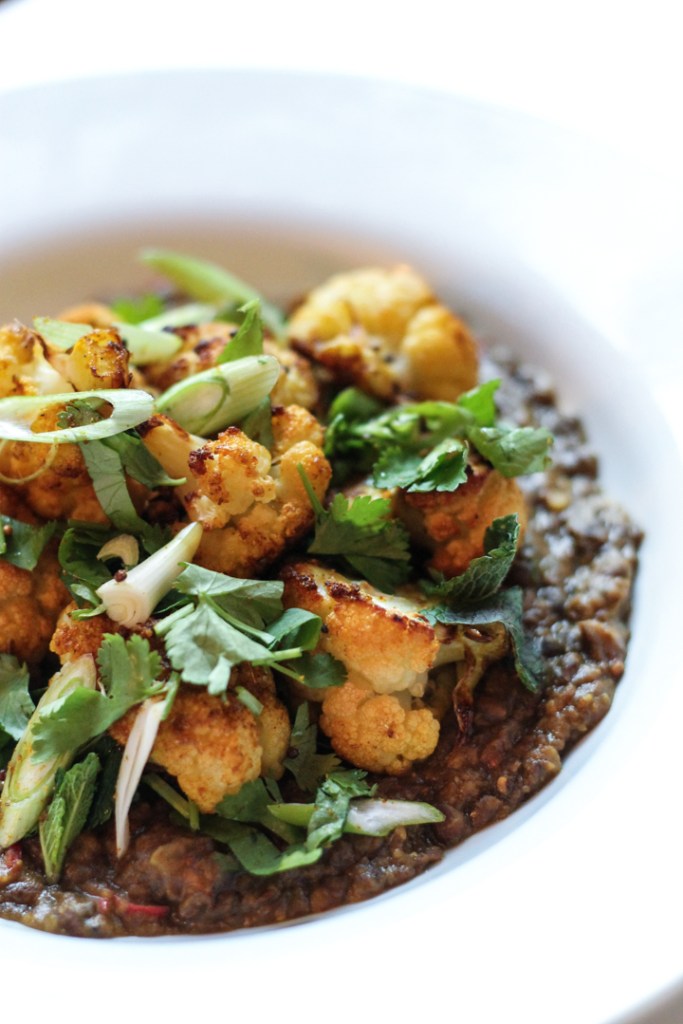
Dahl, Roasted Curried Cauliflower, Shredded Duck in Lime

Jess - Dahl and Cauliflower duck

Jess - Dahl and Cauliflower

Y

ou won’t be surprised to hear it was another week of stressful and busy work so the long weekend glowed like a beacon on Friday evening with promises of yoga, long runs in the sun and some experimental time in the kitchen to blog and relax the mind. I woke to a beautiful sunny day and after a long run to clear the working cobwebs I was already on my way to some downtime. All that was required was some time in the kitchen.

With a stressful period at work keeping 90% of my mind on the task it was time to start planning my second supper club to focus and begin that excitement again! With the date confirmed and inked in the diary I was more than eager to start developing the menu! With just over 2 month before the (second) big day it might seem premature but to get the invites and advert out as soon as possible and the ticket confirmations rolling in the menu was vital. Starter done. Dessert done and obviously featuring ice cream the main needed some attention. With the somewhat limited kitchen facilities and equipment of my cosy, niche and atmospheric chosen venue the dish needed some attention. Ambition needs to be carefully managed and focussed int he right direction.

While flavour is key here using wholesome ingredients cooked from scratch I wanted a menu that would make my potential guests salivate on reading and be booking tickets on autopilot before they could say ‘Deliveroo’! Flavour vital but practicality is also a contender here when cooking solo for 30 paying guests. And in addition economics, aesthetics and style are also important. Factoring all these competing aspects and a love of all things spice this punchy dish was created. I won’t give anything away but the next supper club main with feature something along these lines…

Serves 4

  • 4 duck legs
  • 1 x speedy dahl recipe (see here) with juice of 1/2 lime added at the end.
  • 1 cauliflower, cut into florets
  • 1 tsp turmeric
  • 1 tsp curry powder
  • 1/2 tsp of black mustard seeds and cumin seeds
  • 3 spring onions, sliced on the diagonal
  • Handful of mint leaves, roughly chopped
  • Handful of coriander leaves, roughly chopped
  • 1 large lime
  1. Preheat the oven to 200°C. Season the duck legs and roast for about 40 minutes in the oven.
  2. Scatter the cauliflower florets in a large baking tray and drizzle with a good glut of olive oil.
  3. Toss in the curry powder, turmeric cumin and mustard seeds and stir to coat. Add some seasoning.Jess - Curried Cauliflower2Jess - Curried Cauliflower
  4. After the duck has had 20 minutes of roasting add the cauliflower to the oven and roast for 20 minutes.
  5. Meanwhile make the dahl and set aside to keep warm.
  6. Once the duck and cauliflower are ready remove from the oven. leave the duck to rest for a few minutes before shredding the meat into a warm bowl with two forks and quickly squeezing over the juice of the fresh lime.
  7. Toss the warm cauliflower in the spring onions and herbs.
  8. To plate up, ensure you have warm shallow serving bowls or plates and spoon a generous spoonful of dahl onto the bottom and let it ooz out onto the plate. Top with a handful of the cauliflower before finally topping with a quarter of the shredded duck
  9. Serve immediately while still warm and devour! Serve with warm homemade flatbreads or roti if needed.

WINE: This would be great with an aromatic white such as a Riesling or a Gervertz to balance the spice.

Jess - Dahl and Cauliflower2

Turkish Spiced Meatballs

Jess - Meatballs3

W

hilst the weather today has been glorious and sunny its still felt a little chilly around the ankles and certainly not the April weather I was hoping for! But as long as it isn’t April showers and May holds more promise then I can cope with that. So a Sunday evening after a long and satisfying gym session, run and ahem…jacuzzi session….a home comfort was required to replenish the nutrients and fuel me for another challenging week at work. But nothing on ‘forage in the pantry’ can be complete without the odd scattering of spice, dusting of chopped herbs or middle Eastern influence. So with Istanbul on the mind as the new top draw on my prized ‘must visit’ list, Turkish meatballs sprang to hungry mind and it wasn’t long before I was enjoying a satisfied hunger.

Serves 2

Meatballs

  • 450g minced lamb
  • 2 tbsp raisins
  • 3 tbsp pistachios, roughly chopped
  • Pinch smoked paprika
  • Pinch ground cumin
  • Handful flat leaf parsley, chopped

Sauce

  • 1 can chopped tomatoes
  • 1 large onion, finely chopped
  • 1 large garlic clove, finely chopped
  • 1 tsp ground cinnamon
  • 1 tsp ground cumin
  • 1 tsp ground coriander
  • 1 tsp cumin seed, crushed
  • 1 tbsp balsamic vinegar
  • 50g pearl barley/100g giant cous cous
  • Large handful flat leaf parsley, chopped
  1. Start by combining the meatball ingredients in a large bowl with some seasoning. Shape into 8 large golf ball sized meatballs and chill in the fridge for at least 20 minutes.
  2. Simmer the pearl barley/giant cous cous in boiling water until cooked according to packet instructions. Drain and set aside to keep warm.
  3. Preheat the over to 170°C and remove the meatballs from the fridge. Heat a splash of olive oil in a frying pan over medium high heat.
  4. Fry the meatballs to seal and brown for 2-3 minutes. Once well browned on the outside, wrap in some foil and place in the low oven to bake slowly while you prepare the sauce.
  5. Fry the chopped onion in the leftover lamb juices in the same frying pan adding a little more oil if needed. Soften for 5 minutes until translucent and beginning to brown. Add the chopped garlic and cook for a few more minutes.
  6. Add the ground spices and mix to coat the onion.
  7. Add the chopped tomatoes and a little hot water to thin the sauce to the desired consistency and add some salt and pepper.
  8. Simmer for 5 minutes before adding the vinegar, the drained barely and all but a handful of the parsley. Taste and adjust accordingly. Add a little more water if needed.
  9. Remove the meatballs from the over and add, with any juices from the foil, to the pan. Simmer for a few minutes to heat through.
  10. Serve in deep warmed bowls topped with a scattering of the remaining parsley.

Jess - Meatballs4Jess - Meatballs