Posts tagged bacon

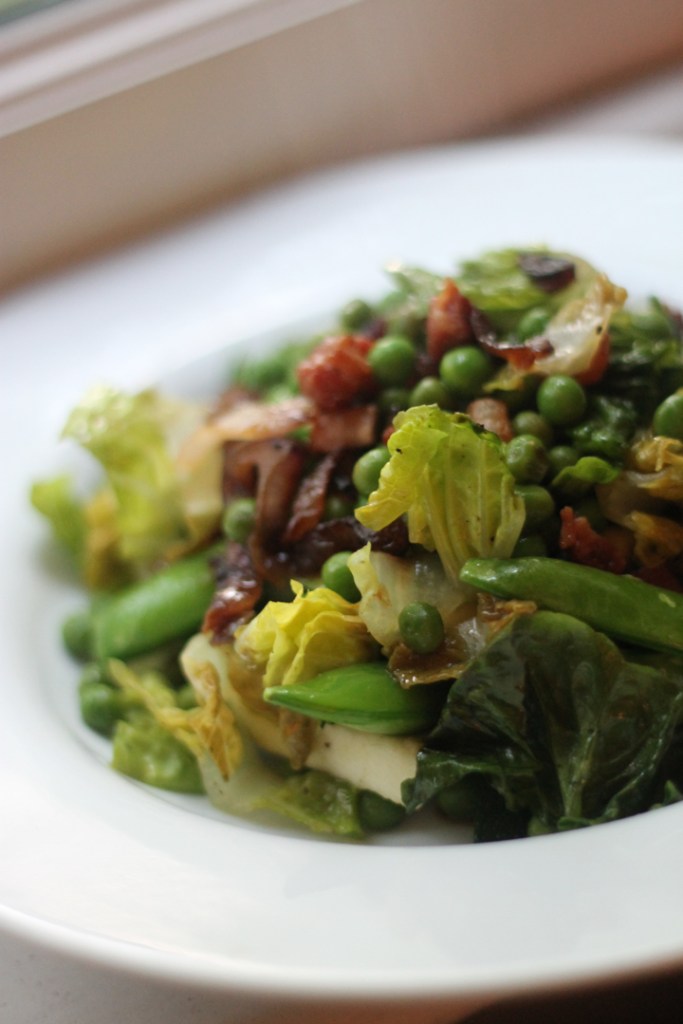
Spring Stew

T

his green spring stew celebrates vegetables but warms the stomach and is a nice transition from a cold Spring day to a Summer evening! You can absolutely experiment with adding different vegetables such as those listed below – weights and measures are also very rough here. Use your hands and throw things in! Just be concious of the cooking times of the different vegetables you choose – asparagus will need to just touch the heat before its overcooked, while green beans will need a little more time. So add these along the way accordingly. Open to variation but the lardons and garlic provide a good foundation and depth of flavour to build on so I recommend these as a must.

I cooked and served this with a delicately fried piece of seabass but a pan fried fillet of soft pink trout would be an excellent and seasonal choice. Topped with a dollop of homemade and indulgent hollandaise (see here) if you want to take this to a higher level or add another dimension.

Serves 2

  • 2 x seabass/seabream/trout fillets
  • 300g frozen garden peas (approximate weight)
  • 2 x little gem lettuce, chopped roughly
  • 200g smoked bacon lardons
  • 200g sugar snaps peas/green beans/asparagus tips/chopped courgettes (or a mixture of them all)
  • 1 red onion, sliced thinly
  • 1 large garlic clove, chopped finely
  • 1 bunch flat leaf parsley, chopped
  • 1/2 lemon, juice only
  • 1/2 stock cube
  • 1 tbsp soft unsalted butter (For the beurre manie, see Cheffy Tip!)
  • 1 tbsp flour

Cheffy Tip: I often use a ‘beurre manie’ (aka, kneaded butter) when I want to thicken a sauce but not make a white sauce or a roux. When you make a casserole and the sauce is a bit thin, or when you want to make the juices in a pan a bit thicker this is your tactic! When you mix the butter and flour into a paste, you coat the flour in butter particles. That way, when you stir this paste into hot sauces and liquids, the butter melts and distributes the flour particles evenly ensuring there are no lumps! (Ideally). You can make a small bowl and then add in tablespoons bit by bit until the thickness desired.

  1. Heat a splash of olive/sunflower oil in a frying pan and sauté the red onion for 8-10 minutes until translucent and softening. Continue cooking until they begin to turn a little golden but don’t burn. Season well.
  2. Add the garlic and cook for a few minutes only.
  3. Add the bacon lardons and cook through until crispy.
  4. Crumble the half stock cube into a mug and add some hot water (about 300ml but its not exact, you won’t use it all, it will have to be used by eye)
  5. Add the frozen peas and toss briefly. You now need to work quickly as the pea, sugar snaps and lettuce will cook fast and you don’t want soggy overcooked fresh greens! Ideally the vege/lettuce should be al dente.
  6. Pour a good splash of the hot stock into the frying pan, enough so that there is a ‘sauce’ that will simmer you veges but not so that its swimming! You don’t need to use all the stock but its there to balance the sauce as you wish. Bring to a simmer.
  7. Meanwhile, in a small bowl mash the soft butter with the flour to a paste until dough like (this is called a ‘beurre manie’). Whisk this quickly into the liquid in the frying pan – I stress quickly to ensure no lumps. This ‘paste’ will thicken the sauce but ensure no lumps. Simmer very gently and you should see the sauce start to thicken a touch. Make/add more more paste as needed if you’ve added lots of stock.
  8. Once you’ve done this, add the chopped little gems and the vegetables of choice and cover the pan with a lid. Let the heat and sauce steam the veges just a touch to let it warm but not go too soggy.
  9. The ‘stew’ should have a thick gravy like sauce but its shouldn’t be swimming in moisture so if it is, just turn the heat up a notch and reduce some of the liquid down. Remove the pan from the heat when ready, check and season as needed and scatter in the chopped parsley.
  10. Finally, add a good squeeze of lemon for seasoning.
  11. Enjoy with a pan fried fillet of fish or steamed cod. Trout would be a great addition here.

Asparagus Salad with attitude

Asparagus

I

ts May! My favourite month. Not just because its my birthday month but because summer is around the corner and we occasionally get some warm sunny days that are by now longer and greener. Also, its not quite summer yet so any warmth is a bonus and any rain can’t be really argued about….rain in July however….that can be, thats not on.

In addition, asparagus season kicks off! One of my favourite vegetables and one that I adore but religiously only use in season. Peruvian flown asparagus in November isn’t quite the same. My patient (and I mean patient) Dad has slaved over a beautiful allotment for a good few years now and asparagus has to be one of the benefits of these hours. Its a funny vegetable to grow really. Its painfully teasing in its initial stages, taking 3 years to form solid allotment foundations. It needs to grow and die again before you can even reap the benefits of your first harvest – 3 years! So it was on day one, year one when Dad announced he was to plant some that we all cheered then sat back in asaparugus-less silence as we waited. But wait we did and now we have a wonderful patch of these cheeky greens. I say funny as while it takes years to establish, when the season hits, asparagus shoots up and grows in lightening speed. It has been known to grow up to 25cm in 24hours! So we can hardly cut it quick enough. While the weather wasn’t ideal for a BBQ this weekend for Dad’s birthday that didn’t stop us from having my (oven grilled) spatchcocked BBQ chicken and this wonderful salad filled with all my Dad’s favourite salad staples and his well deserved asparagus served alongside crispy roasted new potatoes

This is more of an assembly of elements which are open to modification.

Crispy fried croutons, boiled eggs, smoky bacon lardons, stir fired spiced broccoli, crunchy bitter little gems and of course this seasons asparagus….

Serves 6

  • 2 little gem lettuces
  • 1 large head broccoli, chopped into florets and halved if necessary
  • Large bunch asparagus (about 8 stems)
  • 2 free range eggs
  • 3 slices brown bread, chopped into 2 cm pieces
  • 100g pancetta/diced smoked bacon/smoked lardons (optional)
  • Juice 1 lemon
  • 1/2 tsp each fennel seed, cumin seed, nigella seed, coriander seed.
  • Sunflower oil for frying
  • Extra virgin olive oil
  1. Toast the spices in a dry frying pan for a few minutes until fragrant then tip into a pestle and mortar and grind. Set aside
  2. Asparagus – Snap the asparagus where it naturally breaks so you can discard the woody end. Chop the spear ends into half finger length pieces. Blanche these in simmering water for just 2 minutes until just cooked but al dente and drain immediately. Cool under cold water to retain the green colour then allow to cool and dry.
  3. Eggs – Simmer the eggs in boiling water for about 8 minutes depending on their size. Aim for a hard boiled consistency but not overdone. Reduce the time a little if you like them runnier. Drain and cool in cold water. Peel and discard the shell and chop each egg into 8 pieces. Season with a little black pepper.
  4. Salad – Snap the outer leaves of the little gems into a large salad serving bowl and chop the hearts into pieces. Add the cooled and dried asparagus.
  5. Croutons – Heat a thin layer of oil in a frying pan on a medium high heat. When hot, add the bread cubes and some salt and pepper and fry until you have golden and crispy croutons. Drain on kitchen towel and set aside.
  6. Bacon – Add a little more oil to the pan if needed and fry off the bacon pieces until crispy and golden. Drain on kitchen paper then add to the croutons and set aside.
  7. Broccoli – Do this step last so the florets are still a little warm when added to the salad. Either get a clean pan or wipe out the last of the bacon juices and heat a tbsp of olive oil. Add the broccoli florets and season and fry until beginning to char and turn cripsy in places and the stems start to soften. They will have a nice al dente bite to them. As they begin to stir fry and soften, add the crushed spices and fry for a further minute.
  8. Serve – When ready to serve, add the stir fried broccoli to the salad and asparagus and toss well. Add the croutons and bacon and toss again.
  9. Squeeze over the juice of the lemon and a good drizzle of some good quality extra virgin olive oil and toss to combine.
  10. Finally carefully place the eggs on top!

RP - Asparagus

Leek and Parmesan Arancini, Smokey Bacon Mayonnaise

Jess - Leek Parmesan Aracncini_

Jess - Leek Parmesan Aracncini 2

W

hen I first say James Martin make this mayonnaise my mind immediately jumped to all the decedent foods it could accompany. Surprisingly it only briefly lingered on the monstrously unhealthily nature of mayonnaise and bacon!? But once in a while, a Saturday evening needs a decadent dish lovingly and patiently made – think of it as a culinary pat on the back for a hard working week. James Martin is one of those humble chefs that I trust when it comes to recipes (not to mention our matching appreciation for the use of butter) so all that was needed here was something to accompany it. One of my favourite staple flavour combinations being leek and bacon and a need for something fried and crispy for this gourmet mayo, arancini sprang to mind. In preparation for my up and coming supper club where arancini feature as my starter I thought a little more practice couldn’t go amiss. So out came the rice, butter and wooden spoon, the Italian red was decanted and dinner was set…

Serve with a lovely lemony rocket salad to cut through the oil.

Makes 15 large arancini (2-3/person)

  • 1 large onion, finely chopped
  • 2 garlic cloves, crushed
  • 70g butter
  • 200g Alborio rice
  • 1 large glass dry white wine
  • 1 litre hot vegetable or chicken stock
  • 5 leeks
  • 50g grated parmesan cheese
  • 1 lemon
  • 200g breadcrumbs
  • 2 eggs, beaten well
  • 100g plain flour
  • Sunflower/Vegetable oil for deep frying (About 1 litre)

Arancini

  1. Begin by making the risotto either in the morning before eating these or a day ahead of when you want to serve them.
  2. Melt 20g of the butter in a large saucepan or high sided frying pan with a teaspoon of olive oil.
  3. When hot, sweat the onion and garlic, lid on, for about 5-10 minutes until softened and translucent. You shouldn’t allow it to colour.
  4. Turn up the heat and add the rice. Fry for a few minutes until the rice starts to turn translucent. While the pan is still hot, add the wine and allow to bubble vigorously and absorb into the rice. Immediately turn the heat down to a medium low.
  5. Now add the hot stock ladle by ladle once each liquid addition has been absorbed. Between each spoonful allow to bubble at a very gentle simmer. Cook the rice in the stock in this way for about 20 minutes testing the rice after about 18 minutes by which time it should be soft with a slight bite but not mushy.
  6. Meanwhile while the rice is cooking fry the leeks. Melt 20g of the butter in a frying pan with a teaspoon of olive oil. Top and tail the leeks then slice in half and chop on the diagonal into thin slices. Fry on a medium heat with plenty of salt and pepper for about 10 minutes until soft and just starting to caramelise and colour. Set aside once done.
  7. Once the rice is cooked and most of the stock is absorbed you should still be aiming for a loose consistency. Remove from the heat and add plenty of seasoning to taste and then then tip in the leeks. Add the grated zest of the lemon and the juice of half.
  8. Add the parmesan and the rest of the butter and place a lid onto the pot and set aside for 2-3 minutes. After this time remove the lid and stir in the melted cheese to combine.
  9. Tip the risotto onto a shallow dish/baking tray levelling it out thinly to allow it to cool quickly and place in the fridge to chill.Jess - Leek Aracncini
  10. Once chilled, take just bigger than golf ball sized spoonfuls (or smaller depending on how you want to serve them. I suggest one large one each as a starter or 2-3 for a main) and roll into rounds. Arrange your flour, egg and breadcurmbs into 3 bowls in front of you. Dip the risotto balls first into the flour then the beaten egg and finally coat in breadcurmbs and place each on a plate. Continue until you have used up all the rice. This should make about 15 balls.
  11. Place in the fridge until ready to fry.
  12. When ready, heat a saucepan full of the vegetable oil (deep enough to immerse the arancini by at least half) or turn on your deep fat fryer. You will know when it is hot enough as a cube of bread added to the oil will sizzle and turn golden in a matter of minutes.
  13. When the oil is hot enough, fry the aracini, turning as needed, until golden brown and crisp all over. Once golden, remove using a slotted spoon and drain on kitchen towel. Keep warm while you fry the rest.

Jess - Leek Parmesan Aracncini Mayo

Smokey Bacon Mayonnaise

  • 2 egg yolks, room temperature (this is important to prevent it splitting)
  • 1 tsp Dijon mustard
  • 1 tbsp white wine vinegar
  • 6 rashers streaky smoked bacon, chopped into pieces
  • 1/2 lemon
  • 350 ml rapeseed or olive oil
  1. Begin by frying the bacon in a hot pan ahead of time until really crisp. Set aside in a bowl with the fat juices and cool in the fridge completely.
  2. Next, place the eggs yolks, mustard, juice of 1/2 the lemon and the white wine vinegar in the bowl of a food processor and set the motor running.
  3. In a very steady stream add the oil. The more slowly you add it the less chance it will split. The mixture will begin to thicken the more oil you add. Continue until you have combined all the oil and the consistency is thick and smooth.
  4. Next add some freshly cracked pepper and tip in the bacon pieces. Pulse until mixture to combine the bacon.
  5. Spoon into a small serving bowl and cover at room temperature until ready to use.

WINE: By no means do you need to fork out on an extravagant Italian bottle such as the below ‘Gaja Conteisa’ that I devoured these with. But there is something quite ironic about a greasy and mayonnaise laden ball of buttery risotto with a Super Tuscan that I won’t lie….went down like a house on fire. Italy, you made my weekend.

Jess - Leek Parmesan Aracncini Gaja_


Sprouts with a Makeover


image

Sprouts are such a controversial topic. Whether you truly hate the unique taste or you have simply had their unfairly stereotyped reputation brainwashed into you as an impressionable child. Sprouts are very bitter by nature and this is accentuated with the cooking time. This I painfully discovered after using a few of the festive leftovers in a gratin last year along with some freshly boiled ones. The unlucky guests to get the odd effectively double cooked sprout soon knew…..excruciatingly bitter and metalic and unworthy of my delicious and creamy gratin.

So, this year I cooked them differently. Risky -my dad being a traditional man grew this years batch on his precious allotment and harvested within the day of eating. But safe to say I heard no objections as soon as the word bacon was batted around. As a member of the cabbage family I decided to cook them like cabbage or savoy cabbage to be precise. Shredded and sauteed lightly in garlic butter with some salty gems of bacon lardons. Chestnuts, had we had some, would have also been delicious here. By keeping them as raw and crunchy as possible to reduce the cooking time but enough to soften them, they were a welcome change to the Christmas lunch which will be continued from here on….plus, much less risk of choking for the health and safety conscious among us!

(I’ve left out quantities here depending on the number of guests you’re obligingly cooking for)

  • Sprouts, shredded
  • Smoked bacon/pancetta/bacon lardons
  • Butter
  • Garlic
  • Optional- cooked chestnuts
  • Salt and pepper
  1. Start with making your garlic butter. Crush 1-2 peeled garlic cloves into a chunky paste with some coarse salt and the back of a knife and mix with a generous knob of butte (about 25g for 1 large garlic clove if you need a rough measure)
  2. Heat a large frying pan and add the garlic butter and heat until it begins to foam. Cook slowly so the garlic doesn’t burn.
  3. Fry the bacon in a separate pan until crisp. (You can do all this in the same pan but the bacon will soften and you loose that crunchy texture. If you’re not fussed then add the bacon to the foaming butter and cook here)
  4. Add the shredded sprouts to the garlic butter and turn to coat. Add a splash of water to help steam things along a little and cook for a few minutes until as softened as you like them.
  5. Add the crispy bacon and its oil and chestnuts if using. Coat in the delicious juices and serve immediately!

image

Quadruple Tapas

I know the concept behind tapas is to eat each dish as it is ready- picking at little morsels of delicious oily, salty and punchy delights to give all your taste buds a go on the flavour dodgems. A long evening should be spent savouring tapas with no where to be and sipping delicious wine in the summer sun. However, I decided to make a selection for dinner and couldn’t find the relaxing side of constantly running back and forth to the kitchen to fry a croquetas or bake some fresh bread or turn off one of 100 timers. So I made a selection all to be eaten and enjoyed together with some delicious wine. I won’t lie, my way took a strong organisation and a large accommodating hob but I managed it. In addition, I have a new found respect for tapas bars….the amount of work that goes into the prep to bring together all the aspects and flavours of just one small dish is huge,-all requiring those little details to make them perfect. I won’t be opening a tapas bar in the near future but what can be gained from this experiment is that 1) I LOVE tapas but will leave it to the experts and 2) I won’t be so horrified at the staggering prices of a few small tapas dish from now on as I venture out to dine thinking that ‘tapas is just a cheap meal right?’.

image

image

Croquetas (Makes about 9 large croquetas)

I first saw a recipe for these in a Jamie Oliver book which this recipe is based on but they are a common little tapas dish and various flavours and recipe derivatives can be found elsewhere. They are essentially a cheesy flavoured bechamel sauce that is cooled and set and rolled in breadcrumbs and fried so that the inside in a hot molten cheesy mixture hugged lovingly in a crispy coat. You can actually use anything to add flavour to the sauce such as different cheeses, smoked fish, anchovies, different herbs or spices. Go wild!

  • 50g butter
  • 2 tbsp extra virgin olive oil
  • 75g plain flour ( and extra for coating)
  • 300ml milk
  • ¼ tsp ground nutmeg
  • 50g hard cheese- Cheddar/Manchego, grated finely
  • 3 slices of cooked smoked bacon/parma ham, chopped finely
  • Handful of chives, chopped
  • 1 egg, beaten
  • 100g breadcrumbs
  1. Melt the butter and the oil in a pan over a low heat until liquid. Spoon by spoon, incorporate the flour and stir in until you have a thick paste.
  2. Add the milk, splash by splash stirring in vigourously until smooth and lump free. Once all the milk is added, keep on the heat and keep mixing to prevent lumps but to really thicken the sauce.
  3. Once thick, remove from the heat and stir in the nutmeg, lots of seasoning, the bacon, cheese and finally the chives.
  4. Place into a chilled bowl and pop int he fridge until set. (NOTE: Mine was a little loose for moulding into croquetas so I popped it in the freezer about 30 mins before using to make it easier to handle)
  5. Get 3 plates and add the beaten egg, flour and breadcrumbs to each.
  6. Use a spoon to scoop and roll croquetas of your cooled mixture. Coat in first the flour, then the egg and finally the breadcrumbs. Continue you have done all and then cover and chill.
  7. Heat some oil in a pan, or use a deep fryer. When hot enough, fry the croquetas until golden and crisp on the outside. Make sure it is not too hot or the outside will colour before the inside is warm.
  8. Drain on kitchen paper and scatter with flaky salt and serve immediately.

image

Morcilla Broad Beans

This recipe is open to quantities so as long as there is a nice balance it will taste great. Don’t skimp on the morcilla however as it adds bags of flavour and depth and feel free to use black pudding which works just as well.

  • Morcilla, sliced
  • Broad beans, boiled and podded
  • Peas
  • 1 small red onion, finely diced
  1. Heat a little oil in a frying pan and gently fry the red onion until soft
  2. Add the morcilla/black pudding slices and fry until cooked on each side.
  3. Tip in the broad beans and peas and stir to combine, breaking up the morcilla as you stir to distribute evenly. Season and then serve.

image

Crisp Cod and Smoky Aioli

  • 2 cod fillets or any other firm fish
  • Plateful of polenta (seasoned with salt and pepper)
  • 1 egg, beaten
  • Flour for coating
  • 2 egg yolks
  • 1 garlic clove, grated finely
  • 2 tbsp lemon juice
  • ½ lemon, zest
  • 1tsp sweet smoked paprika
  • About 250ml sunflower oil
  • Flat leaf parsley for garnish
  1. Begin with the polenta coated cod which benefits from some time resting once coated. Skin the fish fillets and cut the fillets into chunky strips cutting with the ‘grain’/flakes.
  2. Get 3 plates and place the beaten egg, flour and seasoned polenta onto each.
  3. Coat the fish fillets in the flour, egg and then a good coating of polenta and then place the fillets on a polenta coated plate while you do the rest. Cover and place in the fridge for a few hours once done to allow the polenta to swell a bit and form a good crust.
  4. For the aioli, place the egg yolks, lemon and garlic in the bowl of a food processor and turn it on to blend together. With the motor running slowly and constantly add the oil in a thin stream to allow the yolks and oil to emulsify.
  5. As it starts to thicken, add the paprika and some good seasoning and have a taste. Continue to add as much oil as you like to obtain a thin/thicker texture.
  6. When ready to serve, fry the fillets in a little hot oil with a knob of butter for a few minutes on each side until cooked with a golden crust. Serve immediately garnished with parsley and dipped indulgently into the aioli.

Chorizo

This is now my new favourite way to enjoy chorizo, partly due to this sweet tangy glaze that coats it here. The sauce is wonderful when used a dipping sauce for the olive pittas or some qwilling bread to mop up the juices like an edible sponge.

  • 150g chorizo- raw or cooked
  • 1 ½ tbsp sherry vinegar
  • 1 tsp runny honey
  • Large sprig of rosemary
  • 3 large garlic cloves
  1. Cut the chorizo into chunky horizontal slices and fry in a hot pan (you can add a tiny drop of oil to get it going is needed).
  2. Peel and crush the garlic cloves coarsely with the back of a knife. If using cooking (raw) chorizo, make sure it is nearly cooked but if using cured chorizo, as it starts to colour and crisp add the garlic to the pan in the oily juices and fry for a few minutes.
  3. Add the picked rosemary leaves and fry for a few more minutes.
  4. Remove from the heat and add the sherry vinegar and the honey and stir to coat the chorizo.
  5. Return to the heat and very gently simmer the sauce until a little more syrupy and thick but not too reduced. Remove from the heat, cover and keep warm while you do the rest of your dishes as this one will keep.
  6. Serve with the olive pittas or some fluffy bread dipped into the beautiful oily juices

image

Olive Pitta

  • See here for pittas recipe– Don’t add the nigella seeds but instead, add a good pinch of sweet smoked paprika.
  • Once the dough has risen, add in a small handful of both chopped black olives and sun dried tomatoes.

image