Posts tagged broad beans

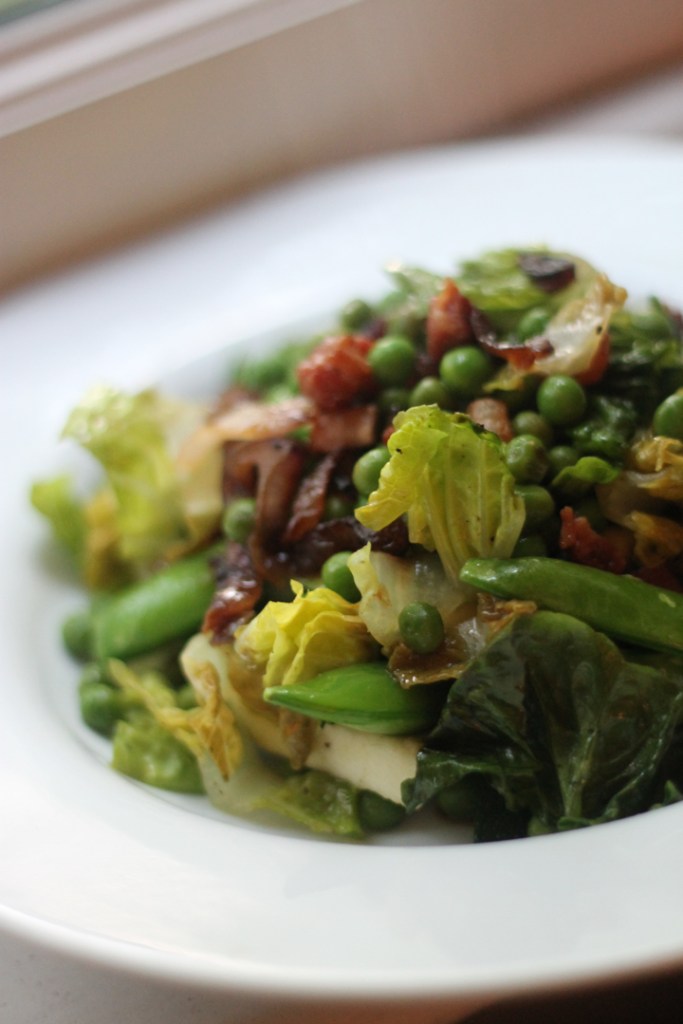
Spring Stew

T

his green spring stew celebrates vegetables but warms the stomach and is a nice transition from a cold Spring day to a Summer evening! You can absolutely experiment with adding different vegetables such as those listed below – weights and measures are also very rough here. Use your hands and throw things in! Just be concious of the cooking times of the different vegetables you choose – asparagus will need to just touch the heat before its overcooked, while green beans will need a little more time. So add these along the way accordingly. Open to variation but the lardons and garlic provide a good foundation and depth of flavour to build on so I recommend these as a must.

I cooked and served this with a delicately fried piece of seabass but a pan fried fillet of soft pink trout would be an excellent and seasonal choice. Topped with a dollop of homemade and indulgent hollandaise (see here) if you want to take this to a higher level or add another dimension.

Serves 2

  • 2 x seabass/seabream/trout fillets
  • 300g frozen garden peas (approximate weight)
  • 2 x little gem lettuce, chopped roughly
  • 200g smoked bacon lardons
  • 200g sugar snaps peas/green beans/asparagus tips/chopped courgettes (or a mixture of them all)
  • 1 red onion, sliced thinly
  • 1 large garlic clove, chopped finely
  • 1 bunch flat leaf parsley, chopped
  • 1/2 lemon, juice only
  • 1/2 stock cube
  • 1 tbsp soft unsalted butter (For the beurre manie, see Cheffy Tip!)
  • 1 tbsp flour

Cheffy Tip: I often use a ‘beurre manie’ (aka, kneaded butter) when I want to thicken a sauce but not make a white sauce or a roux. When you make a casserole and the sauce is a bit thin, or when you want to make the juices in a pan a bit thicker this is your tactic! When you mix the butter and flour into a paste, you coat the flour in butter particles. That way, when you stir this paste into hot sauces and liquids, the butter melts and distributes the flour particles evenly ensuring there are no lumps! (Ideally). You can make a small bowl and then add in tablespoons bit by bit until the thickness desired.

  1. Heat a splash of olive/sunflower oil in a frying pan and sauté the red onion for 8-10 minutes until translucent and softening. Continue cooking until they begin to turn a little golden but don’t burn. Season well.
  2. Add the garlic and cook for a few minutes only.
  3. Add the bacon lardons and cook through until crispy.
  4. Crumble the half stock cube into a mug and add some hot water (about 300ml but its not exact, you won’t use it all, it will have to be used by eye)
  5. Add the frozen peas and toss briefly. You now need to work quickly as the pea, sugar snaps and lettuce will cook fast and you don’t want soggy overcooked fresh greens! Ideally the vege/lettuce should be al dente.
  6. Pour a good splash of the hot stock into the frying pan, enough so that there is a ‘sauce’ that will simmer you veges but not so that its swimming! You don’t need to use all the stock but its there to balance the sauce as you wish. Bring to a simmer.
  7. Meanwhile, in a small bowl mash the soft butter with the flour to a paste until dough like (this is called a ‘beurre manie’). Whisk this quickly into the liquid in the frying pan – I stress quickly to ensure no lumps. This ‘paste’ will thicken the sauce but ensure no lumps. Simmer very gently and you should see the sauce start to thicken a touch. Make/add more more paste as needed if you’ve added lots of stock.
  8. Once you’ve done this, add the chopped little gems and the vegetables of choice and cover the pan with a lid. Let the heat and sauce steam the veges just a touch to let it warm but not go too soggy.
  9. The ‘stew’ should have a thick gravy like sauce but its shouldn’t be swimming in moisture so if it is, just turn the heat up a notch and reduce some of the liquid down. Remove the pan from the heat when ready, check and season as needed and scatter in the chopped parsley.
  10. Finally, add a good squeeze of lemon for seasoning.
  11. Enjoy with a pan fried fillet of fish or steamed cod. Trout would be a great addition here.

Ricotta Gnudi with Chorizo and Peas

Jess - Gnudi5Jess - Gnudi7

T

hese little gnudi pillows are a lighter take on the chewier gnocchi – a potato based recipe –  and instead use creamy ricotta and very little flour to form a creamy and lovely textured equivalent. Historically they are known in Italy as ‘naked’ ravioli. Use your imagination….these ones however are clothed in a simple buttery lemon sauce. A delicious end to whats been a temperamental June weekend. Glorious sun one minute and torrential rain the next. Since the gardens and parks are in full green bloom with all the nourishing rain, a dinner inspired using fresh summer vegetables here makes them not an addition to the gnudi main event but an equal partner.

This recipe is speedy to knock up especially once you’ve fried the gnudi. Simply toss together the blanched vegetables in some buttery lemon and voila…you have a perfect summers meal!

Feel free to use any range of vegetables. Sliced blanched asparagus would be glorious here when in season perhaps with pancetta instead of chorizo. Or try string in some last minute wild garlic leaves, basil or mint.

Serves 2

Gnudi

  • 250g  ricotta cheese
  • 60g plain flour
  • 1 large egg, beten
  • 20g finely grated parmesan (plus more for garnish)
  • Grated zest 1 lemon
  • Salt and pepper

Sauce

  • 1/2 lemon
  • 100g peas
  • 100g broad beans, podded (or any other summer green veg enough for 2)
  • 100g chorizo, sliced on the diagonal
  • 40g unsalted butter
  • Handful chopped chives
  1. Begin making the gnudi. Combine all ingredients into a bowl and mix until well combined.Jess - Gnudi
  2. Tip out onto a floured surface and roll into a log shape (as thick as you like). Add a little more flour if needed. The texture should come together and not be wet but it will be very soft and pillowy like dough. Quite fragile.
  3. Chop into gnudi pieces (mine were about 2 inch long) and place on a tray until ready to cookJess - Gnudi2
  4. Bring a pan of water to the boil and blanch your vegetables of choice and then drain and set aside.
  5. Using the same pan, season the water and poach the gnudi for a few minutes. They will rise to the surface and float once cooked and ready. When this happens, use a slotted spoon to drain and place on a lined tray. Keep the water for the sauce.
  6. Heat a frying pan and add half the butter and a little oil. Heat on a high heat and then fry the gnudi until golden brown all over. Place on a warm plate and keep warm once golden.
  7. Jess - Gnudi3
  8. In the same pan, add the sliced chorizo and fry just until beginning to crisp.
  9. (You need to now work quickly to prevent the vegetables decolouring). Add the vegetables – peas and beans – to the chorizo in the pan and season.
  10. Next add in the rest of the butter and stir to emulsify the sauce. Add a splash of the gnudi poaching water.
  11. Simmer and then add the gnudi to the mixture and warm through and coat in the buttery juices.
  12. Finally, when all warmed through, squeeze over the lemon juice and the chopped chives.
  13. Serve in deep warm bowls topped with any reserved chopped chives and some more grated parmesan

Jess - Gnudi4


Quadruple Tapas

I know the concept behind tapas is to eat each dish as it is ready- picking at little morsels of delicious oily, salty and punchy delights to give all your taste buds a go on the flavour dodgems. A long evening should be spent savouring tapas with no where to be and sipping delicious wine in the summer sun. However, I decided to make a selection for dinner and couldn’t find the relaxing side of constantly running back and forth to the kitchen to fry a croquetas or bake some fresh bread or turn off one of 100 timers. So I made a selection all to be eaten and enjoyed together with some delicious wine. I won’t lie, my way took a strong organisation and a large accommodating hob but I managed it. In addition, I have a new found respect for tapas bars….the amount of work that goes into the prep to bring together all the aspects and flavours of just one small dish is huge,-all requiring those little details to make them perfect. I won’t be opening a tapas bar in the near future but what can be gained from this experiment is that 1) I LOVE tapas but will leave it to the experts and 2) I won’t be so horrified at the staggering prices of a few small tapas dish from now on as I venture out to dine thinking that ‘tapas is just a cheap meal right?’.

image

image

Croquetas (Makes about 9 large croquetas)

I first saw a recipe for these in a Jamie Oliver book which this recipe is based on but they are a common little tapas dish and various flavours and recipe derivatives can be found elsewhere. They are essentially a cheesy flavoured bechamel sauce that is cooled and set and rolled in breadcrumbs and fried so that the inside in a hot molten cheesy mixture hugged lovingly in a crispy coat. You can actually use anything to add flavour to the sauce such as different cheeses, smoked fish, anchovies, different herbs or spices. Go wild!

  • 50g butter
  • 2 tbsp extra virgin olive oil
  • 75g plain flour ( and extra for coating)
  • 300ml milk
  • ¼ tsp ground nutmeg
  • 50g hard cheese- Cheddar/Manchego, grated finely
  • 3 slices of cooked smoked bacon/parma ham, chopped finely
  • Handful of chives, chopped
  • 1 egg, beaten
  • 100g breadcrumbs
  1. Melt the butter and the oil in a pan over a low heat until liquid. Spoon by spoon, incorporate the flour and stir in until you have a thick paste.
  2. Add the milk, splash by splash stirring in vigourously until smooth and lump free. Once all the milk is added, keep on the heat and keep mixing to prevent lumps but to really thicken the sauce.
  3. Once thick, remove from the heat and stir in the nutmeg, lots of seasoning, the bacon, cheese and finally the chives.
  4. Place into a chilled bowl and pop int he fridge until set. (NOTE: Mine was a little loose for moulding into croquetas so I popped it in the freezer about 30 mins before using to make it easier to handle)
  5. Get 3 plates and add the beaten egg, flour and breadcrumbs to each.
  6. Use a spoon to scoop and roll croquetas of your cooled mixture. Coat in first the flour, then the egg and finally the breadcrumbs. Continue you have done all and then cover and chill.
  7. Heat some oil in a pan, or use a deep fryer. When hot enough, fry the croquetas until golden and crisp on the outside. Make sure it is not too hot or the outside will colour before the inside is warm.
  8. Drain on kitchen paper and scatter with flaky salt and serve immediately.

image

Morcilla Broad Beans

This recipe is open to quantities so as long as there is a nice balance it will taste great. Don’t skimp on the morcilla however as it adds bags of flavour and depth and feel free to use black pudding which works just as well.

  • Morcilla, sliced
  • Broad beans, boiled and podded
  • Peas
  • 1 small red onion, finely diced
  1. Heat a little oil in a frying pan and gently fry the red onion until soft
  2. Add the morcilla/black pudding slices and fry until cooked on each side.
  3. Tip in the broad beans and peas and stir to combine, breaking up the morcilla as you stir to distribute evenly. Season and then serve.

image

Crisp Cod and Smoky Aioli

  • 2 cod fillets or any other firm fish
  • Plateful of polenta (seasoned with salt and pepper)
  • 1 egg, beaten
  • Flour for coating
  • 2 egg yolks
  • 1 garlic clove, grated finely
  • 2 tbsp lemon juice
  • ½ lemon, zest
  • 1tsp sweet smoked paprika
  • About 250ml sunflower oil
  • Flat leaf parsley for garnish
  1. Begin with the polenta coated cod which benefits from some time resting once coated. Skin the fish fillets and cut the fillets into chunky strips cutting with the ‘grain’/flakes.
  2. Get 3 plates and place the beaten egg, flour and seasoned polenta onto each.
  3. Coat the fish fillets in the flour, egg and then a good coating of polenta and then place the fillets on a polenta coated plate while you do the rest. Cover and place in the fridge for a few hours once done to allow the polenta to swell a bit and form a good crust.
  4. For the aioli, place the egg yolks, lemon and garlic in the bowl of a food processor and turn it on to blend together. With the motor running slowly and constantly add the oil in a thin stream to allow the yolks and oil to emulsify.
  5. As it starts to thicken, add the paprika and some good seasoning and have a taste. Continue to add as much oil as you like to obtain a thin/thicker texture.
  6. When ready to serve, fry the fillets in a little hot oil with a knob of butter for a few minutes on each side until cooked with a golden crust. Serve immediately garnished with parsley and dipped indulgently into the aioli.

Chorizo

This is now my new favourite way to enjoy chorizo, partly due to this sweet tangy glaze that coats it here. The sauce is wonderful when used a dipping sauce for the olive pittas or some qwilling bread to mop up the juices like an edible sponge.

  • 150g chorizo- raw or cooked
  • 1 ½ tbsp sherry vinegar
  • 1 tsp runny honey
  • Large sprig of rosemary
  • 3 large garlic cloves
  1. Cut the chorizo into chunky horizontal slices and fry in a hot pan (you can add a tiny drop of oil to get it going is needed).
  2. Peel and crush the garlic cloves coarsely with the back of a knife. If using cooking (raw) chorizo, make sure it is nearly cooked but if using cured chorizo, as it starts to colour and crisp add the garlic to the pan in the oily juices and fry for a few minutes.
  3. Add the picked rosemary leaves and fry for a few more minutes.
  4. Remove from the heat and add the sherry vinegar and the honey and stir to coat the chorizo.
  5. Return to the heat and very gently simmer the sauce until a little more syrupy and thick but not too reduced. Remove from the heat, cover and keep warm while you do the rest of your dishes as this one will keep.
  6. Serve with the olive pittas or some fluffy bread dipped into the beautiful oily juices

image

Olive Pitta

  • See here for pittas recipe– Don’t add the nigella seeds but instead, add a good pinch of sweet smoked paprika.
  • Once the dough has risen, add in a small handful of both chopped black olives and sun dried tomatoes.

image

Barbie’s Risotto


image

image

(Beetroot, hazelnut, goats cheese risotto)

This one is for my best bud (who ironically wasn’t there to enjoy it…? Sorry Katy) as she once ordered it at a restaurant just because it was pink! It makes a lovely vegetarian mid-week meal which I even got a man- yes a man- to eat. Now while most 21st century guys under the age of about 35 are willing to try news flavours and recipes, many, like my pa, are set in their foodie ways and require meat and potatoes somewhere on the dinner plate. But, if I can make my dad eat this princess pink, meat free dish then its certainly do-able. Admittedly, he did grow the beetroot and I am inclined to say that he will in fact eat anything that he has produced from his allotment. As a side note- I mean anything. I was told (burdened) this evening with the news that he had some turnips that he’d grown that are (I quote) ‘Great! They taste like melon!’…..interesting.

Anyway, enjoy the risotto!

Serves 4

  • 250g risotto rice
  • 1 onion
  • 1 garlic clove
  • 1 small glass dry white wine
  • 1 litre hot vegetable stock
  • 50g butter
  • Large handful grated parmesan
  • 300g beetroot
  • ½ lemon, juice
  • To serve- Handful podded broad beans, handful hazelnuts, crumbled goats cheese
  1. If using raw beetroot, first boil for about 40 minutes or until soft, leave to cool and then peel. Reserve a chunk and cut into dice and set aside. Place the remaining beetroot in a food processor and puree until smooth-ish adding a few generous splashes of hot stock to loosen. Set aside until needed.
  2. Toast the hazelnuts in a hot oven for about 5-8 minutes and then coarsely chop. Fry in a little oil in a hot frying pan until golden and then set aside to use for garnish.
  3. Melt half the butter with a splash of oil in a large pan and gently fry the onion until soft. Add the garlic and fry for a further few minutes.
  4. Add the rice and fry over a medium-high heat until it starts to turn translucent. When too hot to touch, add the wine and simmer until absorbed.
  5. Turn the heat down to a medium-low and add the hot stock ladle by ladle as it becomes absorbed, stirring all the time keeping the mix on a very gentle simmer. Keep adding stock for about 15-18 minutes until the rice is cooked but with some bite.
  6. When loose in texture and the rice is cooked, stir in the beetroot puree and the beetroot dice. Season to taste, you’ll probably find it needs a generous seasoning of salt.
  7. Add more stock to loosen if necessary and then remove from the heat. Add the remaining butter, the grated parmesan and half the lemon juice, cover with a lid and place the risotto to one side to rest.
  8. When ready to serve, firmly beat the melted butter and cheese into the risotto and season to taste. It should be oozy and runny, not stodgy. Serve spooned into warmed shallow soup bowls, scattered with the broad beans, hazelnuts and a crumbling or  quenelle of goats cheese!

NOTE: See here for my risotto tips

image

Smashed Minty Peas


image

image

This recipe is adapted from a Jamie Oliver recipe from the ‘Jamie at Home’ book. I have many MANY (too many I’m told….?) cook books but there are always those loyal few which I always resort to for some great recipes. This book is certainly one of them and I recommend it (it’s particularly good if you have an allotment as the recipes are seasonal and divided by ingredient). We currently have more peas than can be physically and sanely podded so this seemed like a tasty use for them. With a less bountiful broad bean supply, I adapted the recipe slightly but the end result is a fresh, sweet, minty pea mash. Jamie recommends beautiful buffalo mozzarella but it works equally well with halloumi or feta

  • 350g fresh raw peas, podded
  • 100g podded broad beans, blanched and taken out their skins
  • 60g Parmesan
  • 1 lemon, juice
  • Large bunch of mint
  • Extra virgin olive oil
  • Salt and pepper
  • Sour dough bread slices to serve
  • 1 garlic clove
  1. Use a pestle and mortar to bash the mint leaves with a large pinch of salt and a small handful of peas to release the flavours. (You can make the entire thing in a pestle and mortar but I found it easier in the processer. However, the best way to get the flavour from the mint is by bashing so do this first).
  2. Add the bashed minty peas along with the rest of the peas (save a handful to add whole at the end) into the processor and pulse to roughly chop into a chunky paste. Add the broad beans and pulse again.
  3. Add about 1-2 tbsp of oil to achieve a thick paste and then add the lemon juice. Season and then stir in the parmesan cheese and the reserved whole peas.image
  4. Taste and adjust to your liking with more lemon or cheese or add more oil if it is too thick.
  5. Peel and half the garlic clove horizontally and use it to rub your hot toasted bread as soon as it comes out of the toaster or grill to add a subtle garlic flavour. Drizzle with a little extra virgin olive oil and spoon on your pea ‘mash’. Enjoy with crumbled feta, fried halloumi or creamy buffalo mozzarella!