Posts tagged chilli

Chicken & Black Bean Empanadas

I

promised I’d be inspired from our recent adventures in Mexico. The food and country stole our hearts and we are incredibly lucky to have had such an amazing immersive honeymoon. Whilst I’ve only managed to find one good Mezcal bar in London (Hacha, Brixton/Dalston), I have been creating smoothie bowls, tacos and now, empanadas in the kitchen.

I think empandas are pretty forgiving and adaptable (don’t tell the Mexicans?). Being a very loose cousin to the Cornish pasty in my view, as long as the pastry is fresh and flaky and the filling tasty and moist –  you can’t go wrong. We didn’t eat too many of these in Mexico to know the ‘traditional’ size but I like that you can make these larger or smaller to fit into your menu. Here I opted for the slightly larger than canapé size as part of a Mexican tasting menu.

Makes about 15 (depending on their size)

  • 500g plain flour
  • 2 tsp baking powder
  • 150g cold butter, cubed
  • 1 egg, beaten
  • 4-5 chicken thighs, skin off, deboned
  • 2 large shallots, chopped finely
  • 2 garlic cloves, crushed
  • 2 tsp each ground cumin, coriander, smoked paprika
  • 1 tsp crushed chilli flakes (or as hot as you like)
  • 1 can black beans, drained
  • 1 can tinned tomatoes
  • Handful coriander, chopped

You can use shortcrust pasty or puff if you don’t want to make it yourself. I used a tea saucer size to cut out the pastry circles for size.

Filling

  1. Preheat the oven to 180℃ and get yourself a large casserole dish.
  2. Heat a splash of olive oil over medium heat in your dish and add the shallots. Gently cook for about 8 minutes until soft and translucent making sure they don’t catch. Season well, add the garlic and cook for a further few minutes to soften.
  3. Add the chicken thighs and turn up the heat to brown them slightly on the outside (don’t worry too much, it’ll all go in the oven shortly!)
  4. Add the ground spices and mix everything well to coat for a few minutes.
  5. Add in the tinned tomatoes and mix well. Add half a can of water from the kettle if its looking a bit thick, basically enough to submerge the chicken but not too watery!
  6. Add the black beans and mix well.
  7. Cook in the oven for 45 minutes, lid on. Remove the lid and cook for a further 15 minutes or so. By this time the mixture should have reduced nicely and the chicken tender.
  8. Remove the dish from the oven and leave to cool slightly.
  9. Before it gets cold, take two forks and shred the chicken into bitesize pieces and mix everything to combine before leaving to cool completely before stirring in the chopped coriander.

Pastry

  1. To make the pastry, mix the cold cubed butter and flour and baking powder in a food processor until it resembles breadcrumbs. Season. (You can rub this in by hand but make sure the butter is cold).
  2. Add in a few tbsp of cold water bit by bit with the processor running until the dough just starts to come together in a ball.
  3. Turn the dough out onto a floured work surface and combine into a nice soft ball. Wrap in cling film and refredigate for 1 hour.

Assembly

  1. Remove the pastry from the fridge and leave to warm up for about 15 minutes. Cut into quarters to make it easier to handle. Roll each quarter out on a floured work surface to the ticket of a coin. Use a cutter or an upturned saucer to cut out circles of pastry. Size is totally up to you – you can go large pasty style or small canapé size.
  2. Spoon a small amount of mixture into the centre of the pastry – the amount will depend on the size but be cautious and don’t overfill, its easily done.
  3. Brush beaten egg around the outside of the whole pastry disc.
  4. Turn over the pastry to make a half moon and seal the edges with a fork by pressing the pastry edges together.
  5. Brush the empanada with egg and bake at 200℃ for about 15-20 minutes or until golden brown. 

Roasted Tomatoes & Cold yoghurt

I

‘ve been absent for some time I know. In fact, this has been my biggest hiatus from blogging since I started “forage in the pantry” back in 2012! I haven’t stopped cooking and creating you’ll be pleased to know! On the contrary, I’ve been taking inspiration from our recent travels “honeymooning” in Mexico where I fell head over heels in love with the tacos, avocados, burritos. An oh the mezcal. I’ve been greedily recreating since…and a Mexico post is due.

I have however been back at school. Wine School. Studying for my WSET Diploma. And with studying commitment has come a compromise. I’ve swapped camera spittoon and evenings learning the maximum yields in Champagne to the advantages of hand harvesting…

I am loving it and whilst the end if not near, I am hoping to have some time in the summer to dedicate for  recipe inspiration. So dear followers, I am simply on a blogging sabbatical, not retiring yet.

A sunny summer lunch with the family inspired me to pop up a quick and easy side dish that seemed to get a lot of attention. This one is from ‘Ottolenghi’s’ SIMPLE, but with some modifications, obviously. But its a real winner for ease and flavour. A monkey could make it, I promise. Its fantastic as a side dish for some roasted or barbecued meats or as a starter scooped up with warm pitta or crusty sour dough. The hot/cold contrast is an added bonus.

Serves 6 (as a side dish)

  • 600-800g cherry tomatoes, best you can afford.
  • 3 large cloves garlic, crushed
  • 2 shallots, sliced
  • 4 large sun-dried tomatoes, chopped
  • 2 tbsp sumac
  • 1 tsp dried chilli flakes
  • 1 tsp chopped thyme/rosemary
  • 1 lemon
  • Handful basil
  • Handful pine nuts, lightly toasted
  • 400g thick Greek yoghurt (I always use Skyr)
  • To serve – toasted pitta/crusty sour dough OR as a side dish.
  1. Preheat the over to 200 degrees and get yourself a large roasting tin/dish.
  2. Add all your cherry tomatoes in an even layer.
  3. Scatter over the sliced shallots, crushed garlic and chopped sun-dried tomatoes.
  4. Season well with salt and pepper and sprinkle over the sumac, chilli and thyme leaves. Grate over the zest of half a lemon.
  5. Drizzle with some olive oil (or use the oil from the sun dried tomatoes jar) and toss well to combine.
  6. Roast for about 20 minutes keeping an eye on them until the tomatoes have broken down and rebased their lovely juices. 
  7. Remove from the oven and leave to cool slightly before tearing over all but a handful of basil leaves.
  8. Get yourself a nice serving plate and spoon the yoghurt on top. Spread out and create a slight well in the centre.
  9. Spoon over your lovely roasted tomatoes and their juices.
  10. Scatter with the pine nuts and any left over basil and serve.

Bonus recipe – Roasted new potatoes with oregano & feta

  1. Preheat the oven to 220. Cut your potatoes in half and place on a baking tray
  2. Scatter with flaky salt and dried oregano.
  3. Drizzle with oil and roast for 30 minutes until crispy and golden.
  4. Remove from the oven and let cool slightly before crumbling over some feta.

Bean Chilli

S

ometimes you just need chilli and cornbread in your day. I love a comforting chilli, slow cooked and more often than not these days, made with chunks of braising beef that can be shredded rather than the traditional mince. However, sometimes time isn’t always in the equation for the privileges of slow cooking! On my meat free days or for vegetarian (or vegan) guests, I often make this version and its the smoked paprika that is the winner here for that ‘meaty’ replacement. That said, don’t you dare think about skimping on that. If you don’t have paprika, sorry you’ll need another trip to the shops!

It offers the same comfort and depth of flavour. I know I sound like a broken record but this really can be knocked up in 20-30 minutes max. It really is just a task of opening a lot of cans and stirring. But the take home is that it is wholesome. Its leans away from processed foods and its really cheap. 

9 times out of 10 I will make a cornbread loaf to accompany this (recipe here) but if time does not permit you can enjoy this in SO many ways. Serve on rice for the extra grains or just devour in a bowl like soup. I like to pimp the toppings here with guacamole, soured cream, grated cheddar and coriander. Dip crunchy tortilla chips into it or heck…make a nachos and get that grill on! It also makes an excellent vegetarian burrito filling with eggs and rice. Ok…stop it now I’ve given you quick, cheap and versatile.

Serves 4 (I have never made less than this and would advise you make a batch. It serves 2 with extra and is great reheated/frozen for an even quicker ready meal!)

  • 1 x can mixed beans (I always use Napolina for the quality but any mixed beans will do. Avoid anything in a sauce already)
  • 1 x can black beans
  • 2 x cans chopped tomatoes
  • 1 red onion, chopped
  • 2 garlic cloves, chopped
  • 2 tsp each ground cumin, coriander, smoked paprika,
  • 1 tsp chilli flakes (use as much as you like. I like to use chilli flakes rather than fresh to control the spice here)
  • 1 lime

Toppings & Sides

  • Soured cream OR plain yoghurt with a squeeze of lime
  • Grated cheddar cheese
  • Chopped fresh coriander
  • Guacamole (Or mash 1 avocado with juice from 1/2 a lime and some salt and pepper)
  • Cornbread (see here)
  1. Get yourself a heavy based casserole dish or saucepan.
  2. Heat a splash of sunflower oil and add the onion. Sweat for 8-10 minutes until soft. Add the garlic and cook for a further few minutes.
  3. Add the spices and chilli and cook for 1 minute.
  4. Drain the beans and wash them briefly. Add the beans to the pan and stir. Season.
  5. Add the tinned tomatoes and stir. Wash out the tomato cans with a little water and add that too until its a thick/thin as you desire.
  6. Simmer for 5-10 minutes to let everything warm through. 
  7. Add the juice of 1/2 lime and serve with your toppings and sides!

Don”t feel bound by the beans I suggest here – 2 cans of your favourites will work well. I suggest a mixed can as a base and then go wild with your second – chickpeas or extra kidney beans work well here.

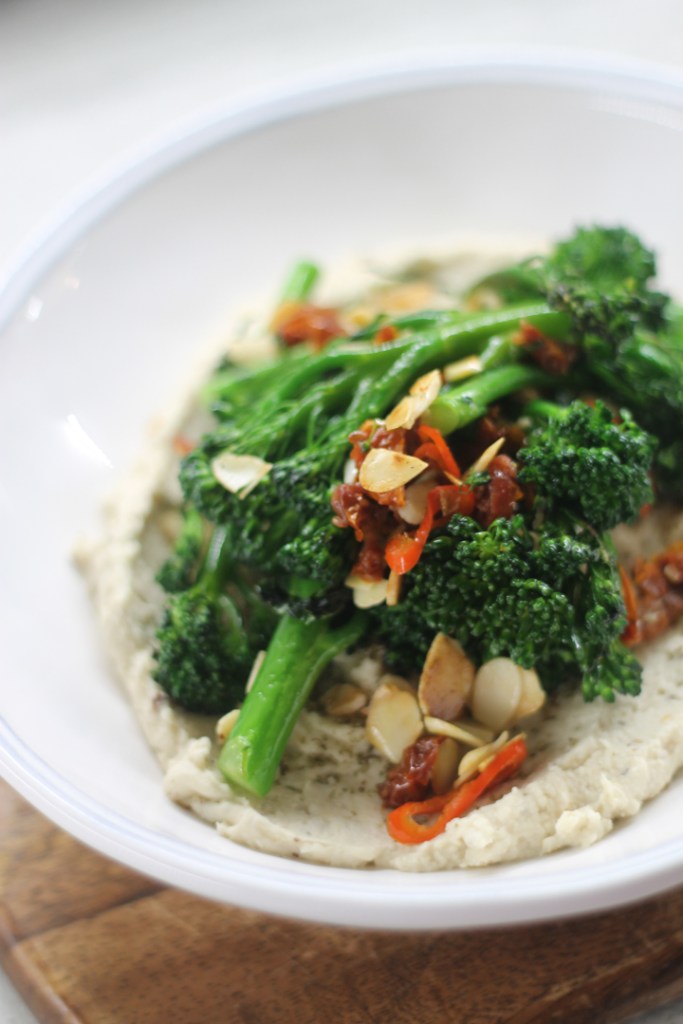
Butterbean ‘Hummus’ with Broccoli, garlic, almonds & chilli

O

ne of the bonus’ for both me and my family & friends is that a cookery book is always a well received gift. Especially if its Middle Eastern inspired. My latest addition is both extremely enlightening and beautifully and factually written! ‘The Jewelled Table’  by Bethany Kehdy.

Having claimed a Middle Eastern ‘style’ to my own food with a heavy twist from almost everywhere, it was interesting to learn some truths about some of the dishes that are now such staples in our UK diets. Hummus most notably. 

  1. ‘Hummus’ means ‘chickpeas’. Hence why this recipe isn’t technically hummus but simply steals the tahini and lemon juice components that make our traditional hummus.
  2. No one country owns hummus. Thus, I think its OK to cook it with your own interpretation.

W

hilst I adore Bethany’s recipes, I’m never one to simply follow and obey. That and I had less time on my hands than a few of her hummus’ called for so I adapted. Mainly from her recommendation to use dried chickpeas. I’ve found a fantastic brand (Napolina) which I will always use so sadly I am a little to lazy to follow this hearty advise.

I’ve have interpreted her ‘Mock hummus’ and added a few bits of my own. I’ve also topped it with the topping from another recipe (‘Butter Hummus’). But admittedly, the delicious and inspiring toppings in this book will make you simply want to create and heat upon a pot of supermarket…’hummus’? 

I hope you’re not confused about hummus. 

Adapted from ‘Mock Hummus, The Jewelled Table’.

Serves 2 (as a side)

Hummus

  • 1 can butter beans, drained.
  • 1-2 garlic cloves
  • 2-3 tbsp tahini
  • 1-2 lemons, juice
  • 1 tbsp spice mix (see tip below). Equally you could use any spices you feel like.
  • Salt and pepper

  1. Blend the butter beans, tahini, juice of 1 lemon, spices and seasoning in a processor until smooth. 
  2. Taste and adjust seasoning or add more lemon if needed.
  3. Transfer to a shallow serving bowl and keep at room temperature.

Braised Broccoli

  • Tenderstem broccoli
  • 1 garlic clove, finely chopped
  • 1/2 red chilli, sliced
  • Handful flaked almonds
  • 3 sundried tomatoes, drained and sliced thinly
  • 1 handful parsley, chopped


  1. Heat a frying pan on medium high and add a splash of rapeseed oil. Stri fry the broccoli for about 5-8 minutes until beginning to cook and crisp.
  2. Add the garlic and chilli and reduce the heat to medium. Cook until just beginning to turn golden (careful not to burn the garlic)
  3. Add the flaked almonds and fry until golden.
  4. Remove from the heat and stir in the herbs and the tomatoes.
  5. Elegantly place on top of the hummus and serve immediately.

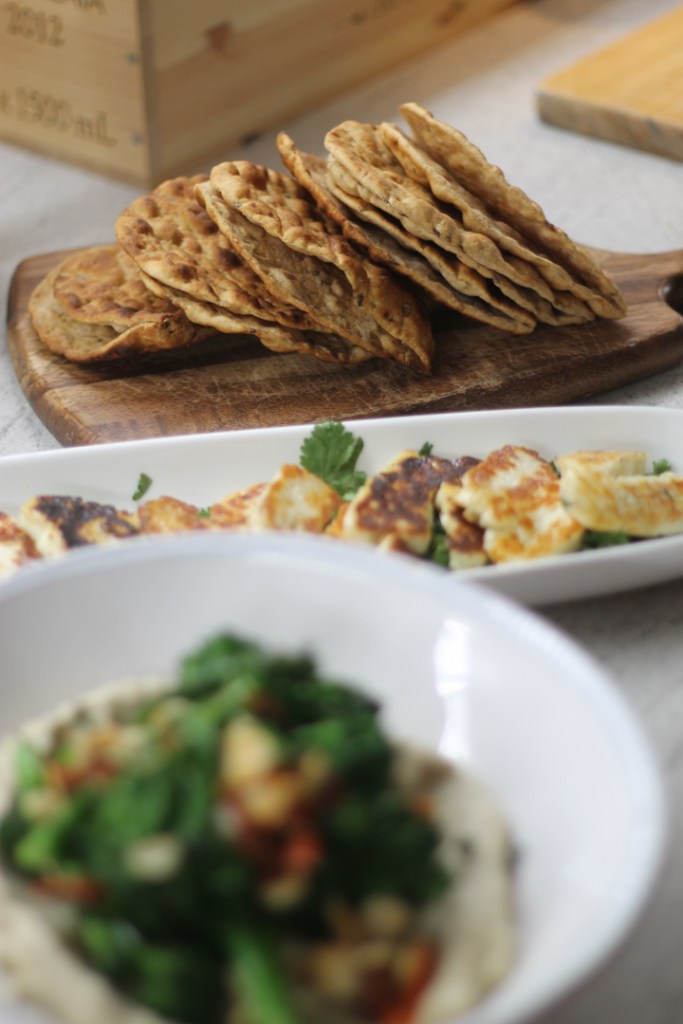
I served mine with fired halloumi and some warm flatbreads for dipping!

Enjoy.

TIP: Spice mix: Made by toasting all whole spices in a hot frying pan until fragrant. Then grind in a pestle and mortar. (The cinnamon can be removed and any empty cardamon pods) 1tbsp of each fennel; cumin; coriander; fenugreek; black/yellow mustard seed; 1 cinnamon stick; 3 cardamon pods; 1 star anise 

Chilli Avocado & Sumac Poached Eggs

T

his post is hardly a ‘recipe’ and at the risk of sounding pretentious, it’s hardly cooking. Pouch an egg, toast some bread and mash an avocado. If you’ve not nailed that one yet then this is the blog post for you (and guaranteed to woo any dates the morning after!). You can’t go anywhere for brunch these days, particularly in London, without the avocado on toast making a headlining appearance. And I’m one of the many who craves this in an cafe at the weekend whilst also being one that knows very well it can be eaten and thrown together quicker and significantly cheaper in the comforts of your own home. I’m sure we’ve all experienced a promising ‘smashed avo on toast’ (usually with a £3 side of ‘seeds’…yes seeds) only to find it bland, under seasoned and in need of a hearty splash of lemon.

So…make it at home! Here are my tips for my personal perfect recipe. Interchangable depending on taste but the basics are here. Excuse my ugly poached egg but as my mother always told me, its what on the inside that counts. And as long as its molten orange yolk then it can look as ugly as a…..*use imagination*.

With my conscious risk of again sounding pretentious, I’ve used some common ingredients here. I’ll admit its nothing original. But there’s a reason it on those brunch menus. Its yummy!

Ingredients – Serves 2

  • 2 slices of bread, toasted (Your choice. Rye and sourdough being my favourite – must be smeared with smashed avo to the very edges – cafe pet hate)
  • 4 eggs, fresh, room temperature
  • 2 ripe avocados
  • 1 lime
  • 1 tbsp chilli flakes
  • 2 spring onions, finely chopped
  • 1 small bunch coriander, chopped
  • Approx 2 heaped tbsp mixed seeds (e.g. pumpkin, sesame, sunflower) – toasted lightly for a few minutes in a hot pan until beginning to pop.
  • 1 tsp sumac
  1. Cut your avocado in half and scoop out the flesh. Smash with a fork into a bowl.
  2. Add the juice of 1 lime, the chilli flakes, spring onions and coriander. Season well with salt and pepper and smash all together. Taste, adding more lime/seasoning if needed.
  3. Bring a pan of water to the simmer. Poach your eggs (suggested 2 at a time depending on pan size) for a few minutes until the whites have set and the yolks are still runny.
  4. While poaching, toast your bread.
  5. Slather the smashed avocado between the 2 toast slices. Scatter over the toasted seeds.
  6. When the eggs are ready, pat dry any excess water on some kitchen towel then immediately sit on top of the toast and avo.
  7. Scatter the eggs with a grinding of pepper and a spindle of sumac
  8. Serve immediately while still warm and yolks runny.


Chicken Satay

I

 usually feel that people fall into a love or hate category when it comes to peanut butter, the later being of rarity these days what with all the dreamy varieties and versions available. I embrace all that can be combined with it favouring the blackcurrant jam toast. However if you’ve not tried celery sticks dipped in peanut butter yet then you can thank me later for the introduction. Having mentioned the vast choice we now have for this delicious American spread, sadly I hate to admit that a cheap jar works wonders here. Save your fancy and expensive cashew, pecan and peanut blend for your sourdough toast at brunch y’all.

With no need to continue my expressive love of peanut butter, chicken satay is like a warm hug when wrapped comfortingly in the soft hand of a loveable flatbread with a crunchy, fresh salad. And this recipe really can be served in many ways as mentioned below. I prefer whole thighs rather than diced breast as they have far more flavour and texture. Served with a spoonful of the rich, spicy sauce, a zesty salad and some pillowey flatbreads. Alternatively, chop, coat and wrap the chicken and salad in the mits of a floury flatbread or flat wrap and dive in hands or face only. Use any combination of salad you like but whatever you do, coat liberally with lemon! It cuts through the rich and creamy peanut sauce welcomingly and essentially.

NOTE: If you haven’t tried making peanut butter before its really really simple provided you have a food processor! See here 

Adapted from Nigel Slater.

Serves 4

Chicken Satay

  • 4-8 chicken thighs, de-bonded (allow for 1-2 each depending on starter/main serving size)
  • 1 small onion, chopped
  • 2 cloves garlic, crushed
  • Thumb ginger, grated
  • 1 tbsp lemongrass paste
  • 1 large red chilli, chopped finely
  • 1-2 limes
  • 125ml crunchy peanut butter
  • 250ml water
  • Bunch coriander, chopped
  • Sunflower or light, flavourless oil.

Salad & Sides

  • 1 cucumber, chopped into batons
  • 4 little gems lettuce, leaves picked
  • Handful radishes, sliced finely
  • Bunch spring onions, sliced as preferred
  • 1 lemon
  • Handful coriander, chopped
  • Flatbreads (homemade, see here)
  1. Preheat the oven to 190°C and begin with the chicken. Heat a hot frying pan with a tbsp of sunflower oil on a high heat. Fry the chicken skin side down until crispy and golden. Turn the thighs over and seal on the other side. Remove from the pan and place in a baking tray. Finish cooking in the oven for about 15-20 minutes while you make the sauce.
  2. Using the same pan, reduce the heat and soften the chopped onion for about 5 minutes. Add the ginger, garlic, chilli and lemongrass and fry for just a few minutes being careful not to burn it – the garlic in particular.
  3. Next add the peanut butter and stir well and continuously to combine with the aromats. Reduce the heat to a low and add half the water. Stir to combine.
  4. The sauce will bubble and thicken as you do this so add the rest of the water when needed, a whisk is useful here.
  5. Keep on a very low heat to warm through, adding a splash more water if you require a thinner consistency.
  6. Add the salad ingredients to a large bowl and squeeze over a generous squeeze of lemon and seasoning.
  7. By now the chicken should have finished cooking, remove from the oven and set aside to rest for a moment while you put the final touches to the sauce.
  8. Add the juice of 1 large lime. Taste – if it needs more to cut through the richness then add another squeeze. Add a handful of the coriander and stir to combine saving the remaining herbs for serving.
  9. Serving is up to you – I prefer to place the thighs gently in the sauce to ensure the skin you worked hard to crisp up remains crispy and then serve the whole dish on the table for people to help themselves from – thighs and sauce scattered with the leftover coriander. Alternatively, you can chop the chicken pieces into bite sized chucks and stir thoughout the sauce to coat entirely and serve in your flatbreads/lettuce leaves like a wrap.

Lahmacun Meatballs

L

ahmacun is like a Turkish meat pizza which I’ve sampled in my many escapades to my favourite middle eastern restaurants and holiday destinations. Pizza you say? In a very loose sense. A thin dough topped with a layer of spiced minced meat and a scattering of tasty salad. However, I’ve been experimenting with textures and I decided to turn mine into meatballs – maintaining the spices and flavours of a traditional Lahmacun serving them on a warm pillowy nigella seed flecked flatbread and topped with a fresh crunchy raw salad.

This would make an excellent dinner party starter in a mini version or a light meal or lunch.

Serves 4 (Makes approx. 16 meatballs)

Meatballs

  • 500g minced beef
  • 1 small onion, diced finely
  • 1 small red chilli, diced
  • 1tsp (heaped) ground cumin, coriander, cinnamon, smoked paprika
  • 50g toasted pine nuts (dry fry in a hot pan until beginning to turn golden and release a nutty aroma!)
  • Handful flat leaf parsley, chopped

Nigella Seed Flatbreads

  • 250g self raising flour
  • 150ml warm water
  • 1 1/2tbsp nigella seeds
  • Salt and pepper

Salad

  • 1 bag radishes, thinly sliced
  • 1 small cucumber, cubed into 1cm dice
  • 1 small red onion, halved and thinly sliced into half moons
  • Small bunch flat leaf parsley, chopped
  • 2 little gem lettuces, chopped (optional)
  • 1/2 lemon
  • Tahini

You’ll need 3 large bowl, one for each component to get yourself started. A large frying pan and preheat the oven to 180°C.

  1. Start by making the meatballs. Mix all the ingredients in your first large bowl and combine with your hands, squeezing the mixture together to ensure all the flavours are dispersed. Don’t overwork or pound the meat however. Season well. Taking golf ball sized chunks, roll into meatballs and place on a plate. Continue until you’ve used up all the meat and you have around 16 meatballs. Cover the plate and chill in the fridge until needed.
  2. Next, make the flatbread dough. Combine the flours, salt and pepper and seeds in your second bowl. Pour in the water and mix with a fork. As it comes together, get your hands in and combine into a dough. It shouldn’t be dry but nor should it be sticky. Depending on the texture, add a tough more water/flour to enable you to roll into a smooth ball. Knead for 2-3 minutes on a clean floured worktop. Set aside in a floured bowl and cover with cling film and leave to rest for  about 20 minutes or so.
  3. Assemble the salad. Combine all ingredients in your final bowl except the tahini and lemon. Season and then set aside until ready to serve.
  4. Begin the cooking – remove the meatballs from the fridge! Heat a splash of vegetable or light olive oil in a frying pan over a high heat and fry the meatballs on all sides until they are golden and a nice crust has formed on the outside. Line a baking tray with foil and add the meatballs (the rest of the cooking can be done in the oven). Scrunch up the foil around them to keep them sealed ask they cook and stay moist. Place int he oven for 15 minutes.
  5. Meanwhile, fry your flatbreads. Heat a dry frying pan over a high heat (you will likely need your extractor fan on here)  Take your dough, divide into 4 balls. On a floured surface, use a rolling pin to roll out into a small saucer size about the thickness of a 10p piece. When the pan is hot, add one flatbread at a time and fry on both sides, turning when beginning to brown and char in places. The dough will ideally bubble up and create air pockets but it doesn’t matter if not.
  6. As you fry and complete each one, wrap them in a pile in a clean tea towel to keep them warm and soft until needed.
  7. Once the flatbreads are toasted and the meatballs are ready, remove them from the oven.
  8. Dress the salad with the lemon juice and toss to combine.
  9. To serve, top each flatbread with 3-4 meatballs. Add a large handful or salad over the top and drizzle with the tahini if you like.

(A lime and mint yoghurt would also go down well here instead of tahini if wanted)

Enjoy!


Sticky Asian Brisket (Coriander, Peanuts, Lime and Chilli)

O

nly a true occasion calls for the level of commitment that cooking a dinner requiring 5-6 hours plus additional prep time and a huge amount of will power and patience. And that occasion was, you guessed it, a Birthday. My sister’s birthday to be precise. Its a running joke (which is also true…and very much not a joke) that her Birthday is an (on average) 2 week occasion spanning the initial pre-brithday drinks followed by the Birthday eve event, the actual Birthday, the post Birthday dinner, the family occasion and finally a get together for those unfortunate enough to miss all the above.

So it was the family occasion when this recipe was summoned for a Sunday dinner with a twist. Sticky, slow cooked spiced beef marinated in soy and lime and scattered with fresh coriander and crunchy peanuts. As a fan of beef, brisket is a deep and meaty flavour that adapts perfectly to the slow cook. That and the Asian influence that my family adore, this recipe was a hit! The reduced soy based sauce at the end is particularly punchy, salty, deep and sticky so it would suit a refreshing simple crunchy salad or lightly flavoured rice to accompany.

Followed by a ginger cake (see here) with candles, singing, some more cake, and some ice cream for good measure it was a culinary Birthday I’ll have to try and top next year…

Serves 6 (Adapted from Delicious Magazine recipe see here)

Ingredients

  • 400g shallots, quartered
  • 5 garlic cloves, crushed
  • 500ml beef stock
  • 200ml runny honey
  • 2kg beef brisket
  • 250ml shaoxing rice wine (from the world food section of large supermarkets)
  • 70ml light soy sauce
  • 70ml dark soy sauce
  • 100g fresh ginger, finely chopped
  • 1 tbsp chinese five-spice powder
  • 2 large red chillies, halved

For serve

  • 150g unsalted peanuts, toasted and lightly crushed
  • 1 red chillies, sliced finely
  • Large bunch coriander, roughly chopped
  • 3-4 limes
  • Rice
  • Crunchy salad (Little gems, chicory, cucumber, spring onion, celery lemon juice etc)
  1. Preheat the oven to 140°C and get a deep roasting tray ready.
  2. Heat a splash of oil in a deep frying pan and add the quartered shallots and fry for about 5 minutes until they begin to brown. Add the garlic and cook for another minute before adding the beef stock and half the runny honey and stir and heat to combine.
  3. Add the rice wine, soy sauce, fresh ginger, five spice and red chills in a big jug.
  4. Lay the brisket in your deep roasting tin and pour over both the stock and shallot mixture and the sauce from the jug. Cover with a piece of parchment and then with a few layers of foil enough to cover the tray tightly folding the edges down. Place in the oven for 3 hours undisturbed.
  5. After this time, remove the foil and parchment and turn over the brisket and baste. Cover again and return to the oven for another 2 1/2 hours.
  6. After this time, remove from the oven and increase the heat to 220°C.
  7. Pour all the juices from the tray into a frying pan and set the brisket aside. Bubble the juices on a high heat on the hob for about 15 minutes to reduce the heat by about half. However check the seasoning as you do so. The soy is quite a salty mixture so if you reduce it too much it will be overpowering. Add a splash of boiling water if you do so. Season with pepper and salt if needed at the same time.
  8. Cover the brisket with just a few ladles of the sauce and then drizzle over the rest of the runny honey. Return to the hot oven for another 15 minutes to caramelise the brisket and crispy the outside.
  9. Once done, remove the brisket from the oven and serve on a large pre-warmed platter with any of the juices and shallots remaining from the tray. Scatter over the herbs, peanuts, chilli and squeeze over the juice of half a lime.
  10. Serve with the reduced sauce in a warmed jug on the side and a good juicy lime half for all your guests!
  11. Serve alongside rice, flatbreads, salad or any accompaniment you like.


Ultimate Cornbread

T

his recipe comes directly from Brad McDonald’s book ‘Deep South‘. After being lucky enough to dine in his awesome restaurant ‘The Lockhart’ before he packed up to open ‘Shotgun BBQ‘ I experienced the jaw dropping sights and tastes of his signature cornbread. Basted in thick honeyed butter bubbling at the sides in its case iron dish it was brought to the table disguised as a lemon drizzle!? And boy did it taste good. Its a bit simpler in flavour (and perhaps authenticity?) than my own signature version which you can find here which is full of sweetcorn for texture, chilli for spice and a bit of cheeky cheddar for tang. Whilst both have their own style, the winner here is the buttery honeyed topping. Slatered warm with salted butter this makes the perfect accompaniment to a hot bowl of soured cream drizzled chilli or simply a bucket of homemade fresh guacamole as I did here.

Having not yet tried Shotgun BBQ it will be my next fit spot…

jess-hovis

jess-cornbread4jess-cornbread2

I used a mini retro loaf tin to create these cute mini loaves perfect for individual portions. However I would also recommend using small loaf tin, one large one, or failing that a muffin tin! This recipe would make about 8 small muffins I think. But feel free to use any tin available – the depth will just mean the cooking tin will vary but if you stick to 25 minutes or so first starters and a knife inserted into the centre is clean then voila!

Ingredients

  • 150g plain flour
  • 150g polenta/cornmeal
  • 25g soft light brown sugar
  • 4g baking powder
  • Large pinch salt
  • 225ml milk
  • 2 large eggs
  • 20g butter, melted
  • 30g lard
  • 50g unsalted butter & 50g runny honey
  1. Preheat the oven to 200°C and place a small knob of lard in each tin
  2. Combine the dry ingredients in a large bowl
  3. Add the wet and mix well to combine
  4. Spoon into the muffin tins/loaf tin (allowing room for rise)
  5. Bake for about 25 minutes until golden. A knife inserted into the middle should come out clean
  6. While they are baking, combine the honey and butter for the topping in a saucepan and melt to combine
  7. When the loaves are ready baste in the hot honey butter and then return to the oven for a few minutes
  8. After this time, remove from the oven and serve immediately, hot and buttery!

I served mine with guacamole  – see here but a chilli would also go down a treat.

jess-cornbreadhoney

jess-cornbreadavo3

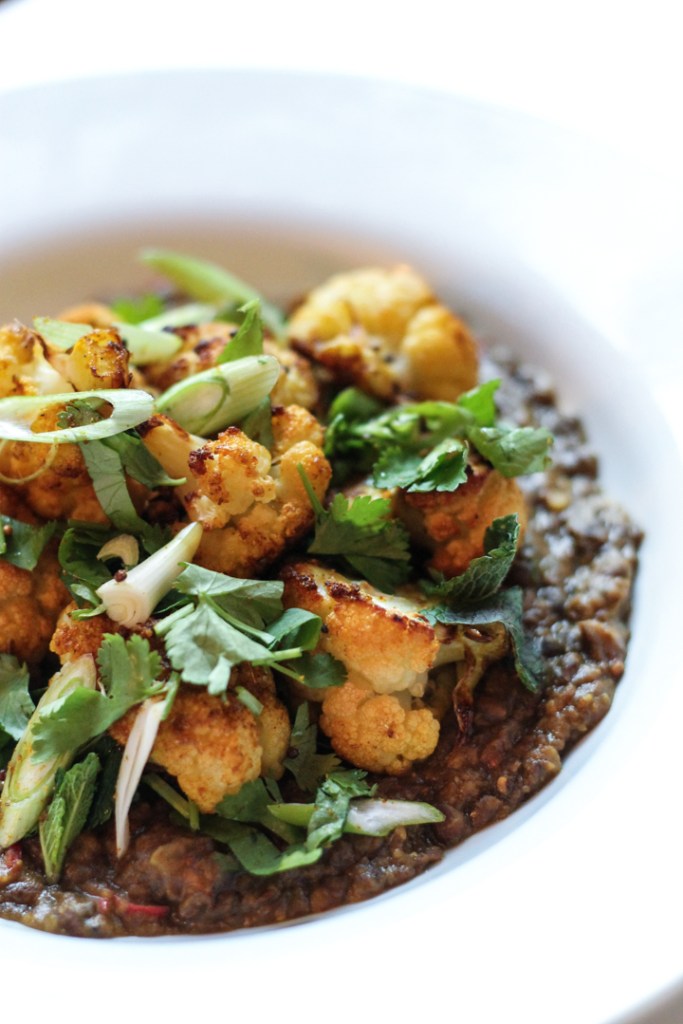
Dahl, Roasted Curried Cauliflower, Shredded Duck in Lime

Jess - Dahl and Cauliflower duck

Jess - Dahl and Cauliflower

Y

ou won’t be surprised to hear it was another week of stressful and busy work so the long weekend glowed like a beacon on Friday evening with promises of yoga, long runs in the sun and some experimental time in the kitchen to blog and relax the mind. I woke to a beautiful sunny day and after a long run to clear the working cobwebs I was already on my way to some downtime. All that was required was some time in the kitchen.

With a stressful period at work keeping 90% of my mind on the task it was time to start planning my second supper club to focus and begin that excitement again! With the date confirmed and inked in the diary I was more than eager to start developing the menu! With just over 2 month before the (second) big day it might seem premature but to get the invites and advert out as soon as possible and the ticket confirmations rolling in the menu was vital. Starter done. Dessert done and obviously featuring ice cream the main needed some attention. With the somewhat limited kitchen facilities and equipment of my cosy, niche and atmospheric chosen venue the dish needed some attention. Ambition needs to be carefully managed and focussed int he right direction.

While flavour is key here using wholesome ingredients cooked from scratch I wanted a menu that would make my potential guests salivate on reading and be booking tickets on autopilot before they could say ‘Deliveroo’! Flavour vital but practicality is also a contender here when cooking solo for 30 paying guests. And in addition economics, aesthetics and style are also important. Factoring all these competing aspects and a love of all things spice this punchy dish was created. I won’t give anything away but the next supper club main with feature something along these lines…

Serves 4

  • 4 duck legs
  • 1 x speedy dahl recipe (see here) with juice of 1/2 lime added at the end.
  • 1 cauliflower, cut into florets
  • 1 tsp turmeric
  • 1 tsp curry powder
  • 1/2 tsp of black mustard seeds and cumin seeds
  • 3 spring onions, sliced on the diagonal
  • Handful of mint leaves, roughly chopped
  • Handful of coriander leaves, roughly chopped
  • 1 large lime
  1. Preheat the oven to 200°C. Season the duck legs and roast for about 40 minutes in the oven.
  2. Scatter the cauliflower florets in a large baking tray and drizzle with a good glut of olive oil.
  3. Toss in the curry powder, turmeric cumin and mustard seeds and stir to coat. Add some seasoning.Jess - Curried Cauliflower2Jess - Curried Cauliflower
  4. After the duck has had 20 minutes of roasting add the cauliflower to the oven and roast for 20 minutes.
  5. Meanwhile make the dahl and set aside to keep warm.
  6. Once the duck and cauliflower are ready remove from the oven. leave the duck to rest for a few minutes before shredding the meat into a warm bowl with two forks and quickly squeezing over the juice of the fresh lime.
  7. Toss the warm cauliflower in the spring onions and herbs.
  8. To plate up, ensure you have warm shallow serving bowls or plates and spoon a generous spoonful of dahl onto the bottom and let it ooz out onto the plate. Top with a handful of the cauliflower before finally topping with a quarter of the shredded duck
  9. Serve immediately while still warm and devour! Serve with warm homemade flatbreads or roti if needed.

WINE: This would be great with an aromatic white such as a Riesling or a Gervertz to balance the spice.

Jess - Dahl and Cauliflower2