Posts tagged chives

Spanish Tortilla with Burrata & Herbs

I

t’s been a while since I’ve posted a recipe but I’ve certainly not stopped cooking. Engaged life has had me practicing my wife skills after all…!

I’ve shamefully never cooked a Spanish tortilla so I felt it was about time I added it to my repertoire. I have historically not had the best track record with eggs. Ask my fiancee..ahem. This is mainly due to my impatience but I’ve apparently gotten better! Wife points! I’ve forever ooooed at the prepacked tortillas in the supermarket ‘delis’ confidently telling myself I’ll make one so I’m glad I finally have because this really is a dish that is so simple and so delicious and much better made at home.

Makes the perfect Monday night dinner or the centre stage of a casual tapas feast for guests with lots of other Spanish treat.

*I am very aware that I’ve tainted the Spanish authenticity in this classic dish with Italian burrata but I challenge any of you to say you won’t be adding it and it doesn’t taste good!

Adapted from ‘Half Baked Harvest‘. I rather non traditionally but with my health in mind, roasted the potatoes slices to soften them rather than frying in oil!

Serves 6

  • 8 eggs
  • 3 potatoes (I used Maris piper), sliced to 1/2cm slices
  • 1 onion, finely sliced
  • Handful thyme & rosemary, leaves picked, chopped
  • 1 packet/bunch chives, chopped
  • 1/2 pack flat leaf parsley, chopped
  • Handful basil, leaves chopped
  • Handful dill, chopped
  • Olive oil
  • 4 slices parma ham/prosciutto
  • 1 packet rocket leaves
  • 1 ball fresh burrata – the best you can afford (use buffalo mozzarella if you can’t get burrata but don’t use normal/cheap mozzarella, it just won’t be the same!)
  • 1 lemon


  1. Preheat the oven to 200°C. Slice the potatoes and spread them evenly on a baking tray. Season and drizzle over some oil and roast for about 15 minutes or until just beginning to brown but not crisp. They should be soft at this stage but not falling apart. Set aside to cool.
  2. Heat a nonstick large frying pan on a medium heat- it is vital its non stick else you’ll have a scrambled egg mess. Add a splash of oil and gently fry the onion until soft and beginning to caramelise. Now, add the chopped rosemary and thyme and fry for a few more minutes. Set aside to cool.
  3. Turn the oven heat up to 220°C.
  4. In a bowl mix all the fresh herbs with the fried onions. Add the potatoes. Whisk the eggs well in a separate bowl and season well. Pour then eggs over the potatoes and gently stir making sure you don’t break the potatoes up.
  5. Preheat the frying pan you used for the onions on a medium heat. Pour in the potato-egg mixture moving the egg around gently at the start and then quickly spread the potatoes into an even layer.
  6. With the heat on medium low, let the eggs cook for about 5-10 minutes using a spatula now and again to tease the edges away from the sides. The aim is to let the bottom cook gently so its important not to have it too hot. Shake the pan gently now and again.
  7. Once there is a good crust around the edges and the eggs are beginning to cook in the middle, place the pan in the oven and cook for about 8 minutes or until the eggs are cooked through.
  8. Remove from the oven and let stand for about 5 minutes.
  9. When ready, carefully invert the pan onto a serving platter.
  10. Top with the rocket leaves and squeeze over a little lemon.
  11. Top with the parma ham and finally the burrata.
  12. Drizzle with some lovely extra virgin olive oil and serve! Ideal at room temperature.

Crab Risotto, Seaweed Crumb & Pol Roger

T

here sadly aren’t many evenings where I indulge in crab and Pol Roger…yet. But if ever an occasion called for such an elaborate and indulgent feast then moving into your first house (flat) purchase with the love of your life surely has to be one. I candidly think this wasn’t quite fancy enough. However, we still don’t have a dining table so the pennies are pinched (from tomorrow).

I’m been saving this glamorous bottle of Champagne for a few years now. Just waiting on the perfect occasion for celebrations and now seemed the perfect time. A classic Champagne only pairs well with greasy, oily and most popularly, deep fried nibbles but being on day 1 in this new kitchen, I opted for a packet of Sainsbury’s chilli coated peanuts. I mentioned that table…

With little energy left to work out the mechanics of the new oven, a hob only, one pot dinner was looking appealing. Deep, rich crab in an oozy, buttery risotto with plenty of zesty lemon was a treat. Topped with some crispy breadcrumbs seasoned with seaweed salt for an extra dimension.

TIPS: For tips on making risottos, please see my tips here.

Serves 2

Crab Risotto

  • 2 large handfuls risotto rice (usually one large one per person)
  • 1 white onion, finely chopped
  • 1 large garlic clove, finely chopped
  • 1 large glass dry white wine
  • 1 1/2 pints chicken stock (hot)
  • Approx 50g parmesan, finely grated
  • 40g unsalted butter, diced
  • 1 lemon, juice and zest
  • 1 packet asparagus spears
  • 200g mixed white and brown crab meat (I use two packets of this 50/50 one from Waitrose)
  • Chives, chopped to serve

Seaweed Crumb

  • 2 slices brown bread
  • Seaweed salt (I use this from Cornish)
  1. Start by making the breadcrumbs to get them out the way. Blitz the bread slices in a food processor until fine. Heat a small frying pan with a little splash of rapeseed/plain flavoured oil on a medium-high heat. Once hot add the breadcrumbs with a big pinch or two of the seaweed salt and fry until golden and crisp. Drain on kitchen towel and set aside with the chives to serve later. Once cool, add half the zest of the lemon.
  2. To begin the risotto, make sure you have a large pot on hob, keeping warm on a low heat with your chicken stock ready at hand.
  3. Heat a large high sided frying pan/ saucepan or (my preference) a Le Cresout pot on a medium heat. Add a splash of oil and a knob of the butter.
  4. Once melted and bubbling, gently sauté the onion until soft and translucent. Add the garlic and gently fry for a few minutes. Season with salt and cracked black pepper.
  5. Turn up the heat and add the rice, mixing continuously to stop it sticking. Cook on a hot heat until the grains are starting to turn translucent.
  6. Turn the heat down to a gentle simmer and add the white wine. Simmer to reduce.
  7. Now, begin the stock addition process. The rice should be cooked in about 15 minutes, with the gentle addition of ladles of your hot stock continuously. Ensure you stir throughout and add more liquid as the mixture absorbs the stock. Don’t let it dry out. You may need more/less stock, don’t worry about the measurements. The above is a guide.
  8. After 15 minutes taste the grains. They should have a slight bite to them but be a few minutes away from cooked. The remaining time will cook this out.
  9. At this stage, ensure the consistency is ‘oozy’. By that I mean NOT dry and will fall front he spoon. Add the asparagus spears, the crab and stir to combine. Taste and season if needed. heat for 2 minutes.
  10. Once heated through, add the juice of the lemon, the remaining zest, the cubed butter, 3/4 of the chopped chives and the parmesan. Put a lid on the risotto and remove from, the heat. Let it sit for 3 minutes or so while you get the dishes and finishing touches sorted.
  11. If you can, preheat some bowls. When ready to serve, mix the melted buttery-cheese into the risotto to combine. If its thickened up, add some more hot water just to loosen – it should ooze on the flat like porridge.
  12. Spoon into bowl and top with the rest of the chives, and a good handful of crispy breadcrumbs.
  13. Devour with Pol Roger if you’re celebrating.

Ricotta Gnudi with Chorizo and Peas

Jess - Gnudi5Jess - Gnudi7

T

hese little gnudi pillows are a lighter take on the chewier gnocchi – a potato based recipe –  and instead use creamy ricotta and very little flour to form a creamy and lovely textured equivalent. Historically they are known in Italy as ‘naked’ ravioli. Use your imagination….these ones however are clothed in a simple buttery lemon sauce. A delicious end to whats been a temperamental June weekend. Glorious sun one minute and torrential rain the next. Since the gardens and parks are in full green bloom with all the nourishing rain, a dinner inspired using fresh summer vegetables here makes them not an addition to the gnudi main event but an equal partner.

This recipe is speedy to knock up especially once you’ve fried the gnudi. Simply toss together the blanched vegetables in some buttery lemon and voila…you have a perfect summers meal!

Feel free to use any range of vegetables. Sliced blanched asparagus would be glorious here when in season perhaps with pancetta instead of chorizo. Or try string in some last minute wild garlic leaves, basil or mint.

Serves 2

Gnudi

  • 250g  ricotta cheese
  • 60g plain flour
  • 1 large egg, beten
  • 20g finely grated parmesan (plus more for garnish)
  • Grated zest 1 lemon
  • Salt and pepper

Sauce

  • 1/2 lemon
  • 100g peas
  • 100g broad beans, podded (or any other summer green veg enough for 2)
  • 100g chorizo, sliced on the diagonal
  • 40g unsalted butter
  • Handful chopped chives
  1. Begin making the gnudi. Combine all ingredients into a bowl and mix until well combined.Jess - Gnudi
  2. Tip out onto a floured surface and roll into a log shape (as thick as you like). Add a little more flour if needed. The texture should come together and not be wet but it will be very soft and pillowy like dough. Quite fragile.
  3. Chop into gnudi pieces (mine were about 2 inch long) and place on a tray until ready to cookJess - Gnudi2
  4. Bring a pan of water to the boil and blanch your vegetables of choice and then drain and set aside.
  5. Using the same pan, season the water and poach the gnudi for a few minutes. They will rise to the surface and float once cooked and ready. When this happens, use a slotted spoon to drain and place on a lined tray. Keep the water for the sauce.
  6. Heat a frying pan and add half the butter and a little oil. Heat on a high heat and then fry the gnudi until golden brown all over. Place on a warm plate and keep warm once golden.
  7. Jess - Gnudi3
  8. In the same pan, add the sliced chorizo and fry just until beginning to crisp.
  9. (You need to now work quickly to prevent the vegetables decolouring). Add the vegetables – peas and beans – to the chorizo in the pan and season.
  10. Next add in the rest of the butter and stir to emulsify the sauce. Add a splash of the gnudi poaching water.
  11. Simmer and then add the gnudi to the mixture and warm through and coat in the buttery juices.
  12. Finally, when all warmed through, squeeze over the lemon juice and the chopped chives.
  13. Serve in deep warm bowls topped with any reserved chopped chives and some more grated parmesan

Jess - Gnudi4


Pea and Avocado Dip with Sprouted Olive Oil Crackers

Jess - Cracker2

Jess - rudehealth

F

irstly I think I need to explain the mystery behind the ‘Sprouted Olive Oil Crackers’. As if the wholesome organic produce that Rude Health so stylishly provide wasn’t tempting enough, they have developed a range of ‘sprouted flours’. Nothing to do with sprouts, nothing to do with flowers…..These flours basically contain a grain that has been allowed to sprout and germinate in an environment which stimulates enzyme activity and allows for the transformation of wonderful nutrients. Soaked in water, the grains sprout and release nutrients and once slow fired and and stone ground these are captured inside these tasty flours ready for your baking purposes. Nutty, wholesome and devine, they can be used in baking like for like to add a fantastic texture and flavour layer. Here I used the flour in some lovely giant tongue shaped crackers which I often make for dinner parties as elaborate dipping utensils!

They are amazing served with dips and spreads. I’ve made these in the past but never with sprouted flour and the baking smell alone as they crisped away in the safety of the oven was enough to inspire a healthy dip to accompany.

Makes about 15 dependant on size (adapted from Ottolenghi)

  1. Preheat the oven to 220°C and line a large tray with baking parchment.
  2. In a large bowl or food processor combine all the ingredients except for the salt until you have  affirm dough.
  3. Leave to rest for 30 minutes or so in the fridge.
  4. When ready to cook, take walnut sized pieces of dough (about 15g) and roll on a floured surface into tongue or oval shaped crackers, paper thin if you can!
  5. Repeat and place on your lined backing tray. Drizzle well with olive oil and scatter with the sea salt.
  6. Bake in the oven for about 6 minutes or until crisp, golden and filling the kitchen with wonderful smells.
  7. Leave to cool on a wire rack before enjoying with a dip or choice.

Pea and Avocado Dip (Serve 4-5 as a starter/nibble)

I saw a version of this recipe in a recent Waitrose magazine. Having been invited to a last minute impromptu BBQ I felt I needed a culinary offering which is where this speedy dip was created. To my disappointment this said recipe wasn’t particularly inspiring on the taste delivery. It was a bit bland. However, with a complete recipe makeover and the addition of some forage in the pantry flavour staples I had a tasty vibrant dip in no time to accompany my sprouted olive oil crackers. Knocked out in minutes I just had time to grab a bottle of chilled white before heading out into the sun….

  • 150 peas, defrosted or fresh
  • 1 lime, juice
  • 1 crushed garlic clove
  • 1 tbsp creme fraiche
  • 15g pistachios
  • 1 avocado, chopped into chunks
  • 1 tsp spice mix (see here)
  • 60g feta cheese
  • Handful mint leaves
  • Chives, dill and chilli oil to garnish
  1. In a food processor, please the peas, lime juice, garlic, pistachios, creme fraiche, spice mix and mint. Pulse and blend until the mixture turns into a paste. You may need to scarp the sides down as you go.
  2. Add plenty of seasoning and then add the feta cheese and avocado.
  3. Blend again to form a smooth paste. If you like it a bit thinner, add some olive oil.
  4. Serve scattered with chopped dill and chives and drizzled with chilli oil

Jess - Peaavocadodip2


Orzo and Crab


I am really not a pasta fan. I rarely eat the stuff. However, I’ve been intrigued to try these little rice-like orzo for a while now. So tonight was the night. Fried with some potted crab, mixed with some fresh lemon which was delicious and as welcome as a priest at a wedding here, scattered with fresh herbs like confetti on a bride. Please excuse the wedding metaphors. The Great British Bake Off final has just finished and the ultimate challenge was wedding cakes….

I served mine with some crispy fried seabass fillets, one of my favourites of the fish world, and some wilted spinach and peas for freshness. See what you think.

Serves 2

  • 160g orzo pasta
  • Up to 60g potted crab in spices (I used the 57g pot of ‘Seafood & Eat It’ potted crab) Or use fresh crab- even better!
  • Large handful parsley, chopped finely
  • Large handful chives, chopped finely
  • Zest and juice of 1 lemon
  • Salt and pepper
  • Olive oil
  • 2 seabass fillets
  1. Boil the pasta in salted water for about 7 minutes until cooked.
  2. While cooking, fry the crab in a little hot oil for a few minutes. Drain the pasta, reserving a splash of the cooking water, and while still loose and warm, add to the frying crab and stir to combine.
  3. Add a splash of the cooking water if dry.
  4. Add the herbs, the lemon zest, seasoning and the juice of the lemon.

image

imageimage

image5.  Keep warm while you fry the fish. Season the fillets and score the skin to stop it from curling in the pan.

6. Fry in a little hot oil for about 3 minutes, skin side down until mostly cooked. Finish on the other side for a final few minutes. Add a knob of butter to the pan and let brown while basting the fish. Serve on top of the orzo with some wilted spinach and peas.

image

Pea, Mint and Black Pudding Fritters


image

If you’re cringing at the thought of black pudding, I’ll be candid- man up. Its no more ‘disgusting’ than eating meat surely?! If you’ve never sampled this cheap and tasty treat, at least try it! And hopefully, like me, on you’re first sample you’ll kick yourself at all the time you wasted not enjoying it! Its deep, rich flavour works amazingly well with the sweet flavour of peas…

This recipe is a bit like a previous post (see here) for pea fritters and if you know me you’ll know that I like to fritter things. Its so easy and you can do it with loads of different ingredients and flavours with whats to hand- as long as you have eggs and flour! Here I have simply added crumbled black pudding instead of the cheese in a previous recipe and some fresh mint. A delicious light lunch.

Serves 4

  • 125ml milk
  • 2 eggs
  • 30g cornflour
  • 100g flour
  • 250g peas
  • 100-150g black pudding (cooked and crumbled)
  • Large bunch mint, leaves picked and chopped finely
  • Handful of chives, chopped finely.
  • Lemon
  1. Boil the peas for a few minutes then run under cold water. Place half the peas in a food processor and puree.
  2. Sieve in the flours, some salt, pepper. Add the beaten eggs and milk and mix until smooth.
  3. Place in a bowl and fold in the whole peas and herbs and mix well with a squeeze of lemon juice. It should be fairly thick, enough to hold its shape in a pan. Finally crumble in the black pudding.
  4. Heat a frying pan to a medium heat and warm some sunflower oil
  5. Fry spoonfuls of the mixture (as large as you like) in the hot oil for a few minutes on each side until golden brown and set in the middle. Pat fry on kitchen roll and devour.

image

image

Lamb, Mint and Pea Salad


image

Leftover lamb never tasted better. Freshly cut herbs from the garden, a cucumber from the greenhouse and some leftover local lamb. A sunny evening called for a fresh cleansing salad to start the week on a healthy note. Although washed down with a large glass of Cab Sauv it probably had the opposite effect!

Not sure the picture does this dish justice but it is extremely tasty, particularly also crumbled with feta or goats cheese as well as or instead of the lamb for the veges.

Serves 3 as a main, 4 as a lunch or starter

Salad

  • 2 little gems
  • 1 romaine lettuce, shredded
  • 1 small cucumber, chopped on diagonal
  • 1 avocado, chopped
  • 1 lemon, juice
  • Handful pine nuts, toasted
  • Bunch mint, leaves picked and chopped
  • Bunch of chives, chopped
  • Leftover lamb, sliced- mine was rare roast butterflied leg but anything works well, shredded etc
  • 250g frozen peas, blanched

Oregano and Lemon Yoghurt

  • 6 heaped tbsp thick yoghurt
  • 1 small garlic clove, minced
  • Bunch oregano, leaves picked
  • ½ lemon juice and zest
  • 1 tsp extra virgin olive oil
  • Salt and pepper

Sun dried Tomato Bread

  • 250g self raising flour
  • 4 sun-dried tomatoes in oil
  • Bunch basil
  • Salt and pepper
  • Warm water
  1. Make the bread first. Blitz the sun dried tomatoes and basil in a processor until fine. Add the flour and some generous seasoning and blend. Pour in enough warm water until the dough comes together in a smooth ball. Turn out onto a floured surface and knead for a few minutes before leaving covered to rest.
  2. Mix the yoghurt ingredients and chill.
  3. Keep the stalks on the little gems to hold them together. Half each and cut each half into 3 keeping them together at the base.
  4. Mix with the blanched peas, shredded romaine, cucumber and chopped herbs on a large platter.
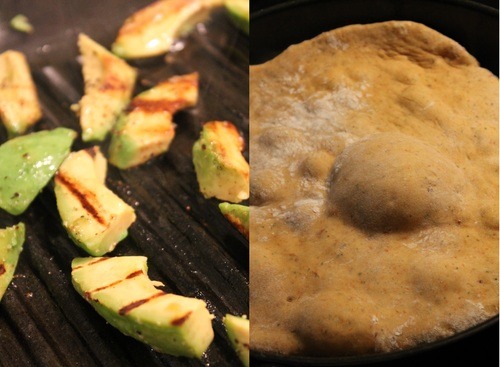
  5. Griddle the avocado on a hot oiled griddle pan until warm and charred. Season well and add to the salad. Squeeze over the juice from the lemon, a good splash of extra virgin olive oil and some seasoning and toss gently to combine.
  6. Sprinkle over the toasted pine nuts and finally the lamb.

image

7.  Heat a large frying pan. Roll the bread out to the thickness of a pound coin and big enough to fit the pan. Fry in the pan for about 5 minutes each side until toasty and beginning to char and crisp. Turn out onto a board and rip up and serve warm with the salad, dunked in the yoghurt or with some salted butter.

image