Posts tagged coconut

Raw Date & Cashew Energy Bars

L

et’s be honest, energy bars are a real hot topic these days and a bit of a buzz word. Millennial’s all leading such ‘busy’ lives, being on-the-go and needing said energy! There are some great brands out there, most trying hard to keep ingredients lists to a minimum but they can get pricey. So, if you’ve got a blender then chuck everything below inside and make your own! These are really tasty and you can play around a bit with the ingredients depending on your tastes.

My athlete of a husband is adventuring off to Scotland for a 4 day cycling voyage from Carlisle to Glasgow so made these to help fuel his assertive legs. Good luck!

Makes 8 large bars or about 24 small ‘bites’

  • 400g pitted dates
  • 200g cashew nuts
  • 100g salted peanuts (Optional. I like the salt but you can use 300g cashew or 100g of another nut)
  • 4 tbsp cocoa powder (dark)
  • 1 tbsp nut butter of choice
  • 1 tbsp coconut oil
  • 1 tbsp vanilla
  1. Blend everything in a food processor until the nuts are in tiny pieces
  2. Add 1 tbsp of cold water and blend again. The mixture should start to stick together. Add another splash of cold water until it blends into a nice ‘dough’.
  3. Line a 20 x 20cm baking tray with parchment.
  4. Tip the mixture into the tray and press into the tin.
  5. Refrigerate for at least 2 hours.
  6. When ready to slice, makes sure its really cold – i put mine in the freeze for an hour or so before cutting (don’t let it get rock hard though!). Slices into bars.

Dal Tadka (with roasted cauliflower)

I

‘m a bit lost for words on this one *love eyes*. I love dal but this one is a culinary cuddle with a gentle kiss of coconut among the curry layers. I am about packing in as much flavour as possible so if you’re used to using my recipes you won’t be surprised that I normally use about double the spices so please be heavy handed! 

I’ll never be a vegan but as I was cooking I realised we’d chosen something similar for our vegan/vegetarian wedding dinner option and thus realised its vegan by coincidence. Not many recipes are such, usually tirelessly omitting all the fun. But if I had to be vegan, I’d eat this one everyday!

Serving suggestions…this is devine with some warm fluffy flatbreads (250g SR flour, 150ml water mix into a dough, rest and roll thinly before dry frying!). It would also work wonderfully as a side dish to a curry feast or some grilled meat at a BBQ.

Serves about 3 people (Or 2 with leftovers in our case!)

Dal

  • 150g red lentils
  • 1 red onion, finely chopped
  • 1 garlic clove
  • 1 knob ginger
  • 1 bride eye red chilli (as hot as you like)
  • 6 fresh curry leaves
  • 1 tbsp black mustard seeds
  • 1 tbsp cumin seed
  • 1 tbsp ground cumin
  • 1.5 tbsp curry powder
  • 400ml coconut milk (I always recommend Dunn’s brand here hands down)
  • 1 lime
  • Olive/vegetable/rapeseed oil
  • Flatbreads – to serve

Cauliflower

  • 1 head cauliflower
  • 1 tbsp Garam Masala
  • 1 heaped tsp tumeric
  • Freshly cracked pepper
  • Handful chopped coriander

Tadka

  • 1 tsp mustard seeds
  • 1 tsp cumin seed
  • Few curry leaves
  • Ghee or oil
  1. Preheat the oven to 200. Break the cauliflower into florets and cut the bigger pieces in half or quarters (think big bitesize so you don’t need a knife!). Add to a large roasting tray in a single even layer so they aren’t cramped.
  2. Scatter garam masala, turmeric and a good pinch of salt and pepper and then drizzle with some olive/vegetable oil and toss to combine.
  3. Timing with the dal cooking times below, roast for about 10-15 minutes during step 8 of making the dal below on a high heat to char the florets but not overcook. Remove from the oven when ready. Scatter with the chopped coriander and keep warm.
  4. For the dal, heat a splash of olive oil in a saucepan pan and soften the chopped onion for about 5 minutes.
  5. Grate in the garlic, ginger and chopped chilli and stir. Add curry leaves and season.
  6. Add the spices and mix well for a few minutes to coat the oily onions and release their flavour!
  7. Add the lentils and stir to combine.
  8. Add the coconut milk and about 100ml of boiling water and stir well. Simmer well for about 20 minutes making sure to stir often to avoid it sticking or catching on the bottom. You may need to add another 100ml of water if it gets thick. I used about 800ml of liquid in total but it may depend on the quality of your coconut milk. (I always recommend Dunn’s brand here hands down).
  9. After 20 minutes of so it should be thick and shiny and the lentils just cooked. Taste and adjust seasoning if needed.
  10. When ready, squeeze in the juice of the lime and keep warm.
  11. Finally, to make the tadka, add a small tsp of oil of ghee to a frying pan. When really hot, add the mustard and cumin seeds and let them sizzle and release their lovely flavours! Add the curry leaves, careful as they will spit (due to their moisture content!). Let them crisp for a few seconds and remove from the heat.
  12. Serve a nice creamy scoop of dal in a warm bowl, top with roasted cauliflower and coriander and finally a little spoonful of that tadka!

Passionfruit Crème Brûlée

W

ith Valentines Day heavy on the February agenda and a strong committed desire to stay at home and cook up a feast, this dessert made a perfect and suggestively named addition. Personally, the thought of going out for dinner on Valentines Day fills me with dread! The busy restaurants, the ‘special menus’, the overpriced deals and the crowds of daters and lovers. Understandably, showing your love with your cooking is not for everyone. And I’ll admit, for someone who loves nothing but spending a month menu planning and an entire evening in the kitchen, creating a 3 course feast was selfishly high on my priorities. This also being the way to a/my man’s heart, it seemed like a win-win…

When thinking of a menu, creme brûlée and passion fruit were the first things on the list being two of my beloved guests favourites. A decadent, creamy and light end to a meal that finished off a French themed super perfectly. Call me cliche with the theme but I didn’t hear any complaints…

I always fail to remember how easy creme brûlée is to make. And this year I finally, FINALLY invested in a cooks blowtorch. And an investment I wish I’d done long ago. A cheap and tremendously useful kitchen addition. Gone are the days of burnt creme brûlées shamefully neglected under the grill. Sweet creme brûlée, a mans gadget and the involvement of flames…again…a win-win dessert. And who doesn’t love the first crack of the sugary top!?

Serving suggestion: I failed to make these on the night but I’d serve these with mini coconut shortbreads. See here and instead of adding the rosemary, replace with 2 tbsp of lightly toasted desiccated coconut.

Serves 5 (I reused the infamous ‘Gu’ ramekins and this made 5)

  • 500ml double cream
  • 100g caster sugar
  • 6 egg yolks
  • 1 vanilla pod
  • 6 passion fruit
  • 6 tbsp caster sugar
  1. Preheat the oven to 150°C. Find a deep roasting tin and get your ramekins ready in the tray.
  2. Add the double cream to a saucepan and scarp in the seeds of the vanilla pod using a teaspoon and add in the pod too. Scald the cream. I.e. Heat until just below the boiling point. It should be just ready to bubble but not simmer. Remove from the what and let the vanilla infuse for a few moment while you whisk the eggs.
  3. In a large bowl, add the egg yolks, sugar and the pulp from all the passion fruits. Whisk well to combine.
  4. Place a tea towel underneath the bowl to prevent it moving and then, whilst whisking continuously, pour in the hot cream in a slow stream. Continue whisking until well combined.
  5. Strain the mixture through a sieve into a good pouring jug or saucepan. Discard the vanilla pod husk and the passion fruit seeds.
  6. Pour the mixture evenly among the ramekins in the roasting tray filling to the top.
  7. Fill the tray with hot water, pouring until the liquid comes about halfway up the ramekins.
  8. Carefully so as not to spill, place the tray in the centre of the oven and cook for 30-35 minutes until just set and with a very slight wobble in the centre. Leave to cool completely before chilling in the fridge.
  9. When ready to eat, remove from the fridge and scatter a thin, even layer of caster sugar over the top. Using your blow torch, glaze the surface and the sugar will begin to caramelise. Rotate the ramekin as it melts to ensure it evenly caramelises being careful not to burn. Sit for about 1 minute and then enjoy! With shortbreads if you wish.

If you’re keen for a French showstopper then I also made this pork cassoulet for main.

Chana Dahl and Flatbread

W

e all know our favourite comfort foods on a cold, challenging day or just after a bit of a tough one be it winter or summer. They usually consist of English favourites like bangers and mash or a hearty pie. Mine vary throughout the seasons but usually consist of a creamy coconut rice topped with Asian salmon (recipe here) or a big bowl of fish soup. But dahl is another comfort food altogether and one that so effortlessly lives up to the job.

There are many types of dahl, made from varying pulses. Having sampled ‘Dishmoon‘s’ infamous black dahl I’ve been on a quest to make a rival recipe! I religiously order it with every visit to Dishoom. I even have a colleague who orders a portion with the bill so he gets a bowl ‘to go’. Its that good! However, I’ll be confidently honest here and admit that my attempt at a black dahl (recipe here) ticked the box for me in terms of flavour and decadence.

However, this variation is suitably named as ‘Speedy dahl’. The flavour is there but you don’t get the depth that you get from a slow cooked and infused recipe with commitment of time and love. So, after a long run around London last Sunday afternoon, a cold bitter chill in the air and a deserving appetite I set my pan on the hob to master a new recipe. Serve in bowlfuls with roti, naan, chapatis or flatbread alone or refined here with a piece of elegantly friend sea bass, it’ll offer the comfort you need. Its a hug in a bowl…..

Serves 4

  • 3 tsp cumin and coriander seeds
  • 1 tsp yellow mustard seeds
  • 3 tsp garam masala
  • 1 tsp ground turmeric
  • 2 tbsp coconut oil 
  • onion, finely chopped
  • Knob ginger (about 35g), finely pounded with a pestle & mortar/grated
  • 1 large garlic clove, finely pounded with a pestle & mortar/grated
  • 1/2 can chopped tomatoes
  • 600ml coconut milk
  • 250g yellow split peas (rinsed well)
  • 3-4 small green chillies, finely chopped
  • fresh curry leaves
  • 1-2 limes
  • Coriander, roughly chopped
  1. To start, drain the split peas well in 4-5 changes of water then allow them to sit in a bowl of water while you start the dahl.
  2. Dry fry the cumin, coriander and mustard seeds in a hot frying pan until fragrant. Next pound in a pestle and mortar.
  3. Add the turmeric, garam masala and set aside
  4. Heat the coconut oil in a hot frying pan and sweat the onion of ragout 10 minutes until soft and beginning to carmalise.
  5. Next add the ginger, garlic and chopped chillies and cook for a few more minutes.
  6. Add the dry spices (and a touch more coconut oil if needed) and stir all to combine, frying the spiced onions for 2-3 minutes more.
  7. Add the tomatoes, coconut milk and the curry leaves. Drain the split peas and add these too.
  8. Bring to the simmer and then allow to bubble slowly and gently for about 1 – 1.1/2 hours (alternatively pop in a low 150°C oven with a lid on) until the split peas become tender and begin to break down. Keep an eye on it while it simmers so it doesn’t catch on the bottom. Add a touch of water if its drying out.
  9. After this time and the lentils are soft, remove from the heat. Use a potato masher to gently ‘mush’ the lentils into a paste. This is just to make it thicker, you don’t need to aim for a smooth dahl.
  10. Taste and season well and add the juice of at least 1 lime or more if required. It should lift the taste of the whole dahl.
  11. Scatter with the coriander and the dahl is ready to serve!

I served mine with fennel seed flatbreads (recipe here). Amend the spice/seeds as needed.

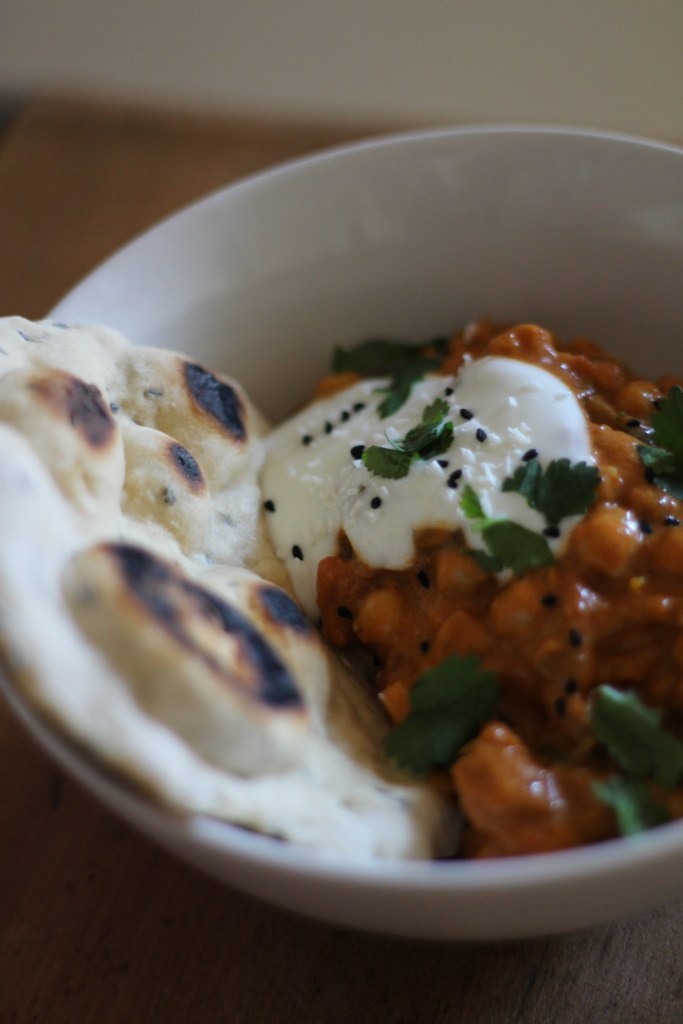
Chickpea Curry, Coconut Yoghurt, Naan and Mango Chutney

jess-chickpea-curry3jess-chickpea-curry2

I

 am not a vegetarian (lets just make that clear) but sometimes meat just isn’t required. When flavour is so prominent there is sometimes no need for it and this curry certainly has a big punch of spice. If you’re going to make a curry, don’t be timid, the more spice the better in my eyes! And I reassure you that you won’t miss the meat in this one – chickpeas make a substantial replacement. However feel free to replace with diced chicken, whole chicken legs, chunky white fish or even lamb. Or keep it vegetarian but pulse free with chunky cauliflower or broccoli or stirring through some spinach at the end.

Homemade flatbreads, sweet mango chutney and a cooling coconut yoghurt are the perfect side dishes. Who needs a takeaway….

Serves 4

Curry

  • 2 x cans chickpeas, drained
  • 1 can (full fat) coconut milk
  • 1 can chopped tomatoes
  • 1 large/ 2 small red onions roughly chopped
  • 2 garlic cloves, crushed
  • 1/2 red chilli, chopped
  • 1 thumb piece ginger, grated
  • 1/2 tsp fennel seeds
  • 1/2 tsp fengrueek seed
  • 1 tsp black mustard seeds
  • 1 tsp cumin seeds
  • 1 tsp each ground cumin, coriander, garam marasal, curry powder, tumeric
  • 5 cardamon pods
  • Bunch coriander
  • 1 lime
  • Spinach or extra vegetable optional

Yoghurt & Flatbread

  • 250g plain yoghurt
  • 2 large handfuls desiccated coconut
  • 500g self raising flour
  • 1 tbsp nigella seeds
  • Milk
  • Mango chutney to serve
  1. Start by mixing the flatbread dough. Add the flour, nigella seeds and some salt and pepper in a bowl. Add a small splash of milk (a little at a time) mixing as you go until you have a smooth dough that is not too wet. If you do add too much milk just counteract with some extra flour. Tip the dough onto a floured surface and knead for a few minutes until combined and smooth. Leave the dough ball to rest in a floured bowl while you make the curry.
  2. Start the curry by toasting the whole spices in a hot dry frying pan for a few minutes to release the fragrance. When you smell them toasting remove from the heat and add to a pestle and mortar and grind well. Add the dry spices and set aside.
  3. Heat a little vegetable oil in a frying pan/saucepan (bear in mind you will need the curry in a saucepan later so use whatever is easiest) and gently soften the red onion for about 10 minutes until soft and translucent. Add the garlic, ginger and chilli and fry for a few more minutes.
  4. Next add the spices to the onion mix and fry for about 2 minutes adding a splash more oil if needed.
  5. Next add the tinned tomatoes and simmer gently for a minute mixing well to incorporate the onion spice mixture before adding the coconut milk to the sauce.
  6. At this stage I recommend transferring the sauce to a saucepan with a lid if you haven’t already. Simmer gently for 5-10 minutes to thicken the sauce before adding the chickpeas. Season to taste and keep on the simmer while you make the flatbreads and yoghurt. Add a splash of water for a thinner sauce or simmer to reduce for a more concentrated texture (depending on preference)
  7. Toast the coconut in a dry frying pan until just turning golden. Remove and add to the yoghurt. Set aside.
  8. Take the rested flatbread dough and divide out into generous golf ball sized rounds. Roll into flatbreads, the thickness of a 10p piece and set each aside. Heat a dry frying pan on high and turn on the extractor fan! Dry fry the flatbreads on each side. They should puff up a little in pockets and char a little. You’ll have to play with your own hob temperature but a high heat is needed. Continue with all the breads, wrapping them in a pile in a clean tea towel to keep them warm and soft after each one.
  9. (If adding any vegetables, add to the hot curry now and simmer until cooked.)
  10. When the breads and yoghurt are done and the mango chutney is at hand and ready to go, chop a large handful or coriander and the stems and add to the curry. Squeeze in the juice of the lime and taste and adjust the flavour as needed.
  11. Serve the curry in large warm bowls topped with the yoghurt, chutney and a scattering of coriander. Dip in your flatbreads to your hearts content.


Coconut Blueberry Yoghurt Loaf

Jess - Coconut yoghurt loafJess - Coconut yoghurt loaf 2

I

was recently lucky enough to receive a generous bounty (excuse the pun) of The Coconut Collaborative’s tasty products to do some experimenting with. As my close friends will know I love all things coconut. I can’t get enough. So any food based with this creamy exotic flavour is in my good books. While targeted at the dairy free among us, you would not know for the lack of it with it creamy moreish taste. I thought I’d attempt to use their delicious flavoured and non flavoured yoghurts in a cake, dairy free, and packed with fruit. Devine.

And I know recipes do tend to write this a lot but this really (truly, honestly) is the EASIEST cake in the world to knock out. I think it took me a 5 minutes. Mixing bowl, spoon and loaf tin. Minimal washing up…more eating time. No scales needed just a ratio of yog-pots!

Jess - Coconut yoghurtJess - Coconut yoghurt2Makes 1 loaf

  • 1x 120g pot of ‘The Coconut Colloborative’ blueberry yoghurt (Here is have used this coconut based yoghurt so this is a dairy free loaf! But feel red to use any yoghurt of choice)
  • 2 pots self raising flour
  • Just under 1 pot caster sugar (dependant on the sweetness of your yoghurt)
  • 1/2 pot of vegetable oil
  • 3 eggs, beaten
  • 1 tsp vanilla extract/ seeds from 1 pod
  • Pinch salt
  • 150g blueberries
  1. Preheat the oven to 180°C. and grease and line a loaf tin
  2. Place the yoghurt in a large mixing bowl and then add the rest of the ingredients except the blueberries.
  3. Mix thoroughly to combine until you have a smooth batter
  4. Mix in the blueberries
  5. Spoon the mixture into a loaf tin and bake in the own for about 45 minutes until cooked. Bake for a little longer if a knife inserted into the middle does not come out clean.
  6. Leave to cool, dust with icing sugar and serve with extra blueberries and a hearty spoonful of Coconut Ice cream (see here for a dairy free option)

Jess - Coconut yoghurt loaf 5

Sticky Salmon-Pineapple Kebabs, Thai black rice salad

I

‘m always surprised at the amount of people who are surprised at the flavour that rice can have on its own without additional added flavours. If you pick the right rice that is. If you’re used to the same old white or even brown rice then venture out! I use red French Camargue rice as my staple now due to its wonderful nutty flavour but after stumbling over some Thai black rice recently which fell into my innocent shopping basket I had a salad on the mind. A dark and nutty flavour goes wonderfully with Thai flavours and fruits. Try mango and prawns, basil and coriander (see here) which was my initial intention. However as a nod to the gorgeous weather this weekend a barbeque inspired kebab was required. Seeing as my garden-lacking London flat could not supply my bbq needs, a sticky, sweet and if you cook the salmon well, oh so tender kebab a top this fresh and herby Thai rice salad suited Sunday evening down to the ground. Cold beer to accompany and the BAFTAS.

Serves 2 (make 4 skewers)

  • 2 salmon fillets, cut into 2cm chunks
  • 1 fresh pineapple, cubed into 2cm chunks
  • Broccoli florets (about 6-8)
  • 2 tbsp soy sauce
  • 1 large tsp sesame oil
  • 1 1/2 tsp runny honey
  • Small knob ginger, grated
  • 4 oz Thai black rice
  • 4 spring onions, sliced
  • 50g desiccated coconut
  • Bunch coriander, chopped (save some for garnish)
  • 2 sheets nori seaweed, cut into small 1 cm wide pieces or strips (optional)
  • 1 lime
  • 4 skewers (soaked in water for 20 minutes)
  1. Combine the soy sauce, sesame, honey and ginger in a bowl and mix well
  2. Marinade the salmon chunks, broccoli florets and pineapple chunks in this mixture for 1 hour in the fridge.
  3. After 1 hour, prepare your skewers. Feed alternating salmon and pineapple and broccoli chunks onto each. Set aside on a line baking tray and chill. Preheat the oven to 180°C.Jess - Salmon Asian KebabsJess - Salmon Asian Kebabs2
  4. Meanwhile make the rice salad. Simmer the rice for around 25 minutes until just cooked with a little bite.
  5. While this is cooking toasted the coconut in a dry frying pan until just bringing to turn golden. Watch it as it catches easily. When fragrant, remove and add to a bowl.
  6. Combine with the chopped spring onions, coriander and the chopped nori sheets.
  7. When the rice is ready, drain well. Immediately add the bowl of coconut and herbs and squeeze in the juice of the lime. Place a lid on top and keep warm.
  8. Remove the salmon skewers from the fridge and heat a frying pan until hot and add a tsp of oil.
  9. Sear the skewers on both sides to get a lovely caramelised effect all over. Add the rest of the marinade to the pan (it will sizzle) and then immediately transfer the skewers and the pan juices to the baking tray. Pop in the oven for 5 minutes to finish the cooking.
  10. Meanwhile, plate up the rice in warm serving dishes. After 5 minutes check the salmon is tender and cooked through but just pink and remove from the oven. Top your Thai rice salad with the kebabs and any extra chopped coriander to garnish.

Jess - Salmon and Thai rice2

Rum Roasted Pineapple, Coconut Ice Cream, Mint Sugar

I

‘m not a dessert person or a sweet tooth, unless it comes to ice cream. And this so happens to be my favourite ice cream recipe! Don’t get me wrong I love making desserts. Planning them, creating them and being able to execute a beautiful creation but I usually never eat them. So with guests for supper this weekend, a fuss free dessert was required. With a fatty hearty main on the cards, a fresh and citrus cleansing after was the perfect match. You can take more time over this as I mention below (see notes) by adding some grated coconut to the ice cream, grilling the pineapple towards the end, caramelising with a blow torch or wonderfully charring on the barbeque but fuss free was the aim here.

I made the ice cream in 5 minutes at breakfast and it was ready and set by dinner time and is just as impressive as a classic recipe. The pineapple is sweet and deliciously roasted and with a depth of flavour from the rum that makes this more than a fruit salad finish to a meal. Sometimes the simple ones are the best and this is no doubt a powerful but humble choice.

Serves 6 

Pineapple

  • 1 large pineapple
  • 1 vanilla pod
  • 2 tbsp dark rum
  • 2 tbsp soft brown sugar
  • 6 tsp butter

Coconut Ice Cream

  • 400ml full fat coconut milk
  • 1 can condensed milk
  • Zest 1 lime
  • 1 fresh coconut, grated/ 150g toasted desiccated coconut (optional)

Mint sugar

  • Bunch mint leaves picked
  • 2 tbsp granulated sugar
  1. Start on the ice cream. If you’re after a super fast recipe, simply combine the condensed milk, coconut milk and lime zest, whisk to combine then place in a tupperware in the freezer (untouched) for at least 8 hours. For added flavour though you can add in the grated flesh of one fresh coconut or the desiccated coconut but if you’ve ever tried to grate a fresh coconut you’ll know it takes some commitment…
  2. Preheat the oven to 190°C.. Warm the rum gently in a pan and then add the sugar and the seeds of the vanilla pod. Stir to combine.
  3. Top and tail the pineapple and remove the rind. Cut in half lengthways and then cut each half into thirds. Remove the hard centre segment and then place the slices in a large bowl.
  4. Spoon over the rum mixture and let it sit for about 10 minutes.
  5. Line a baking tray and spoon the marinading pineapple onto the tray evenly with any of the leftover rum marinade. Place a tsp of butter on top of each and roast for about 30 minutes until tender. You can stick them under the grill for the final few minutes to char them slightly if you like but again, the aim here is fuss free!Jess - Pineapple
  6. Once ready remove from the oven and set aside. Bash the sugar and mint in a pestle and mortar until crushed and vibrant green
  7. Top each slice of pineapple with a little mint sugar and serve warm alongside a creamy scoop of your coconut ice cream


NOTE: There are certainly ways to ‘glam’ this up. Grill the pineapple once cooked for a caramelised effect, scorch with a blowtorch for the same effect or beautifully grilled on the barbecue. Add the fresh coconut to the ice cream as mentioned or make a lovely heard of sesame praline (melt caster sugar until golden, add sesame seeds and turn out onto an oiled sheet of parchment). Shortbread would also never go unwanted here.
Jess - Pineapple3

Beef Rendang

I

‘ve been looking for a cold carefree weekend to indulge in this slow cooked curry for ages but with long busy working days, midweek life hasn’t obliged. I love any form of slow cooking and coupled with my more recent love and commitment to the Asian flavours of the East they are combined lovingly here in a comforting wintery curry that while warming the heart will also transport you to the sunny climates of Malaysia….of Bruges!?

Bruges might not seem like the most logical inspiration but a quick hop skip and jump over to Belgium for the evening promoted this weeks blog post! The cold chilly weather, the (sadly) persistent rain and the festive Chrismassy lights was cue for something warming on return to the UK. But my main incentive starts with beer.

Histroical, medical and romantic, Bruges is a small and compact little city. But it has without a doubt the highest concentration of chocolate shops and beer merchants littered on every corner! Belfry view done and canals walked it was time for the brewery tour!

Processed with VSCOcam with f2 preset

image3

image5

O

ne of the oldest breweries left in Bruges, De Halve Maan promised history and charm and certainly delivered. We began in the brewing room before winding our way romantically around the high beams and rafters of the old listed building from cold cellar to the top of the roof before ending up in the restaurant bar, rewarding beer in hand, leather sofas and a warming fire to dry our wet feet. With Belgium beer on tap we drank away the rainy afternoon with a platter of meat and cheese and long outstayed our welcome.

Processed with VSCOcam with f2 preset

Processed with VSCOcam with f2 preset

S

o on return home and that carefree Sunday afternoon to indulge, we drank our loot with this warming curry.

Serves 3

  • 500g braising steak, chopped
  • 1 red onion, chopped
  • 3 garlic cloves, chopped
  • 1 large red chilli, chopped (a hot as you dare!)
  • 2 inch large piece ginger, chopped
  • 1 tsp tumeric
  • 1 lemongrass, bashed roughly
  • 15 g tamarind paste (about 1 tbsp)
  • 1/2 tbsp brown sugar
  • Large pinch ground coriander and cumin
  • 2 kaffir lime leaves
  • 5 cardamon pods
  • 1 star anise
  • 1 cinnamon stick
  • 5 tbsp desiccated coconut
  • 350ml coconut milk
  • Rice, lime and coriander to serve
  1. Preheat the oven to 160°C.
  2. Start by making the paste. Place the onion, garlic, chilli, ginger, turmeric, lemongrass, tamarind and sugar in the bowl of a food processor and process until you have a fine paste.
  3. Heat 1 tbsp of sunflower oil in a large ovenproof saucepan/casserole dish over a medium heat. Cook out the paste for about 5 minutes but don’t burn or let it catch. Next add the lime leaves, cardamon, star anise and cinnamon stick.
  4. Add the chopped beef and cook for 10 minutes on a medium high heat until starting to colour and brown.
  5. Meanwhile, dry toast the coconut in a hot frying pan until golden brown and toasted (careful not to burn). Set aside.
  6. Next add the ground spices and the coconut milk to the beef.
  7. Bring to the simmer and mix well. Add the coconut. Place in the oven with a lid for 1 1/2 hours .
  8. During this time, check and stir occasionally. After this time, check the thickness of the sauce. If it needs to be reduced, remove the lid and placed back in the oven for 5 minutes or so or reduce on the hob. Add a splash more coconut milk if it looks too dry.
  9. Serve on warm rice dressed in lime juice and scattered with coriander.

Chocolate Mint Tart with Sugared Pistachios

image
image

M

y recent adventure to the colourful delights of Morocco has naturally fuelled my blogging obsession once again. I have, for this week at least, exhausted the classic tagine and now have only sweet treats on the mind. Green & Blacks recent emphasis on colour in our taste and perception can not only be reflected in their packaging but I couldn’t help but see this mirrored in Morocco which is a country that is summed up by colour and flavour. A feast for the eyes. With teasing fresh mint tea available in Morocco at any opportunity (whether requested or not) I stole this flavour inspiration using Green & Blacks new ‘Mint Crisp’ bar.

If you’re a chocolate connoisseur you’ll already have noticed Green & Blacks new bars – ‘Thins’ – so this won’t come as surprising news. Long ago I spotted the ‘Mint Crisp’ flavour and stocked up. I love this new format or bite-sized slices of flavoursome chocolate. Ironically here I’ve used the new ‘Thins’ bar in this recipe….which won’t make you that. But hey, the mint brings back the buzz of the Medina’s and Riads.

image
image

This tart is rich and dense. If you’re not a mint fan then feel free to make this soley dark or try using G&B’s salted caramel thins in stead. The crunchy topping adds a lovely texture but again can be substituted with pecans, walnuts, or almonds (which would go particularly well with the salted caramel bar). Devour with some clean simple ice cream or fruit.

Pastry

  • 1 x quantity of shortcrust pastry (see here for recipe) made with additional small handful of desiccated coconut.

Filling

  • 150g Green & Blacks ‘Mint Crisp Chocolate’
  • 100g Green & Blacks dark 70-80% chocolate
  • 100ml single cream
  • 250ml whole milk
  • 3 beaten eggs
  • 1 tsp vanilla extract

Topping

  • 50g pistachios
  • 1 tbsp caster sugar
  • 4 tbsp desiccated coconut
  • 1 large lime, zest only
  1. Start by making the pastry case according to the link above and using a deep 20cm wide pastry case. Add a handful of coconut to the flour if you like.
  2. Preheat the oven to 180°C. Set aside your blind baked pastry case while you make the filling.
  3. Mix the cream and milk together in a saucepan and heat until just about to come to the boil.
  4. Remove from the heat and break in the chocolate in small pieces. After a few minutes mix together until the chocolate is smooth and fully melted into the cream. Use a whisk to throughly combine the cream and melted chocolate.
  5. Leave to cool until lukewarm.
  6. When lukewarm, beat in the eggs and vanilla.
  7. Place the tart case on a baking tray and fill ¾ full with the chocolate filling.
  8. Place the tray on the oven shelf and once its stable, fill the tart to full with the remaining mixture (or as much as will fit int your tin! I had a little left over)
  9. Bake for about 20 minutes until just set and shiny.
  10. Remove from the oven and leave to cool completely.
  11. Meanwhile make the topping. Crush the nuts in a pestle and mortar until finely crushed but with a few chunks here and there.
  12. Toast the coconut in a dry hot frying pan until just beginning to colour golden and then add to the nuts. Stir in the lime zest and the sugar and combine.
  13. Once the tart has cooled, use this mixture to scatter over the top of the tart.
image