Posts tagged ginger

Sticky Hoisin Pork & Homemade Coriander Noodles

Y

ou might have guessed but I recently bought a pasta machine as a lockdown past time! I’m not even a big pasta fan! I’d go so far as saying I’m not really a fan at all, eating it only about 2-3 times a year! Alas, I like to expand my skillzzz. Plus, turns out you can really easily make noodles, which are growing on me!

I’ve always rather turned my nose up at dried packed noodles. Probably because I associate them all with pot noodles and instant university food. I still remember my first pot noodle when I was about 7 and I wasn’t even impressed then. Aliet not much impressed me in the kitchen when I was younger apart from alphabites and fish fingers!

You can absolutely skip the homemade noodles. Like fresh vs dried pasta, I’ll admit there isn’t a huge amount of difference. The main advantages here being that I know exactly what went into mine and it was only 3 ingredients and no preservatives! Secondly you can flavour with things like coriander to make them a beautiful vibrant green. Use the dried or fresh noodles of your choice here, I know everyone has a preference.

Note: A pork fillet if quite big and this may feed 3-4 but we eat a lot of protein and are growing young adults…ahem.

Serves 2

  • 1 pork loin/fillet (450g approx)
  • Knob ginger, grated
  • 2 garlic cloves, chopped finely
  • 3 tbsp hoisin sauce
  • 2 tbsp honey
  • 2 tbsp soy sauce
  • 1 red chilli, chopped
  • 2 red peppers, chopped
  • Handful green beans, top and tailed, halved
  • 2 tsp sesame oil
  • Garnish – Sesame seeds & chopped coriander
  • Dried egg noodles/odon noodles OR below noodle recipe. If using dried noodles, skip to the pork method steps!

Noodles (if making)

  • 125g flour
  • 1 egg
  • Large handful coriander
  1. Begin with the noodles if making. Blend the coriander in a food processor with the flour.
  2. Add the egg and blend until the dough comes together. Add a touch (be very reserved!) of cold water to help bring it together but don’t be tempted to add too much. Touch the dough if not sure, it should be a bit sticky but not wet.
  3. Roll onto a floured work surface and knead together to form a silky dough for about 5 minutes. Then rest in a ball for 30 minutes in the fridge.
  4. When ready to roll, flatten into a rectangle as best you can and feed through your pasta machine on the thickest setting, getting thinner as you go. You may need to cut your final strip into 2 as it’ll be too long to handle. Once nicely thin, pop through the setting of choice to obtain your desired noodle shape!
  5. Scatter lots of flour over the noodles to stop them sticking until ready to cook.

Pork recipe

  1. Marinade the pork fillet (halved if easier) in the ginger, garlic, hoisin, soy, honey, chilli and set aside in the fridge for about 20 minutes. Preheat the oven to 200 degrees.
  2. Heat a frying pan on a high heat and add a splash of olive/sunflower/plain oil (never heat extra virgin, I’ll keep saying it). Sear the pork on both sides for about 2 minutes until it forms a nice caramelised golden seal.
  3. Top the pork with all but 2 tbsp of the marinade and cover with foil or a lid. Roast in the oven for 10 minutes.
  4. While that is roasting, stir fry the peppers and beans in a little oil in a hot frying pan to begin soften.
  5. Bring a pan of water to the boil at the same time.
  6. When the pork is ready remove from the oven and leave to rest on a board. Add the juices from the roasting pan and the rest of the marinade you reserved earlier to the peppers and turn up the heat.
  7. Add your noodles to the boiling water and cook for about 1 minute for fresh and 2 for the dried. Drain quickly (keep a little cooking water clinging to the noodles to help stop them stick if you can so don’t drain too heavy handedly!). Drizzle with the sesame oil to stop them sticking.
  8. Add the noodles to the peppers and sauce and mix all really well to combine and coat all the noodles in the sauce.
  9. Remove from the heat and slice your rested pork, adding any juices back to the noodles and pepper pan.
  10. Serve a spoonful of peppers and noodles in a warm bowl and top with the sliced pork, some fresh coriander and some sesame seeds if you like!

Roasted Indian Chicken Curry

R

oasting (especially if done slowly) always brings out a flavour that can’t be beaten by quick or lazy cooking. Combining amazing spices, some ginger heat and of course some coconut milk and popping this in a hot oven care free was the ideal way to focus my time, attention and love on a juicy glass (ahem…shared bottle) of Syrah from South Africa (see foot note). I’d recommend cooking this on a Sunday if you fancy a change from a roast but with all the depth of flavour. Feel free to experiment with different spices, cuts of meat or side dishes. My nigella seed flatbreads dipped in mango chutney would work a treat. This is also a very mild curry (note, no chilli) so don’t expect to be punched by heat! But do add accordingly if that’s how you want your Sunday evening.

TIP: This can by all means be made simply roasted in tray from start to finish with no fuss! (I opted to use a tray and then a casserole dish but this can be ignored). Roasting in a deep roasting tin then adding the coconut milk gives you crispy potatoes, chicken and minimal washing up. When you ‘roast’ in a casserole dish you don’t get the circulation of air and the crispy finish that you do when in a tray so this is preferred. However, I often like to manipulate the sauce consistency so I prefer to manage this by adding to a casserole once ready to add the coconut milk. But this is up to you!!

Serves 2

  • 4 x chicken pieces on the bone (2 x thighs and 2 x drumsticks)
  • 1 large red onion, sliced
  • 2 garlic cloves, crushed
  • 500g small potatoes/new potatoes (halved if needed)
  • 2 tsp fennel seeds
  • 2 tsp coriander seeds
  • 2 tsp cumin seeds
  • 2 tsp black mustard seeds
  • 2 tsp ground coriander
  • 1 tsp ground tumeric
  • 1 x can coconut milk
  • Handful curry leaves
  • 150g frozen peas
  • Large handful green beans
  • 1 lime
  • Bunch coriander, chopped

Marinade

  • Knob of ginger, freshly grated – 2 tbsp
  • 1 garlic clove, crushed
  • 2 limes, zest only (reserve for serving)
  • 1 tsp ground tumeric
  • 2 tsp ground coriander
  • 1 large tsp ground garam masala
  • Sunflower oil

To serve

  • Popadoms
  • Mango chutney
  • Chopped coriander
  • Lime wedges (from marinade)
  1. Start by marinating the chicken (at least 30 minutes before, overnight if possible). Combine all the marinade ingredients in a large bowl and add the chicken and potatoes. Add a few tsp of sunflower oil and use your hands to fully coat. Cover and refrigerate.
  2. When ready to cook, preheat the oven to 200°C.
  3. This can be made in either a roasting tray OR a large flameproof casserole dish however I found the combination of the two the best (see above tip). Drizzle a little oil in the roasting tray and add the sliced red onions and garlic. Remove the chicken and potatoes from the fridge and add to the dish. Make sure the skin of the chicken is facing upwards and that the chicken is sitting on top of the everything.
  4. Roast in the oven for 50 minutes.
  5. Meanwhile, heat a frying pan over a high heat and dry fry the fennel, coriander, cumin and mustard seeds for a few minutes, just until fragrant. Remove form the heat and grind in a pestle and mortar.
  6. Add these spices and the ground spices to the coconut milk and whisk. Add the curry leaves.
  7. After 50 minutes, remove the tray from the oven. Transfer the contents to a large casserole dish, ensuring your scrap all the delicious goodness off the bottom.
  8. Add the coconut milk (avoiding soaking the crispy chicken skin if you can) and ensure again that the chicken pieces are facing upwards, skin on the top.
  9. Bake in the oven for another 30 minutes.
  10. After this time, add the beans, peas and a generous squeeze of lime. Return to the oven for 5-10 more minutes.
  11. When ready to serve, scatter over the chopped coriander. Serve with popadoms and mango chutney.

WINE: We devoured this with a delicious Syrah from South Africa from the gorgeous Vrede en Lust. Benefits from decanting.

Hoisin, Soy and Ginger Meatballs

U

ntil this recipe, I’d really underestimated minced pork. I like pork. I appreciate a good sausage (…ahem..) and I would fight you greedily for the crackling on a hog roast but I rarely cook with it. However my love of Asian-fusion recipes, the need for a warming Autumnal meal and some timely inspiration resulted in this tasty, moreish and speedy meatball dish.

It was an intense weekend. In training for 15km run round Lake Garda in October, it was decided that a smaller practice run was on the Saturday morning agenda. Two hours of enthusiastic and competitive running later, we’d clocked up 13 miles, some sore joints and a feisty appetite. So Sunday welcomed warm showers, relaxation and calorie replacement. And this recipe did a fine job.

Warming, comforting, firey, hoisin-sweet and punching in flavour, it was like an Asian hug in a bowl after a hectic weekend. It also makes a super speedy mid week meal and fantastic leftovers. I’m eating them as I write and they are just as good the second time round on a bowl of vegetable stir fry or raw courgette.

Rice – serve on your rice of choice. I’d recommend a jasmine or a sticky rice to avoid too many flavours. I do however like to squeeze a generous lime into the rice once cooked to add some contrast to the sweet hoisin here.

Serve 4

Meatballs

  • 600g minced pork
  • 30 self raising flour
  • 2 1/2 tbsp soy sauce
  • 1 tbsp hoisin sauce
  • 2 tbsp grated fresh ginger
  • 2 garlic gloves, grated
  • 1 small red chilli (as hot as you like)

Sauce

  • 1 bunch spring onions, chopped
  • 1 tbsp grated fresh ginger
  • 1 garlic clove, grated
  • 2 tbsp hoisin sauce
  • 1 tbsp soy sauce
  • 125ml chicken stock

To serve

  • Steamed pak choy, broccoli,/any green vege
  • Bunch coriander, chopped
  • Steamed coconut/jasmine/brown/sticky rice (of choice)
  • 1 lime
  1. Start by combining all the meatball ingredients in a large bowl. Use your (clean) hands, combine the mixture together so that everything is mixed well. Don’t overwork and pound the meat or it’ll give you rubbery meatballs. Chill for about 15 minutes.
  2. Once a little chilled, heat your oven to 240°C.
  3. Start cooking your rice now.
  4. Roll your pork into meatballs – golf balls size (about 16)
  5. Get a large frying pan on a high heat and add a splash of sunflower oil. (I like to fry mine to give a crispy outside then finish them off in the oven. Alternatively you can avoid this step and jump straight to the oven). Flash fry your meatballs for a few minutes until they form a dark golden crust on the outside. Place into a lined baking dish and add to the oven for about 10 minutes to finish cooking.
  6. Meanwhile make your sauce. Add a splash more oil to your frying pan and fry the spring onions on a medium heat to soften slightly. Add the ginger and garlic and fry for another minute.
  7. Add the hoisin and the soy and stir well. Finally add the stock and simmer gently until the sauce thickens slightly.
  8. Remove your meatballs from the oven and add them to the frying pan and coat them liberally in the sauce.
  9. Add a good squeeze of lime to the cooked rice if appropriate and serve about 4 meatballs per person on top of this. Spoon over some of the excess sauce.
  10. Scatter with coriander and a squeeze of lime if needed.
  11. Serve alongside your fresh greens.


Chicken Satay

I

 usually feel that people fall into a love or hate category when it comes to peanut butter, the later being of rarity these days what with all the dreamy varieties and versions available. I embrace all that can be combined with it favouring the blackcurrant jam toast. However if you’ve not tried celery sticks dipped in peanut butter yet then you can thank me later for the introduction. Having mentioned the vast choice we now have for this delicious American spread, sadly I hate to admit that a cheap jar works wonders here. Save your fancy and expensive cashew, pecan and peanut blend for your sourdough toast at brunch y’all.

With no need to continue my expressive love of peanut butter, chicken satay is like a warm hug when wrapped comfortingly in the soft hand of a loveable flatbread with a crunchy, fresh salad. And this recipe really can be served in many ways as mentioned below. I prefer whole thighs rather than diced breast as they have far more flavour and texture. Served with a spoonful of the rich, spicy sauce, a zesty salad and some pillowey flatbreads. Alternatively, chop, coat and wrap the chicken and salad in the mits of a floury flatbread or flat wrap and dive in hands or face only. Use any combination of salad you like but whatever you do, coat liberally with lemon! It cuts through the rich and creamy peanut sauce welcomingly and essentially.

NOTE: If you haven’t tried making peanut butter before its really really simple provided you have a food processor! See here 

Adapted from Nigel Slater.

Serves 4

Chicken Satay

  • 4-8 chicken thighs, de-bonded (allow for 1-2 each depending on starter/main serving size)
  • 1 small onion, chopped
  • 2 cloves garlic, crushed
  • Thumb ginger, grated
  • 1 tbsp lemongrass paste
  • 1 large red chilli, chopped finely
  • 1-2 limes
  • 125ml crunchy peanut butter
  • 250ml water
  • Bunch coriander, chopped
  • Sunflower or light, flavourless oil.

Salad & Sides

  • 1 cucumber, chopped into batons
  • 4 little gems lettuce, leaves picked
  • Handful radishes, sliced finely
  • Bunch spring onions, sliced as preferred
  • 1 lemon
  • Handful coriander, chopped
  • Flatbreads (homemade, see here)
  1. Preheat the oven to 190°C and begin with the chicken. Heat a hot frying pan with a tbsp of sunflower oil on a high heat. Fry the chicken skin side down until crispy and golden. Turn the thighs over and seal on the other side. Remove from the pan and place in a baking tray. Finish cooking in the oven for about 15-20 minutes while you make the sauce.
  2. Using the same pan, reduce the heat and soften the chopped onion for about 5 minutes. Add the ginger, garlic, chilli and lemongrass and fry for just a few minutes being careful not to burn it – the garlic in particular.
  3. Next add the peanut butter and stir well and continuously to combine with the aromats. Reduce the heat to a low and add half the water. Stir to combine.
  4. The sauce will bubble and thicken as you do this so add the rest of the water when needed, a whisk is useful here.
  5. Keep on a very low heat to warm through, adding a splash more water if you require a thinner consistency.
  6. Add the salad ingredients to a large bowl and squeeze over a generous squeeze of lemon and seasoning.
  7. By now the chicken should have finished cooking, remove from the oven and set aside to rest for a moment while you put the final touches to the sauce.
  8. Add the juice of 1 large lime. Taste – if it needs more to cut through the richness then add another squeeze. Add a handful of the coriander and stir to combine saving the remaining herbs for serving.
  9. Serving is up to you – I prefer to place the thighs gently in the sauce to ensure the skin you worked hard to crisp up remains crispy and then serve the whole dish on the table for people to help themselves from – thighs and sauce scattered with the leftover coriander. Alternatively, you can chop the chicken pieces into bite sized chucks and stir thoughout the sauce to coat entirely and serve in your flatbreads/lettuce leaves like a wrap.

Blackberry and Ginger Pudding

jess-blackberry-ginger-pudding4

T

his is one of the tastiest but easiest little puddings to knock up and its packed full of flavour and perfect for a winter evening with a steaming bowl of velvety sweet custard. Ambrosia obviously. But if you’re feeling the urge to make a your own creme angliase then my cinnamon version found here is great. Its not a steamed pudding as such but it may as well be with its warm spongy texture and comfort. I’ll admit the ginger is excessive but don’t be shy, you’ll appreciate the bounty if you go all in here – its a ginger pudding after all. A little lemon zest lifts it into a lighter pudding and the blackberries are just so god damn seasonal. And a nod to the ‘forage’.

This recipe if straight from Sky Gyngell’s ‘A Year in my Kitchen’ and I made no changes. Its perfect.

Serves 4

  • 100g unsalted butter
  • 100g caster sugar
  • 2 eggs
  • 100g self raising flour
  • Zest 2 lemons
  • 4 knobs of stem ginger, finely chopped
  • 4 tbsp golden syrup
  • Blackberries
  • Pinch salt
  1. Grease 4 mini pudding moulds or ramekins. I also lined the base with a little parchment to stop it sticking. Preheat the oven to 180°C.
  2. Cream the butter and sugar together until fluffy and smooth.
  3. Beat in the eggs one by one until combined
  4. Next sift in the flour and fold in.
  5. Fold in the lemon zest and ginger.
  6. Spoon a generous tbsp of golden syrup into the base of each pudding bowl. Top with enough blackberries to cover the base in a single layer. Spoon over the sponge mixture divided between each mould.
  7. Grease 4 small sheets of foil and cover the moulds loosely with it. Place on a baking sheet and bake for about 30 minutes until a knife inserted comes out clean.
  8. Turn out onto a plate and serve warm with a steaming helping of custard.

jess-blackberry-ginger-pudding3

Sticky Salmon-Pineapple Kebabs, Thai black rice salad

I

‘m always surprised at the amount of people who are surprised at the flavour that rice can have on its own without additional added flavours. If you pick the right rice that is. If you’re used to the same old white or even brown rice then venture out! I use red French Camargue rice as my staple now due to its wonderful nutty flavour but after stumbling over some Thai black rice recently which fell into my innocent shopping basket I had a salad on the mind. A dark and nutty flavour goes wonderfully with Thai flavours and fruits. Try mango and prawns, basil and coriander (see here) which was my initial intention. However as a nod to the gorgeous weather this weekend a barbeque inspired kebab was required. Seeing as my garden-lacking London flat could not supply my bbq needs, a sticky, sweet and if you cook the salmon well, oh so tender kebab a top this fresh and herby Thai rice salad suited Sunday evening down to the ground. Cold beer to accompany and the BAFTAS.

Serves 2 (make 4 skewers)

  • 2 salmon fillets, cut into 2cm chunks
  • 1 fresh pineapple, cubed into 2cm chunks
  • Broccoli florets (about 6-8)
  • 2 tbsp soy sauce
  • 1 large tsp sesame oil
  • 1 1/2 tsp runny honey
  • Small knob ginger, grated
  • 4 oz Thai black rice
  • 4 spring onions, sliced
  • 50g desiccated coconut
  • Bunch coriander, chopped (save some for garnish)
  • 2 sheets nori seaweed, cut into small 1 cm wide pieces or strips (optional)
  • 1 lime
  • 4 skewers (soaked in water for 20 minutes)
  1. Combine the soy sauce, sesame, honey and ginger in a bowl and mix well
  2. Marinade the salmon chunks, broccoli florets and pineapple chunks in this mixture for 1 hour in the fridge.
  3. After 1 hour, prepare your skewers. Feed alternating salmon and pineapple and broccoli chunks onto each. Set aside on a line baking tray and chill. Preheat the oven to 180°C.Jess - Salmon Asian KebabsJess - Salmon Asian Kebabs2
  4. Meanwhile make the rice salad. Simmer the rice for around 25 minutes until just cooked with a little bite.
  5. While this is cooking toasted the coconut in a dry frying pan until just bringing to turn golden. Watch it as it catches easily. When fragrant, remove and add to a bowl.
  6. Combine with the chopped spring onions, coriander and the chopped nori sheets.
  7. When the rice is ready, drain well. Immediately add the bowl of coconut and herbs and squeeze in the juice of the lime. Place a lid on top and keep warm.
  8. Remove the salmon skewers from the fridge and heat a frying pan until hot and add a tsp of oil.
  9. Sear the skewers on both sides to get a lovely caramelised effect all over. Add the rest of the marinade to the pan (it will sizzle) and then immediately transfer the skewers and the pan juices to the baking tray. Pop in the oven for 5 minutes to finish the cooking.
  10. Meanwhile, plate up the rice in warm serving dishes. After 5 minutes check the salmon is tender and cooked through but just pink and remove from the oven. Top your Thai rice salad with the kebabs and any extra chopped coriander to garnish.

Jess - Salmon and Thai rice2

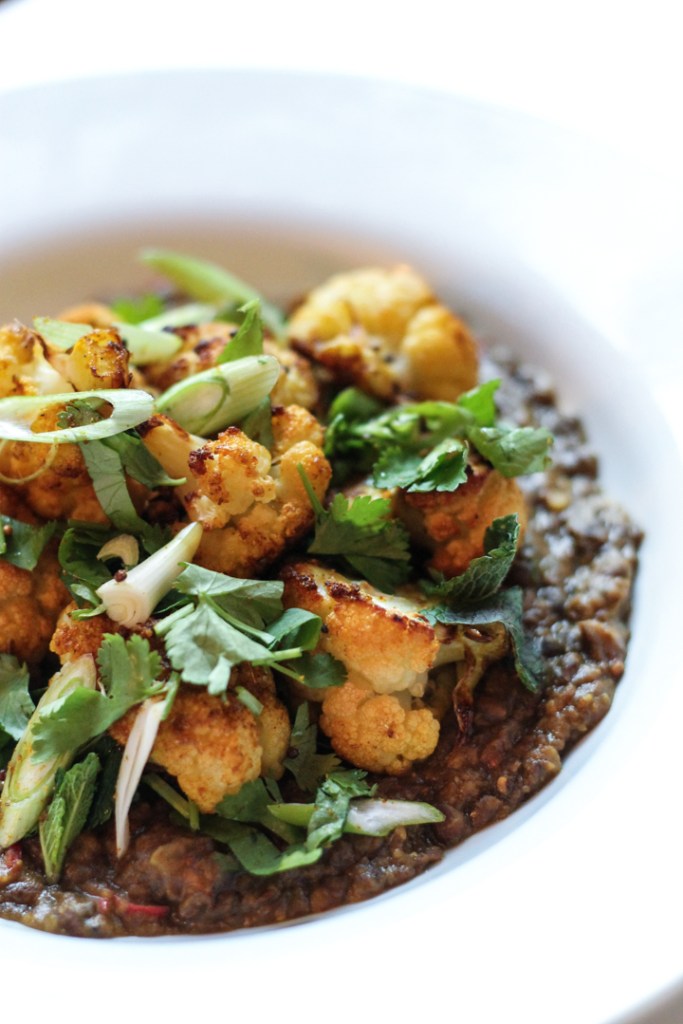
Dahl, Roasted Curried Cauliflower, Shredded Duck in Lime

Jess - Dahl and Cauliflower duck

Jess - Dahl and Cauliflower

Y

ou won’t be surprised to hear it was another week of stressful and busy work so the long weekend glowed like a beacon on Friday evening with promises of yoga, long runs in the sun and some experimental time in the kitchen to blog and relax the mind. I woke to a beautiful sunny day and after a long run to clear the working cobwebs I was already on my way to some downtime. All that was required was some time in the kitchen.

With a stressful period at work keeping 90% of my mind on the task it was time to start planning my second supper club to focus and begin that excitement again! With the date confirmed and inked in the diary I was more than eager to start developing the menu! With just over 2 month before the (second) big day it might seem premature but to get the invites and advert out as soon as possible and the ticket confirmations rolling in the menu was vital. Starter done. Dessert done and obviously featuring ice cream the main needed some attention. With the somewhat limited kitchen facilities and equipment of my cosy, niche and atmospheric chosen venue the dish needed some attention. Ambition needs to be carefully managed and focussed int he right direction.

While flavour is key here using wholesome ingredients cooked from scratch I wanted a menu that would make my potential guests salivate on reading and be booking tickets on autopilot before they could say ‘Deliveroo’! Flavour vital but practicality is also a contender here when cooking solo for 30 paying guests. And in addition economics, aesthetics and style are also important. Factoring all these competing aspects and a love of all things spice this punchy dish was created. I won’t give anything away but the next supper club main with feature something along these lines…

Serves 4

  • 4 duck legs
  • 1 x speedy dahl recipe (see here) with juice of 1/2 lime added at the end.
  • 1 cauliflower, cut into florets
  • 1 tsp turmeric
  • 1 tsp curry powder
  • 1/2 tsp of black mustard seeds and cumin seeds
  • 3 spring onions, sliced on the diagonal
  • Handful of mint leaves, roughly chopped
  • Handful of coriander leaves, roughly chopped
  • 1 large lime
  1. Preheat the oven to 200°C. Season the duck legs and roast for about 40 minutes in the oven.
  2. Scatter the cauliflower florets in a large baking tray and drizzle with a good glut of olive oil.
  3. Toss in the curry powder, turmeric cumin and mustard seeds and stir to coat. Add some seasoning.Jess - Curried Cauliflower2Jess - Curried Cauliflower
  4. After the duck has had 20 minutes of roasting add the cauliflower to the oven and roast for 20 minutes.
  5. Meanwhile make the dahl and set aside to keep warm.
  6. Once the duck and cauliflower are ready remove from the oven. leave the duck to rest for a few minutes before shredding the meat into a warm bowl with two forks and quickly squeezing over the juice of the fresh lime.
  7. Toss the warm cauliflower in the spring onions and herbs.
  8. To plate up, ensure you have warm shallow serving bowls or plates and spoon a generous spoonful of dahl onto the bottom and let it ooz out onto the plate. Top with a handful of the cauliflower before finally topping with a quarter of the shredded duck
  9. Serve immediately while still warm and devour! Serve with warm homemade flatbreads or roti if needed.

WINE: This would be great with an aromatic white such as a Riesling or a Gervertz to balance the spice.

Jess - Dahl and Cauliflower2

Crispy Asian Beef

I

f you’re intending on sticking to or continuing to stick to a healthy diet this month after the indulgences of Christmas then I recommend Asian food as a good go to. It packs a reliant punch on flavour without compromising on health and nutrition. Not to mention that this is a really quick recipe and can be served out in about 20 minutes.

As a passionate cook and appreciator of food I have always been the type to savour my meals either for flavour or appreciation for the time and effort spent creating it – either by myself or more importantly a fellow cook. However, I can’t help but notice that many of us eat too fast. Not only does this encourage us to be unappreciative of the food, time and effort that has gone into making it but you cannot appreciate and savour the flavours. Sticking to the topic of nutrition and health this month, on a nutritional side the faster you eat the more chance you have of overeating. Eating slowly allows your stomach to register satiety at the right time. It also helps improve your digestion. Hand in hand with this I also recommend chewing your mouthfuls more to aid speed and digestion. Just putting down your fork (or chopsticks) after eat mouthful to enjoy, talk to your dinner friends and take your time is such a great habit to get into.

That said, a great way to get into this habit if using chopsticks! Not only is it fun and authentic but if you’re anything like me and still learning you can’t help but eat slowly…if at all. So obviously have a fork ready to hand to prevent starvation.

NOTE: Quite without meaning to I’ve created a gluten free meal using my stash of ‘Clearspring Gluten Free Brown Rice Noodles’. Asain food is a great go-to is your are gluten free. As I say, it packs a punch on flavour without compromising nutritional requirements.

Serves 2

  • 250g beef mince
  • 1 thumb size knob ginger, finely shredded
  • 1 large garlic clove, crushed
  • 1/2 red chilli (hotter the better here)
  • 1 star anise
  • 1 tbsp sunflower oil
  • 2 tbsp soy sauce
  • 1 tsp sesame oil
  • 1tsp fish sauce
  • Bunch coriander, chopped
  • Bunch basil, chopped
  • 4 spring onions, chopped
  • 100g ‘Clear Spring’ ‘Gluten free brown rice noodles’
  • 1 tsp sesame oil
  • Juice 1 lime
  • Serve: I recommend a nice lime juice covered fresh crispy salad e.g. Cos lettuce, grated carrot, bean sprouts, cucumber etc
  1. Submerge and soak the noodles in boiling water for at least 10 minutes. Set aside kept warm until ready to serve.
  2. Heat the sunflower oil in a frying pan or wok on a high heat. Add the beef mince and use a spatula to break up the pieces into chunks. then add the star anise. Fry on a high heat for about 5 minutes until the mixture begins to brown well and crisp up. Keep an eye on it moving the mince around continuously.
  3. After about 5 minutes when well browned add in the ginger, garlic and red chilli and continue to fry on a high heat until the meat is really browned and crispy as below.
  4. After about 5-10 minutes add the soy sauce, sesame oil and fish sauce and stir to combine. Cook until really dark and crispy to your liking.
  5. Remove from the heat and stir in the chopped spring onions, coriander and basil
  6. Drain the noodles and squeeze over the lime juice and add the sesame oil
  7. Serve the noodles in warm bowls and top with your crispy beef piece and a lovely crunchy fresh salad.
  8. Jess - Crispy Asaian Beef 2


Dorset Apple Cake


T

here is nothing like a bit of baking on a cold, drizzly weekend to ease and nourish the soul and there is nothing like the warming spices of cinnamon and ginger combined lovingly with a spongey sweet cake and some juicy sharp seasonal apples to bake! Devoured cold with a warm brew or warm and spongy with lashings of Ambrosia, ice cream or just a trowel-ful of clotted cream you’ll fail to not be comforted by this festive tray bake. Open to additional ingredients this cake batter would be beautiful marbled with chunks of sweet marzipan or topped with some flaked almonds or toasty pecan nuts.

Adapted from Marry Berry

Makes about 18 large pieces

  • 3 large cooking apples (About 550g)
  • 1/2 lemon
  • 225g unsalted butter
  • 225g light muscovado sugar
  • 300g self raising flour
  • 2 tsp baking powder
  • 1 large heaped tsp cinnamon
  • 1 tsp ground ginger
  • 4 eggs
  1. Preheat the oven to 180°C and grease and line a tray bake tin (about 30cm x 23cm)
  2. Peel, core and quarter the apples. Slice each thinly and place in a bowl. Squeeze over the lemon to prevent browning.
  3. Now, using an electric hand mixer or food processor, blend the butter, sugar, flour, baking powder, half the cinnamon and ginger together before adding the eggs. Beat well adding a splash of milk to loosen for a few minutes until golden, glorious and combined.
  4. Spoon half into the lined baking tray. Top with halve the apples slices scattered randomly but evening over. Sprinkle over the remaining cinnamon
  5. Spread over the remaining batter and even out with a pallet knife
  6. Top with the remaining apples slices, pushing them into the batter slightly.
  7. OPTIONAL: Top with flaked almonds or nuts or a sprinkle or crunchy demerara sugar.
  8. bake for about 40 minutes until golden, spongey and firm and just communing away from the sides of the tray.
  9. Leave to cool before cutting. Serve warm with ice cream, custard or cream or at room temperature with a nice cup of tea!

Jess - Dorset Apple Cake3

Beef Rendang

I

‘ve been looking for a cold carefree weekend to indulge in this slow cooked curry for ages but with long busy working days, midweek life hasn’t obliged. I love any form of slow cooking and coupled with my more recent love and commitment to the Asian flavours of the East they are combined lovingly here in a comforting wintery curry that while warming the heart will also transport you to the sunny climates of Malaysia….of Bruges!?

Bruges might not seem like the most logical inspiration but a quick hop skip and jump over to Belgium for the evening promoted this weeks blog post! The cold chilly weather, the (sadly) persistent rain and the festive Chrismassy lights was cue for something warming on return to the UK. But my main incentive starts with beer.

Histroical, medical and romantic, Bruges is a small and compact little city. But it has without a doubt the highest concentration of chocolate shops and beer merchants littered on every corner! Belfry view done and canals walked it was time for the brewery tour!

Processed with VSCOcam with f2 preset

image3

image5

O

ne of the oldest breweries left in Bruges, De Halve Maan promised history and charm and certainly delivered. We began in the brewing room before winding our way romantically around the high beams and rafters of the old listed building from cold cellar to the top of the roof before ending up in the restaurant bar, rewarding beer in hand, leather sofas and a warming fire to dry our wet feet. With Belgium beer on tap we drank away the rainy afternoon with a platter of meat and cheese and long outstayed our welcome.

Processed with VSCOcam with f2 preset

Processed with VSCOcam with f2 preset

S

o on return home and that carefree Sunday afternoon to indulge, we drank our loot with this warming curry.

Serves 3

  • 500g braising steak, chopped
  • 1 red onion, chopped
  • 3 garlic cloves, chopped
  • 1 large red chilli, chopped (a hot as you dare!)
  • 2 inch large piece ginger, chopped
  • 1 tsp tumeric
  • 1 lemongrass, bashed roughly
  • 15 g tamarind paste (about 1 tbsp)
  • 1/2 tbsp brown sugar
  • Large pinch ground coriander and cumin
  • 2 kaffir lime leaves
  • 5 cardamon pods
  • 1 star anise
  • 1 cinnamon stick
  • 5 tbsp desiccated coconut
  • 350ml coconut milk
  • Rice, lime and coriander to serve
  1. Preheat the oven to 160°C.
  2. Start by making the paste. Place the onion, garlic, chilli, ginger, turmeric, lemongrass, tamarind and sugar in the bowl of a food processor and process until you have a fine paste.
  3. Heat 1 tbsp of sunflower oil in a large ovenproof saucepan/casserole dish over a medium heat. Cook out the paste for about 5 minutes but don’t burn or let it catch. Next add the lime leaves, cardamon, star anise and cinnamon stick.
  4. Add the chopped beef and cook for 10 minutes on a medium high heat until starting to colour and brown.
  5. Meanwhile, dry toast the coconut in a hot frying pan until golden brown and toasted (careful not to burn). Set aside.
  6. Next add the ground spices and the coconut milk to the beef.
  7. Bring to the simmer and mix well. Add the coconut. Place in the oven with a lid for 1 1/2 hours .
  8. During this time, check and stir occasionally. After this time, check the thickness of the sauce. If it needs to be reduced, remove the lid and placed back in the oven for 5 minutes or so or reduce on the hob. Add a splash more coconut milk if it looks too dry.
  9. Serve on warm rice dressed in lime juice and scattered with coriander.