Posts tagged peas

Spring Stew

T

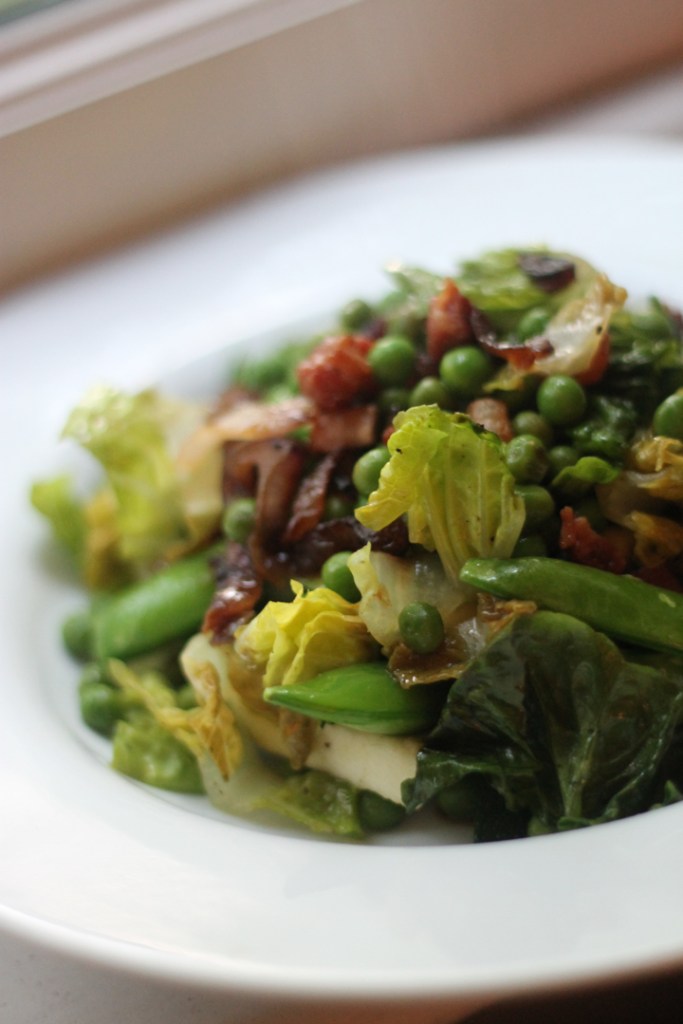
his green spring stew celebrates vegetables but warms the stomach and is a nice transition from a cold Spring day to a Summer evening! You can absolutely experiment with adding different vegetables such as those listed below – weights and measures are also very rough here. Use your hands and throw things in! Just be concious of the cooking times of the different vegetables you choose – asparagus will need to just touch the heat before its overcooked, while green beans will need a little more time. So add these along the way accordingly. Open to variation but the lardons and garlic provide a good foundation and depth of flavour to build on so I recommend these as a must.

I cooked and served this with a delicately fried piece of seabass but a pan fried fillet of soft pink trout would be an excellent and seasonal choice. Topped with a dollop of homemade and indulgent hollandaise (see here) if you want to take this to a higher level or add another dimension.

Serves 2

  • 2 x seabass/seabream/trout fillets
  • 300g frozen garden peas (approximate weight)
  • 2 x little gem lettuce, chopped roughly
  • 200g smoked bacon lardons
  • 200g sugar snaps peas/green beans/asparagus tips/chopped courgettes (or a mixture of them all)
  • 1 red onion, sliced thinly
  • 1 large garlic clove, chopped finely
  • 1 bunch flat leaf parsley, chopped
  • 1/2 lemon, juice only
  • 1/2 stock cube
  • 1 tbsp soft unsalted butter (For the beurre manie, see Cheffy Tip!)
  • 1 tbsp flour

Cheffy Tip: I often use a ‘beurre manie’ (aka, kneaded butter) when I want to thicken a sauce but not make a white sauce or a roux. When you make a casserole and the sauce is a bit thin, or when you want to make the juices in a pan a bit thicker this is your tactic! When you mix the butter and flour into a paste, you coat the flour in butter particles. That way, when you stir this paste into hot sauces and liquids, the butter melts and distributes the flour particles evenly ensuring there are no lumps! (Ideally). You can make a small bowl and then add in tablespoons bit by bit until the thickness desired.

  1. Heat a splash of olive/sunflower oil in a frying pan and sauté the red onion for 8-10 minutes until translucent and softening. Continue cooking until they begin to turn a little golden but don’t burn. Season well.
  2. Add the garlic and cook for a few minutes only.
  3. Add the bacon lardons and cook through until crispy.
  4. Crumble the half stock cube into a mug and add some hot water (about 300ml but its not exact, you won’t use it all, it will have to be used by eye)
  5. Add the frozen peas and toss briefly. You now need to work quickly as the pea, sugar snaps and lettuce will cook fast and you don’t want soggy overcooked fresh greens! Ideally the vege/lettuce should be al dente.
  6. Pour a good splash of the hot stock into the frying pan, enough so that there is a ‘sauce’ that will simmer you veges but not so that its swimming! You don’t need to use all the stock but its there to balance the sauce as you wish. Bring to a simmer.
  7. Meanwhile, in a small bowl mash the soft butter with the flour to a paste until dough like (this is called a ‘beurre manie’). Whisk this quickly into the liquid in the frying pan – I stress quickly to ensure no lumps. This ‘paste’ will thicken the sauce but ensure no lumps. Simmer very gently and you should see the sauce start to thicken a touch. Make/add more more paste as needed if you’ve added lots of stock.
  8. Once you’ve done this, add the chopped little gems and the vegetables of choice and cover the pan with a lid. Let the heat and sauce steam the veges just a touch to let it warm but not go too soggy.
  9. The ‘stew’ should have a thick gravy like sauce but its shouldn’t be swimming in moisture so if it is, just turn the heat up a notch and reduce some of the liquid down. Remove the pan from the heat when ready, check and season as needed and scatter in the chopped parsley.
  10. Finally, add a good squeeze of lemon for seasoning.
  11. Enjoy with a pan fried fillet of fish or steamed cod. Trout would be a great addition here.

Ricotta Gnudi with Chorizo and Peas

Jess - Gnudi5Jess - Gnudi7

T

hese little gnudi pillows are a lighter take on the chewier gnocchi – a potato based recipe –  and instead use creamy ricotta and very little flour to form a creamy and lovely textured equivalent. Historically they are known in Italy as ‘naked’ ravioli. Use your imagination….these ones however are clothed in a simple buttery lemon sauce. A delicious end to whats been a temperamental June weekend. Glorious sun one minute and torrential rain the next. Since the gardens and parks are in full green bloom with all the nourishing rain, a dinner inspired using fresh summer vegetables here makes them not an addition to the gnudi main event but an equal partner.

This recipe is speedy to knock up especially once you’ve fried the gnudi. Simply toss together the blanched vegetables in some buttery lemon and voila…you have a perfect summers meal!

Feel free to use any range of vegetables. Sliced blanched asparagus would be glorious here when in season perhaps with pancetta instead of chorizo. Or try string in some last minute wild garlic leaves, basil or mint.

Serves 2

Gnudi

  • 250g  ricotta cheese
  • 60g plain flour
  • 1 large egg, beten
  • 20g finely grated parmesan (plus more for garnish)
  • Grated zest 1 lemon
  • Salt and pepper

Sauce

  • 1/2 lemon
  • 100g peas
  • 100g broad beans, podded (or any other summer green veg enough for 2)
  • 100g chorizo, sliced on the diagonal
  • 40g unsalted butter
  • Handful chopped chives
  1. Begin making the gnudi. Combine all ingredients into a bowl and mix until well combined.Jess - Gnudi
  2. Tip out onto a floured surface and roll into a log shape (as thick as you like). Add a little more flour if needed. The texture should come together and not be wet but it will be very soft and pillowy like dough. Quite fragile.
  3. Chop into gnudi pieces (mine were about 2 inch long) and place on a tray until ready to cookJess - Gnudi2
  4. Bring a pan of water to the boil and blanch your vegetables of choice and then drain and set aside.
  5. Using the same pan, season the water and poach the gnudi for a few minutes. They will rise to the surface and float once cooked and ready. When this happens, use a slotted spoon to drain and place on a lined tray. Keep the water for the sauce.
  6. Heat a frying pan and add half the butter and a little oil. Heat on a high heat and then fry the gnudi until golden brown all over. Place on a warm plate and keep warm once golden.
  7. Jess - Gnudi3
  8. In the same pan, add the sliced chorizo and fry just until beginning to crisp.
  9. (You need to now work quickly to prevent the vegetables decolouring). Add the vegetables – peas and beans – to the chorizo in the pan and season.
  10. Next add in the rest of the butter and stir to emulsify the sauce. Add a splash of the gnudi poaching water.
  11. Simmer and then add the gnudi to the mixture and warm through and coat in the buttery juices.
  12. Finally, when all warmed through, squeeze over the lemon juice and the chopped chives.
  13. Serve in deep warm bowls topped with any reserved chopped chives and some more grated parmesan

Jess - Gnudi4


Tofu, Mushroom and Seaweed Kale

Jess - Ingredients

A

 vegan dish was a palatable challenge for me I’ll admit. In a world where butter dominates the foundations of my recipes like culinary cement; I was skeptical. No butter? You heard correctly…no butter? However, with a goodie bag of Japanese inspired ingredients from Clearspring, whose vast array of cultural delicacies regularly glare at me temptingly from their own region of the supermarket, I thought I’d experiment and I can safely say that butter wasn’t missed here!? With the divergence in diets and intolerances infiltrating our British habits in what is perhaps a foodie fad or otherwise, I thought I’d better jump on the diary and meat free band wagon and see if soya and tofu could satisfy my taste buds. With fish and vegetables dominating my diet already I was keen to see what the removal of dairy would have to offer.  I enjoyed this meal twice this week which is surely enough said. One evening using nutty pearl barely and the other using some of Clearspring’s gluten free brown noodles. Both delicious and fresh.

Gluten, diary, meat and nut free I think this one deserves the intolerance crown.

Serves 2

  • 1 box mushrooms (250g). Mixed such as shitake, oyster or chestnut
  • 1 small handful dried mixed wild mushrooms, soaked in boiling water for 15minutes then chopped roughly
  • 1 garlic clove, crushed
  • 1 tsp sesame oil
  • 1 tbsp sunflower oil
  • 80g pearl barely/80-100g brown rice noodles
  • 200g kale
  • 100g peas
  • 4 spring onions, sliced
  • 1 tbsp Clearspring seaweed flakes OR Welshman’s caviar
  • 1 tbsp Soy sauce
  • Handful of coriander leaves, chopped
  • 100g cubed tofu (optional)
  • 1 tbsp black sesame seeds (optional)
  1. Start by either soaking your noodles in hot water for 30 minutes covered or simmering your pearl barely for 25-30 minutes in hot water under tender. Drain well and drizzle with the sesame oil and keep warm.
  2. Heat a frying pan over a medium heat. Gently soften the sliced spring onions for about 5-8 minutes until just beginning to brown and season. Once softened, place in a bowl and set aside keeping warm if you can. These will be combined with the cooked kale later.
  3. Heat the same frying pan again until hot. Add the sunflower oil. Chop the mushrooms roughly into hearty chunks and gently fry for about 10-15 minutes with plenty of salt and pepper to cook and crisp up the mushrooms. They will release a little moisture so keep frying to evaporate this off and brown and crisp them up slightly.
  4. Meanwhile, cook your kale in a pan of boiling water for 1-2 minutes. Add the peas and bring back to the boil. Once boiling remove from the heat and drain well allowing all the moisture to drain.
  5. Tip back in the pan, add 1 tbsp soy sauce and the seaweed flakes. Add the reserved spring onions and mix. Place the lid back on a keep warm while you finish the mushrooms.
  6. When the mushrooms are ready, crisp and delicious add the garlic and allow to cook for a few more minutes. Then turn up the heat and add the chopped rehydrated dried mushrooms, the noodles or pearl barely and fry for 1-2 minutes to reheat and combine the flavours.
  7. Optional here, add some cubed tofu and heat through and scatter with the coriander.
  8. Serve the mushrooms on top of the kale and garnish with black sesame seeds if you like

Crusted Cod, Balsamic Lentils, Chorizo, Pea, Mint


image

This recipe was thrown together after I caved as I frequently do to the delights of Portobello market at lunchtime yesterday. Sometimes I leave my purse in the office just to prevent myself buying anything I don’t need. What with that and an ‘All Saints’ up the road I could be in serious trouble. I saw some fresh peas crying out (literally…how could I leave them) to be stripped and podded from their padded overheated jackets now the sun is out and with some oily and spicy chorizo in the fridge at home they were immediately planned for supper.

image

image

Serves 2 (as with many of my recipes, this is done with the ‘handful’ measurement so scale up as appropriate. I usually allow 1 handful per person for things like peas etc)

  • 2 cod fillets
  • 2 Large handfuls of breadcrumbs (About 30-50g)
  • Bunch flat leaf parsley
  • 1-2tbsp extra virgin olive oil
  • 1 large garlic clove, crushed
  • 4 oz Puy Lentils
  • 1 tbsp balsamic vinegar
  • About 500g fresh peas in their pods, 250g shelled (of two large handfuls of frozen peas)
  • 50g chorizo, chopped into chunks
  • Handful chopped mint
  • Green beans to serve
  1. Begin by simmering the lentils for about 18-20 minutes until tender
  2. Meanwhile, whiz up the bread crumbs in a processor until fine and then add the parsley and some seasoning and blend until all chopped together. Add enough oil to bind the mixture together so it isn’t too dry.
  3. Preheat the oven to 200°C and line a baking try with foil. Place the cod fillets  skin side down on top and pat a large handful of the breadcrumb coating onto the top. (add more oil to the mixture if it looks a bit dry and won’t hold together).
  4. When the lentils are cooked, drain and set aside. Fry the crushed garlic in a little oil to soften on a low heat. Once soft, turn up the heat and add the balsamic and let it simmer for a few seconds before tipping in the lentils and seasoning to taste. Keep warm while you cook the fish.
  5. Bake the cod for about 6 minutes until just cooked and flaky and the breadcrumbs have started to brown and crisp on top.
  6. Lastly while the cod is cooking fry the diced chorizo in a hot pan until the oils begin to release. Add the peas (which you can par- boil first if you like but I love them raw and green) and coat in the lovely orange oil.
  7. When ready to serve, place the cod on top of the warm lentils and spoon the pea and chorizo around the edge. Drizzle with any remaining oil from the pan and scatter with mint.
  8. Serve with buttered and minty green beans if you like!

image

image

Spring Supper (Seabass, minted pea puree, roasted parsnips, chorizo)

image

Finally the evenings are getting longer and the evening light is perfect for photography and dining in the sun (not warmth quite yet unfortunately). Home to the countryside for Easter weekend and the warm days continued. Good Friday called for good food. Naturally. This dish seemed to personify the start of spring and a spring cleaning of the diet and lifestyle. Except if you’d given up chocolate for lent that is. You folks will probably be in a cocoa comma still….this dish may help?

Serves 2

  • 2 seabass fillets
  • 250g peas
  • Handful mint leaves
  • ½ lemon, juice
  • Large knob butter
  • 100g chorizo, chopped
  • 2-3 parsnips, peeled and sliced
  • 4 tbsp grated parmesan
  1. Parsnips – season well and coat in olive oil. Roast at 200°C for 25-30 minutes until tender and crisp.
  2. Parmesan wafer – Line a baking tray with non stick parchment and spoon the parmesan into a cookie cutter to form a circle – don’t be tempted to press the cheese down as it will melt on cooking. Bake for 5 minutes at 200°C until melted and golden. Remove from the oven and leave to cool before peeling gently from the parchment.
  3. Minted pea puree – boil the peas with half the mint leaves for a few minutes until soft. Drain while reserving the minty cooking water and tip into a food processor. Add a large knob of butter, salt and pepper, the fresh mint leaves, lemon juice and blend to a puree. Add some of the reserved cooking water a bit at a time to thin it down until you reach the desired consistency.
  4. Chorizo – heat a frying pan until hot. Fry the chorizo in the dry pan until it starts to release its oily juice and crisp up. Keep warm.
  5. Seabass- season the seabass fillets well making a slit in the skin side to stop it curling up on cooking. Coat in a light drizzle of olive oil. Heat a frying pan to a medium-high setting and fry the seabass fillets, skin side down, for about 3 minutes until crispy skinned and mostly cooked. Turn for the final minute to finish the cooking and squeeze with a splash of lemon juice.
  6. Top serve – lay the roasted parsnips on the plate and spoon on some pea puree. Top with the seabass and spoon over the chorizo and drizzle with some of the oils. Complete with the parmesan wafer!

Delicious served with a chilled glass of Italian, Puglian Verdeca. I had the pleasure of working at a recent event with the producer – Masserai Li Veli. Delicious. humble and organically produced wines. See here for where to buy some!

imageimage

Black pudding, Minted Pea Puree, Apple

I completely understand that black pudding is not for everyone’s palate or psychological well being. However I loose my reluctant understanding for the folk that have never sampled this fine delicacy but screw up their faces with such sincere disapproval as if instead I had announced my chosen career path as a stripper! (Case #1, my sister. And we’ll soon know if she’s actually been reading my blog if I hear her wining tones at this comment). If you’ve never tried black pudding then who knows- you could have wasted years rejecting something delicious so this recipe is a fine way to start.

I usually default away from making cliche recipes in my desperate need to experiment at any occasion that calls for food but sometimes I must admit you can’t beat the satisfaction and comfort of a classic. And, lets face it, they exist for a reason and black pudding and pea really is a classic example of two deliciously matched soul partners of the food world. Peas are sweet and fresh which is the perfect harmony for the fatty and rich black pudding. What could be more unfussy and simple than a pile of minted pea puree with a crispy fried slice of black pudding resting lazily on top….

  • A bowl of peas (a good handful per person)
  • Small bunch of mint, leaves picked
  • Knob of butter
  • Black pudding slices (1-2 slices per person)
  • 1 apple (serves 2 people)
  • Lemon juice
  1. Boil the peas for a few minutes and then drain.
  2. Place in a food processor with some generous seasoning the knob of butter and the mint leaves and blend to a puree adding a little warm stock or boiling water to loosen to the desired consistency. Alternatively, without a processor you could eat this as a coarse pea mash which would be equally as delicious.
  3. Cut your apple into matchsticks with a sharp knife and set aside in a bowl with a little squeeze of lemon juice to prevent it turning brown and a little seasoning.
  4. Heat a frying pan until hot and add a tiny drop of oil if you wish. Fry the black pudding for a few minutes on each side until crispy and cooked through.
  5. Serve on top of your warm pea puree and top with a handful of the crunchy apple matchsticks.
  6. Drizzle with a little oil and a scattering of mint leaves and serve.

image

If you’ve been converted to black pudding then here are a few more of my favourite delicious ingredients that go well with it:

  • Butternut squash
  • Blue cheese
  • Pear, apple
  • Roast pork, belly is good
  • Cauliflower
  • Fennel
  • Mushrooms
  • Thyme, rosemary
  • Prunes
  • Eggs (especially little fried quails eggs)
  • Chicken, rabbit, monkfish (stuffed with black pudding)
  • Oh and of course, a fry up…..

image

Black pudding stuffed chicken in a mushroom and red wine sauce, wet polenta and garlic kale (Serves 4)

  • 4 free range chicken thighs, skin on, bone removed
  • 4 chicken drumsticks.
  • 2-3 large thick slices of black pudding
  • A few rosemary sticks, leaves picked and chopped
  • Thyme, leave picked
  • 1 red onion, chopped
  • 1 large glass red wine
  • Stock – beef for a rich sauce, chicken for a lighter one
  • 1 handful of dried wild mushrooms
  • 150g quick cook polenta
  • 400ml milk
  • Knob of butter
  • 20g grated parmesan
  • Kale
  • 1 garlic clove, chopped finely
  1. Preheat the oven to 180°C. To start, heat the milk and the same amount of water in a sauce pan and add a few peppercorns and a bay leaf. Just before it comes to the simmer remove from the heat and leave to infuse to use in the polenta later.
  2. Crumble the black pudding into a bowl and add the thyme. Mash until paste-like. Open up the chicken thighs and stuff a spoonful of the black pudding inside and roll up. You can secure these with the rosemary sticks if you wish. Season the skin well. Stuff this black pudding mix under the skin of the drumsticks too and season.
  3. Fry the red onion in a little oil until soft and then add the rosemary leaves. Add the red wine and simmer briefly before adding the mushrooms which will soften in the liquid and remove from the heat
  4. Place in a casserole dish and add the chicken pieces so they fit tightly. Add enough stock to come most of the way up the sides of the chicken so that the chicken can poach and roast gently as it cooks being careful not to pour it over the skin or you won’t get a crispy skin (we can’t have that!)
  5. Place in the oven and cook for about 30-40 minutes until the chicken is golden, cooked through and the sauce is bubbling away nicely.
  6. Meanwhile, tip the kale into boiling water for a matter of 30 seconds to wilt but drain it quickly while still bright green, soft and full or nutrients. Leave to drain the excess moisture. Heat a little oil in your frying pan from before and gently fry your garlic over a very low heat being careful not to burn it. Add the kale and a knob of butter and stir to combine. Set aside to keep warm.
  7. I suggest leaving the polenta until last minute as it won’t wait so see to the kale first and then the chicken. Once the chicken is cooked remove from the sauce and leave to rest in a warm place. The sauces thickness with vary depending on how much stock you added but to thicken (which is what I needed to do) mix a tbsp of butter and flour in a mug until you have a paste. Whisk this paste into the red wine sauce until smooth and the sauce will begin to thicken without being lumpy. Set aside to keep warm.
  8. Before you cook the polenta, make sure you’re ready to go -plates warming, guests hungry, wine open and aerating!
  9. Drain the milk from earlier and bring to the simmer. Whisk the polenta in a steady stream into the milk and stir continuously as it will thicken immediately. Let it bubble for a minute until smooth and creamy. Stir in the butter and cheese and some generous seasoning (it will need salt) and taste.
  10. Spoon into bowls immediately and top with a chicken thigh and drumstick each and a generous spoonful of the mushroom sauce.
  11. Sit aside some warm garlicky kale and serve on a wild and windy evening with a bold punchy glass of red.

WINE RECOMMENDATION: This weekend I tried Waitrose’s Vina Valdivieso Chilean Cabernet Sauvignon from the Maipo Valley. It was bold and had lovely dark berry and fruit flavours and some menthol notes to it. Delicious with the rich black pudding.

image

Waitrose £9.99

Persian Pulled Lamb, Cauliflower Couscous, Pea Puree

image

image

A weekend of much need experimental cookery and kitchen therapy. I was craving an experiment in the kitchen and with the flat to myself, Julie & Julia playing away on repeat and the sun shining, this is what I churned out.When coming up with new recipe ideas and dishes I seem to find myself just thinking of my favourite flavours and seeing how I can wind them selfishly into the final product. This was wonderfully indulgent whilst being relatively healthy and undeniably tasty. The various textures keep it interesting and the strong flavours keep the healthy aspect well hidden.

I recently ventured to the ‘Wild Food Cafe’ (see here) tucked snuggly away in the Bohemian Neal’s Yard in Covent Garden. Located above the renound Neal’s Yard Remedies and around the corner from the infamous Neal’s Yard Diary it was sure to combine many of the local gems of the area that make Borough Market what it is. Oh and not to mention Monmouth Coffee tucked around the bend. As a ‘raw’ food cafe serving raw and healthy dishes the nutritious menu was right up my street. A menu that would have even the most devoted vegan speechless at the lack of opportunity for stereotypical complaining, I tried some interesting new delights (see below). So, I was inspired to do something back home in the raw style. I can see the attraction of having a raw food element in your diet. Gentle or little cooking maintains the important nutrients, but living a life on raw is unrealistic and downright boring if I’m honest. I was surprised not to have seen this ‘of-the-moment’ and stylish cauliflower couscous on the menu but its been on my ‘to cook’ list for long enough and now seemed like an opportune time to add texture to this lovely dish.

Serves 4

Pulled Lamb

  • 1 small shoulder lamb
  • 1 sprig rosemary, leaves picked
  • 1 sprig thyme, leave picked
  • 2 garlic gloves, chopped
  • 1 tbsp Ras el Hanout
  • Olive oil
  • 1 small glass white wine
  • 1 red onion. quartered

Pea Puree

  • 400g peas
  • Generous knob butter
  • Bunch mint, leaves picked
  • Vegetable stock
  • Salt and pepper

Cauliflower ‘Couscous’

  • 300g cauliflower florets
  • Large bunch mint, leave picked
  • Large bunch coriander,
  • 1 lemon/orange zest and juice
  • 60g flaked almonds
  • Salt and pepper
  1. Preheat the oven to 160°C. Place the red onion in the bottom of a  roasting tin or a large casserole dish.
  2. Chop the rosemary, thyme and garlic finely together. Sprinkle the ras el hanout over the lamb with a few glugs of olive oil. Massage the spices into the meat and then add the herbs and garlic and coat the lamb.image
  3. Place the lamb on top of the onion and pour the wine around the bottom. Cover the pan with a lid or cover with foil and roast for 3 hours. Top up with a little water now and again if drying to prevent the bottom catching. After this remove the lid/foil and turn the heat up to 180°C to brown the lamb.
  4. Once cooked, remove from the oven and leave to rest while you make the side dishes.
  5. For the ‘couscous’, toast the flaked almonds in a dry frying pan until lightly brown. Pulse in a food processor until fine and the texture of couscous and place in a large bowl.
  6. Pulse the cauliflower florets in the processor similarly until you form a couscous like texture. Tip into the bowl with the almonds.
  7. Chop the herbs finely and add with the citrus zest to the bowl. Add a squeeze of the citrus juice, season and stir to combine and set aside at room temperature.
  8. Once ready to serve, boil the peas for a few minutes in the stock. Transfer them to the food processor (reserving the stock) with the mint leaves and the butter. Season and add a little of the cooking stock to loosen and puree until smooth.
  9. Carve or pull the slow cooked lamb into chunks and serve on top of the warm pea puree with the couscous on the side.

Tomorrows leftovers fried until crispy in the warm hands of a soft flatbread topped with some lime yoghurt and salad is nearly as good as the main event!

A brief review…..The Wild Food Cafe, Neal’s Yard, Covent Garden

On entering the Bohemian cafe we were met with long, packed communal tables with happy chatting diners. The odd tyedye t-shirt, flowery head band and a more than average number of dreadlocked men mirrored the my initial expectations. After a helpful and sincere welcome from the team, we sat positioned next to some whirring suspect machines that we soon learned were churning away the homemade chocolate and nut butters of which I am a fan of and have made in the past- a good start. The menu was really interesting and original. We dined on a superfood salad containing a handful of delights. Courgette noodles coated provocatively in a punchy mango dressing and some powerful fresh pesto eagerly wrapped around some grainy quinoa were just a few of the surprises in this supersalad. Their devine sprouted wheat bread, toasted, was hearty, malt-like and dense whilst their pumpkin seed ‘cheese’ was on par with the flavours of my pumpkin seed butter but with a cheesy and characteristic tang. Goodness knows how that was created but their raw cookery courses run in house during the week are a good place to start. But don’t be deterred by salad…the hearty falafel burger or the generously portioned ‘raw’ chocolate torte made with avocado and cocoa will satisfy any sceptic. And folks…if you have a taste card like myself then its 2-4-1! It was a mere steal at £13 for the two of us for lunch.

image

Pea, Mint and Black Pudding Fritters


image

If you’re cringing at the thought of black pudding, I’ll be candid- man up. Its no more ‘disgusting’ than eating meat surely?! If you’ve never sampled this cheap and tasty treat, at least try it! And hopefully, like me, on you’re first sample you’ll kick yourself at all the time you wasted not enjoying it! Its deep, rich flavour works amazingly well with the sweet flavour of peas…

This recipe is a bit like a previous post (see here) for pea fritters and if you know me you’ll know that I like to fritter things. Its so easy and you can do it with loads of different ingredients and flavours with whats to hand- as long as you have eggs and flour! Here I have simply added crumbled black pudding instead of the cheese in a previous recipe and some fresh mint. A delicious light lunch.

Serves 4

  • 125ml milk
  • 2 eggs
  • 30g cornflour
  • 100g flour
  • 250g peas
  • 100-150g black pudding (cooked and crumbled)
  • Large bunch mint, leaves picked and chopped finely
  • Handful of chives, chopped finely.
  • Lemon
  1. Boil the peas for a few minutes then run under cold water. Place half the peas in a food processor and puree.
  2. Sieve in the flours, some salt, pepper. Add the beaten eggs and milk and mix until smooth.
  3. Place in a bowl and fold in the whole peas and herbs and mix well with a squeeze of lemon juice. It should be fairly thick, enough to hold its shape in a pan. Finally crumble in the black pudding.
  4. Heat a frying pan to a medium heat and warm some sunflower oil
  5. Fry spoonfuls of the mixture (as large as you like) in the hot oil for a few minutes on each side until golden brown and set in the middle. Pat fry on kitchen roll and devour.

image

image

Lamb, Mint and Pea Salad


image

Leftover lamb never tasted better. Freshly cut herbs from the garden, a cucumber from the greenhouse and some leftover local lamb. A sunny evening called for a fresh cleansing salad to start the week on a healthy note. Although washed down with a large glass of Cab Sauv it probably had the opposite effect!

Not sure the picture does this dish justice but it is extremely tasty, particularly also crumbled with feta or goats cheese as well as or instead of the lamb for the veges.

Serves 3 as a main, 4 as a lunch or starter

Salad

  • 2 little gems
  • 1 romaine lettuce, shredded
  • 1 small cucumber, chopped on diagonal
  • 1 avocado, chopped
  • 1 lemon, juice
  • Handful pine nuts, toasted
  • Bunch mint, leaves picked and chopped
  • Bunch of chives, chopped
  • Leftover lamb, sliced- mine was rare roast butterflied leg but anything works well, shredded etc
  • 250g frozen peas, blanched

Oregano and Lemon Yoghurt

  • 6 heaped tbsp thick yoghurt
  • 1 small garlic clove, minced
  • Bunch oregano, leaves picked
  • ½ lemon juice and zest
  • 1 tsp extra virgin olive oil
  • Salt and pepper

Sun dried Tomato Bread

  • 250g self raising flour
  • 4 sun-dried tomatoes in oil
  • Bunch basil
  • Salt and pepper
  • Warm water
  1. Make the bread first. Blitz the sun dried tomatoes and basil in a processor until fine. Add the flour and some generous seasoning and blend. Pour in enough warm water until the dough comes together in a smooth ball. Turn out onto a floured surface and knead for a few minutes before leaving covered to rest.
  2. Mix the yoghurt ingredients and chill.
  3. Keep the stalks on the little gems to hold them together. Half each and cut each half into 3 keeping them together at the base.
  4. Mix with the blanched peas, shredded romaine, cucumber and chopped herbs on a large platter.
  5. Griddle the avocado on a hot oiled griddle pan until warm and charred. Season well and add to the salad. Squeeze over the juice from the lemon, a good splash of extra virgin olive oil and some seasoning and toss gently to combine.
  6. Sprinkle over the toasted pine nuts and finally the lamb.

image

7.  Heat a large frying pan. Roll the bread out to the thickness of a pound coin and big enough to fit the pan. Fry in the pan for about 5 minutes each side until toasty and beginning to char and crisp. Turn out onto a board and rip up and serve warm with the salad, dunked in the yoghurt or with some salted butter.

image

Quadruple Tapas

I know the concept behind tapas is to eat each dish as it is ready- picking at little morsels of delicious oily, salty and punchy delights to give all your taste buds a go on the flavour dodgems. A long evening should be spent savouring tapas with no where to be and sipping delicious wine in the summer sun. However, I decided to make a selection for dinner and couldn’t find the relaxing side of constantly running back and forth to the kitchen to fry a croquetas or bake some fresh bread or turn off one of 100 timers. So I made a selection all to be eaten and enjoyed together with some delicious wine. I won’t lie, my way took a strong organisation and a large accommodating hob but I managed it. In addition, I have a new found respect for tapas bars….the amount of work that goes into the prep to bring together all the aspects and flavours of just one small dish is huge,-all requiring those little details to make them perfect. I won’t be opening a tapas bar in the near future but what can be gained from this experiment is that 1) I LOVE tapas but will leave it to the experts and 2) I won’t be so horrified at the staggering prices of a few small tapas dish from now on as I venture out to dine thinking that ‘tapas is just a cheap meal right?’.

image

image

Croquetas (Makes about 9 large croquetas)

I first saw a recipe for these in a Jamie Oliver book which this recipe is based on but they are a common little tapas dish and various flavours and recipe derivatives can be found elsewhere. They are essentially a cheesy flavoured bechamel sauce that is cooled and set and rolled in breadcrumbs and fried so that the inside in a hot molten cheesy mixture hugged lovingly in a crispy coat. You can actually use anything to add flavour to the sauce such as different cheeses, smoked fish, anchovies, different herbs or spices. Go wild!

  • 50g butter
  • 2 tbsp extra virgin olive oil
  • 75g plain flour ( and extra for coating)
  • 300ml milk
  • ¼ tsp ground nutmeg
  • 50g hard cheese- Cheddar/Manchego, grated finely
  • 3 slices of cooked smoked bacon/parma ham, chopped finely
  • Handful of chives, chopped
  • 1 egg, beaten
  • 100g breadcrumbs
  1. Melt the butter and the oil in a pan over a low heat until liquid. Spoon by spoon, incorporate the flour and stir in until you have a thick paste.
  2. Add the milk, splash by splash stirring in vigourously until smooth and lump free. Once all the milk is added, keep on the heat and keep mixing to prevent lumps but to really thicken the sauce.
  3. Once thick, remove from the heat and stir in the nutmeg, lots of seasoning, the bacon, cheese and finally the chives.
  4. Place into a chilled bowl and pop int he fridge until set. (NOTE: Mine was a little loose for moulding into croquetas so I popped it in the freezer about 30 mins before using to make it easier to handle)
  5. Get 3 plates and add the beaten egg, flour and breadcrumbs to each.
  6. Use a spoon to scoop and roll croquetas of your cooled mixture. Coat in first the flour, then the egg and finally the breadcrumbs. Continue you have done all and then cover and chill.
  7. Heat some oil in a pan, or use a deep fryer. When hot enough, fry the croquetas until golden and crisp on the outside. Make sure it is not too hot or the outside will colour before the inside is warm.
  8. Drain on kitchen paper and scatter with flaky salt and serve immediately.

image

Morcilla Broad Beans

This recipe is open to quantities so as long as there is a nice balance it will taste great. Don’t skimp on the morcilla however as it adds bags of flavour and depth and feel free to use black pudding which works just as well.

  • Morcilla, sliced
  • Broad beans, boiled and podded
  • Peas
  • 1 small red onion, finely diced
  1. Heat a little oil in a frying pan and gently fry the red onion until soft
  2. Add the morcilla/black pudding slices and fry until cooked on each side.
  3. Tip in the broad beans and peas and stir to combine, breaking up the morcilla as you stir to distribute evenly. Season and then serve.

image

Crisp Cod and Smoky Aioli

  • 2 cod fillets or any other firm fish
  • Plateful of polenta (seasoned with salt and pepper)
  • 1 egg, beaten
  • Flour for coating
  • 2 egg yolks
  • 1 garlic clove, grated finely
  • 2 tbsp lemon juice
  • ½ lemon, zest
  • 1tsp sweet smoked paprika
  • About 250ml sunflower oil
  • Flat leaf parsley for garnish
  1. Begin with the polenta coated cod which benefits from some time resting once coated. Skin the fish fillets and cut the fillets into chunky strips cutting with the ‘grain’/flakes.
  2. Get 3 plates and place the beaten egg, flour and seasoned polenta onto each.
  3. Coat the fish fillets in the flour, egg and then a good coating of polenta and then place the fillets on a polenta coated plate while you do the rest. Cover and place in the fridge for a few hours once done to allow the polenta to swell a bit and form a good crust.
  4. For the aioli, place the egg yolks, lemon and garlic in the bowl of a food processor and turn it on to blend together. With the motor running slowly and constantly add the oil in a thin stream to allow the yolks and oil to emulsify.
  5. As it starts to thicken, add the paprika and some good seasoning and have a taste. Continue to add as much oil as you like to obtain a thin/thicker texture.
  6. When ready to serve, fry the fillets in a little hot oil with a knob of butter for a few minutes on each side until cooked with a golden crust. Serve immediately garnished with parsley and dipped indulgently into the aioli.

Chorizo

This is now my new favourite way to enjoy chorizo, partly due to this sweet tangy glaze that coats it here. The sauce is wonderful when used a dipping sauce for the olive pittas or some qwilling bread to mop up the juices like an edible sponge.

  • 150g chorizo- raw or cooked
  • 1 ½ tbsp sherry vinegar
  • 1 tsp runny honey
  • Large sprig of rosemary
  • 3 large garlic cloves
  1. Cut the chorizo into chunky horizontal slices and fry in a hot pan (you can add a tiny drop of oil to get it going is needed).
  2. Peel and crush the garlic cloves coarsely with the back of a knife. If using cooking (raw) chorizo, make sure it is nearly cooked but if using cured chorizo, as it starts to colour and crisp add the garlic to the pan in the oily juices and fry for a few minutes.
  3. Add the picked rosemary leaves and fry for a few more minutes.
  4. Remove from the heat and add the sherry vinegar and the honey and stir to coat the chorizo.
  5. Return to the heat and very gently simmer the sauce until a little more syrupy and thick but not too reduced. Remove from the heat, cover and keep warm while you do the rest of your dishes as this one will keep.
  6. Serve with the olive pittas or some fluffy bread dipped into the beautiful oily juices

image

Olive Pitta

  • See here for pittas recipe– Don’t add the nigella seeds but instead, add a good pinch of sweet smoked paprika.
  • Once the dough has risen, add in a small handful of both chopped black olives and sun dried tomatoes.

image