Posts tagged raspberry

Chocolate & Amaretto Cremeux with Raspberry Sorbet

…this dessert followed those pig cheeks. My word. Given the horrific weather forecast ahead of us this week, this provided some solace.

C

remeux sounds a bit posh but its essentially a “chocolate creme anglaise” i.e. custard. It’s served here in a very rustic form as a rich spoonful alongside some sharp fresh raspberry sorbet. The cold sorbet cuts through the rich chocolate in such a pleasant way.

Topping with something crunchy is a must for texture – I added some sugared almonds but a crushed ginger nut biscuit, baked crumble topping or even a sesame seed snap would work wonders. You can serve fresh raspberries if you don’t want to make your own sorbet or some roasted fruit but try and stick to something cleansing as the cremeux if fairly rich.

Serves about 6

This you’ll need to prepare at least the morning of eating, if not the day before as many of these elements need to cool/set.

Sorbet

  • 500g raspberries (I use a bag of frozen ones, defrosted)
  • 200g caster sugar
  • 270 ml water
  • 1/2 lemon

Cremeux

  • 200g dark (70%) chocolate
  • 150ml double cream
  • 150ml whole milk
  • 2 tbsp amaretto (optional)
  • 2 eggs
  • 1 tbsp caster sugar
  1. Start with the sorbet. Heat the sugar and water in a saucepan until sugar is dissolved. Bring the heat up and simmer for a few minutes so you get a nice sugar syrup. Remove and leave to cool.
  2. Blend the raspberries in a blended until purred. If using defrosted ones, make sure they are fully defrosted.
  3. Push through a sieve using a spoon to press the pulp through and remove the seeds. Discard the seeds and add the pulp to the cooled sugar syrup and whisk to combine – its should be glossy and vibrant pink. Add the lemon juice.
  4. Churn in an ice cream maker for about 20 minutes before spooning off into a tupperware and freezing fully.

Cremeux

  1. Whisk the sugar and eggs in a large bowl until combined.
  2. Chop the chocolate finely and place in another large bowl that will ultimately hold the finished mixture (so needs to fit in the fridge)
  3. Heat the milk and cream in a pan just until it comes to the simmer. Add the amaretto.
  4. Take the hot mixture and pour slowly into the eggs whisking the whole time so it doesn’t scramble.
  5. Return the whole mixture back to the saucepan and very gently heat stirring continuously with a wooden spoon – again to ensure it doesn’t scramble.
  6. The mixture will begin to thicken and when it can coat the back of the spoon, remove from the heat.
  7. Pour the hot ‘custard’ over the chocolate and leave alone for a few minutes.
  8. All the chocolate should have melted well but give it all a good stir to melt the last chunks and fully combine until you have a glossy chocolate custard!
  9. Leave to cool before covering with cling film (to prevent a skin) and pop in the fridge to set for at least 6 hours.

When ready to serve, you may need to remove the sorbet from the freezer ahead of time to let it defrost a bit as it might be rock hard. Then, take a spoonful of your lovely cremeux and gently spoon onto a plate. Sit a lovely scoop of sorbet alongside and top with some crumble, roasted nuts or anything crunchy to give a nice contrast.


Raspberry Oat Crumble Bars

T

he end of summer may have reluctantly and technically arrived (boo, hiss) but my Dad’s allotment is still brimming with delicious harvest for the taking and is something to feel excited about. I love September because even in my post-school years, it marks the start of a new ‘term’, new starts and fresh excitement for the year ahead and remaining without the pressure of January New Year Resolutions.

I returned home this weekend to a pantry lined with freshly made raspberry jam from the bounty of berries picked over the summer that we struggled to consume. Raspberry jam is such a childhood memory for me and just its smell makes me think of jam sandwiches. I was keen to make something delicious combining my other two favourite delights – shortbread and crumble. Simple and pleasing.

You can of course use other jams, other berries or a mix of both. I expect this would be amazing with blackberries and blackberry jam. Or some apple jam and some blackberries scattered on top. Raspberry does however have a wonderful tart flavour that works so well with the sweet and sugary crumble topping so think about this when choosing your options. These are best sliced once cool if you can be patient as they’re very crumbly. Wonderful served at room temperature or warmed with custard or vanilla ice cream.

Ingredients (makes about 15 pieces)

  • 225g unsalted butter, cold, cubed
  • 175g plain flour
  • 50g caster sugar
  • 100g jumbo oats
  • 100g dark brown muscovado sugar
  • Handful hazelnuts, roasted and crushed
  • Rasberry jam (*You can also use other jams and berries. Mix and match)
  • 1 packet fresh raspberries
  1. Grease and line a brownie tin with baking parchment (about 23cm x 20cm but just a rectangle size is good in approximate measurements). Preheat the oven to 180°C.
  2. Start on the shortbread base. In a food processor, blend 125g butter, 75g plain flour and the caster sugar until the mixture resembles a breadcrumb like mixture and can be formed into a dough.
  3. Tip onto a lightly floured work surface and form into a soft dough ball. Roll the dough out into a rectangle the rough shape of the baking tin to make it easier for yourself. Lift the dough rectangle and place it into the baking tray using your fingers to push the dough to fit neatly. Break off any bits of dough and use to press into any gaps/cracks to make it fit properly. (*You can also just tip the mixture straight from the processor, without forming into a dough, and then use your fingers to press the mixture into the baking tray).
  4. Bake for 20-25 minutes until the shortbread is very lightly golden and just baked. It can be a tiny bit underdone as it will go back into the oven later but make sure its not too golden and hard or it’ll be overdone.
  5. Meanwhile, in the same food processor bowl, blend the remaining 100g flour, 100g butter and 100g muscovado sugar until just turning to breadcrumbs. Add the oats and pulse to combine. You can continue to blend here as much as you want but the mixture will start to form a dough rather than a crumble like at the shortbread stage which isn’t what you want. I like to have a fine breadcrumb to scatter but with some larger chunks of crumble pieces so pulse as you like. Set the mixture aside.
  6. Once the shortbread is cooked, spread a tin layer of raspberry jam over the top. Use as much as you want. It helps if the base is still hot and just out the oven as it melts the jam. Scatter over the fresh raspberries.
  7. Next, scatter over the crumble mixture making sure it covers all the fruit and that it is in a thin and even layer on top. This crumble mixture makes a little too much so don’t feel you have to use it all. Leftover can be frozen or popped into the fridge for Sunday night crumble.
  8. Return to the oven and bake again for 20-30 minutes until golden and crunchy.
  9. Remove from the oven and leave to cool in the tin until cool enough to chill further in the fridge. Once fully cool, remove and slice into pieces.


Cranachan Ice Cream

S

o we all know I’m partial to ice cream. However I am not a desserts kind of girl in general. That being said I honestly feel like most desserts can be bettered in ice cream version!? Take my apple crumble ice cream or my carrot cake inventions for example. So with a Burn’s night supper party on the horizon I figured it was time to plan a traditional menu. But with the thought of the a creamy glass of cranachan to polish off a tasty haggis I was having none of it. Ice cream it was.

Serve topped with your honey ‘granola’ and a neat shot of whiskey to warm the cooling ice cream.

Serves about 6

  • 1 can condensed milk
  • 300ml single cream
  • 1 vanilla pod, seeds scrapped
  • Splash whiskey (optional)
  • 250g frozen or fresh strawberries/raspberries (or a mixture)
  • 1 1/2 tbsp caster sugar
  • 150g oats
  • 50g flaked almonds
  • 4 tbsp runny honey
  • Knob butter
  • Whiskey and extra honey to serve
  1. If using fresh strawberries, cut into quarters. Place the fruit in bowl and sprinkle with the caster sugar and set aside for 5 minutes.
  2. Whisk the condensed milk, cream, whiskey and vanilla seeds in a jug and pour into a tupperware container.
  3. Fold in the fruit, place a lid on the box and freeze.
  4. Meanwhile, preheat the oven to 180.
  5. Mix the almonds and oats in a bowl.
  6. Melt the honey and butter and pour over the oats and combine well until thoroughly covered.
  7. Spread out on a lined baking tray in a thin layer and toast in the oven for 15minutes, turning twice duinrg cooking.
  8. Leave to cool completely and crisp up.
  9. To serve, spoon generous helpings of ice cream into a bowl, scatter with the toasted oats and drizzle over and extra honey. Serve with a neat shot of whiskey!


Bakewell Tart

I

 love a traditionally made bakewell tart but its seems that those who don’t agree seem to have a tainted opinion founded into their childhood from thier experiences of Mr Kipling’s overly sweet and synthetic offerings. Found overdosed with grainy icing in your packed lunch that should ideally inspire and energise!? That said, on baking this tart over the weekend for my family his holy name was referenced three times without provoking! But I assure you that a homemade bake well is a good way to convince those haunted by Mr.K’s recipe and being such a traditional recipe I felt it needed a proud place on my blog archive.

I do already have a Rhubarb bake well tart recipe but this arguably this is not ‘traditional’ as is my style. And in fact this one is in my style also using some leftover homemade blackcurrant jam from the summer. But feel free to use a jam of choice here, traditional raspberry or strawberry, apricot or even marmalade!

Makes 1 tart

  • 1 pastry case (see here)
  • 100g unsalted butter
  • 100g caster sugar
  • 75g ground almonds
  • 50g plain flour
  • 2 eggs
  • Splash almond extract (optional)
  • 100g jam (raspberry, blackcurrant, strawberry etc)
  • Handful of flaked almonds
  • 6 tbsp icing sugar
  • Juice 1/2 lemon
  1. Make the pastry case – instructions here
  2. Preheat the oven to 180°C.
  3. Cream the butter and sugar together
  4. Then gradually beat in the eggs and the almond extract until the mixture is combined
  5. Gently fold in the ground almonds and flour until well combined.
  6. Spoon the jam evenly over the base of the pastry case.
  7. Cover with the almond frangipani mixture and use a palate knife or spatula to smooth out the surface until even and the jam is completely covered.
  8. Scatter over the flaked almonds
  9. Bake for 30 minutes until golden and the middle is set. Leave to cool completely.
  10. Sieve the icing sugar into a bowl. Add the lemon juice drop by drop being careful you don’t add to much to fast. You’re aiming for a really thick paste consistency that you can pipe.
  11. Spoon into a piping bag and snip a small end off. Pipe the icing in your desired pattern over the top.
  12. Serve with creme fraiche!

IMG_4989

Raspberry and Lemon Goo Brownies


image

image

Coma inducing, artery cloying, heart attack provoking…I could go on. But once in a while a little ‘indulgence’ is necessary. These are best left to be made for you by someone else. Not only for the pure reason that, this way, you won’t be exposed to their contents but because if I’m honest I had rather lost my appetite for all things sweet by the end of this weekends baking session and wasn’t able to enjoy them to their true potential. I am however, one step further away from conducting diabetes…However, if ever there was a gooey brownie recipe then this is it. I thought I’d try a little quirky take on the usual suspects by adding some lemon flavour in the form of the new Green & Black’s lemon bar which, thanks to them, I have generously stashed on the pantry shelf, teasing the rest of my ingredients with its youthful shiny complexion and style. It adds the tiniest of freshness to an otherwise rich brownie and is a nice tang with the rapsberries.

Although these brownies posed extremely sluttily and temptingly in their photo shoot when it came to sampling we actually all ended up cutting them into at least half as they are very rich. Therefore, when attempting this recipe, don’t hesitate to half the quantities used. Its obviously ridiculous but handling smaller quantities does make you feel like they are that little bit less unhealthy…!

Makes…more than enough (about 20)

  • 200g Green & Blacks Lemon chocolate
  • 100g Green & Blacks milk cooking chocolate
  • 250g unsalted butter
  • 400g soft brown muscavado sugar
  • 4 eggs
  • 140g plain flour
  • 50g Green & Blacks cocoa powder
  • 150g raspberries (or blueberries/blackberries/cherries etc)
  • Feel free to add nuts also if you like
  1. Preheat the oven to 180°C and line a 20 x 30cm brownie tin with parchment.
  2. In a large saucepan, combine the butter, chocolate and sugar and melt gently over a medium-low heat until all is melted and combined, stirring from time to time. Set aside to cool slightly.
  3. Making sure the chocolate is not too hot, beat the eggs in, one at a time, stirring vigorously. The mixture will thicken and turn smooth.
  4. Sieve in the flour and cocoa and fold in until well combined (add nuts here if using)
  5. Pour half the mixture into the lined tin, scatter with the fruits and then top with the remaining mixture. Alternatively add the fruit to the batter all at once.
  6. Bake for 30 (for really gooey) or 35 minutes until still soft in the middle. Don’t be tempted to leave them in longer if you think they are not done. They will set a little in the tray on cooling.
  7. Leave to cool in the tin before turning out and cutting indulgently. Serve proudly with a gym membership and a tangy topping of creme fraiche to your adoring, and now loyal, guests!

Delicious with the addition of chopped roasted nuts or different fruits. Serve with a lovely tangy creme fraiche, warm from the oven for extra (excuse the pun) brownie points with your guests.

image

Rose and Raspberry Polenta Loaf

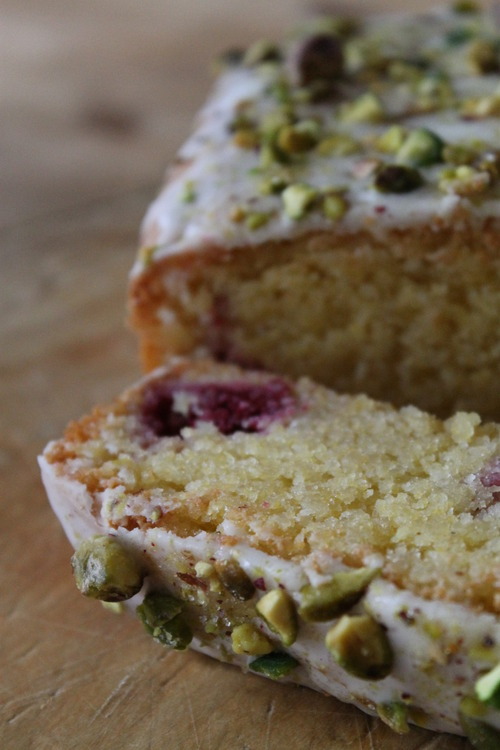
This moist little loaf is so pretty, I stood hovering with a knife for longer than is healthy before plunging in. Made with deliciously tasty almonds, a splash of rose (optional) and the last of this years frozen raspberry harvest, it succeeded in filling the cake tin…….temporarily. I never used to like rosewater’s soapy flavouring but I’ve grown to appreciate it if used subtly. Feel free to leave it out, or add only a few drops but it is lovely with the crunchy contrast of the lemon and pistachio sugar icing slavered obligingly on top like spilt paint.

  • 200g butter
  • 200g caster sugar
  • 3 eggs
  • 100g ground almonds
  • 100g flaked almonds
  • 100g polenta
  • 1 tsp baking powder
  • 10ml or less rosewater
  • 150g frozen raspberries

Icing and Pistachio Sugar

  • Icing sugar
  • Lemon juice
  • Handful of pistachios
  • Granulated sugar
  1. Preheat the oven to 170°C  and line a loaf, cake or baking tin of choice, with baking parchment.
  2. Begin by blitzing the flaked almonds in a food processor until ground. Alternatively you can just use 200g ground almonds to start with but this gives a bit more texture as you can leave them a bit chunkier than the ground packets.
  3. Cream the butter and sugar together until fluffy.
  4. Add the beaten egg bit by bit, mixing in thoroughly after each addition. If it begins to curdle, add a handful of almonds but don’t worry too much.
  5. Add the rest of the almonds, polenta and baking powder and mix well.
  6. Add the rose water if using and the frozen raspberries (coated in a little flour to prevent them sinking)
  7. Spoon the mixture into the prepared tin and bake for 45-60 minutes, depending on the thickness of your mixture in the tin. Check it after 30 minutes. It should be golden and spring back to the touch.
  8. Meanwhile sieve a handful of icing sugar into a clean bowl and add a teaspoon of lemon juice at a time until you get the desired consistency. I wanted a thick icing sugar but still with a good dripping texture.
  9. To make the pistachio sugar, grind a handful of pistachio nuts in a pestle and mortar or crush in a bag with the back of a spoon until coarse.
  10. Then add about 1 tbsp of granulated sugar and grind with the pistachios.
  11. When the cake is ready, leave to cool before icing and scattering with the pistachio sugar. This can also be decorated with rose petals or pomegranate seeds too if you’re feeling very girly.

imageimage

This cake is delicious served with clotted cream, creme fraiche, a glass of bubbly or alone with only a fresh peppermint tea for company.

image