Category Sweet Treats

Rhubarb Sorbet and Ginger Treacle Tart


image

image

I really think this is one of the prettiest and simplest desserts that you can have this time of year. Nothing but some old stale breadcrumbs, humble hardy grown rhubarb and some sweet tangy ginger. Cold golf balls of frozen candy floss to top a pointy slice of warm ginger spiced treacle tart after the slow roasted spring lamb shoulder we devoured for Easter lunch.

I’ve always grown my own rhubarb letting it ripen naturally around the summer time into gangly red and green fingers of sweet and sour goodness. But Portobello market is bursting with the ‘forced’ type at the moment and I couldn’t resist bagging some of the leggy, blushing pastel pink stems for this killer sorbet.

Serves 12

Rhubarb Sorbet

  • 800g forced, pink rhubarb, chopped
  • 175g caster sugar
  • 100ml water
  • 1 lime
  1. Mix the chopped rhubarb with the caster sugar and and place in a saucepan. Heat gently with the water until beginning to soften and simmer for about 5 minutes.
  2. When tender, remove from the heat, squeeze in the lime juice and leave to cool slightly.
  3. Puree until smooth, taste and adjust with sugar or lime (it should be a little sweeter than you like as the freezing with dampen this) and then churn in an ice cream maker for about 30 minutes. Alternatively, pour into a container and freeze, mixing every 30mins-1hr to break up the ice crystals until set.

image

image

Ginger Treacle Tart

Pastry

  • 125g chilled butter
  • 250g flour
  • Zest ½ orange
  • Cold water

Filing

  • 200g white breadcrumbs (the staler the better)
  • 400g golden syrup
  • 2 eggs, beaten
  • Pinch ground ginger
  • 2-3 balls of preserved stem ginger, chopped finely
  • ½ lemon, zest and juice
  1. Start with the pastry. Mix the butter into the flour in a processor or with your hands until you form a breadcrumb like texture. Mix in the orange zest. Add a spoonful of cold water, a small bit at a time and mix into the flour and butter until you can form a smooth dough. Shape into a disc, wrap in cling film and leave to chill for about 30 minutes or so in the fridge.
  2. Grease and line a 20-22cm tart tin and preheat the oven to 180°C. Remove the pastry from the fridge and leave to adjust to room temperature before rolling out on a floured surface to about the thickness of a pound coin. Line the greased tin pressing the pastry into the case. Chill the casing for about 10 minutes if you can.
  3. Prick the base with a fork to stop it rising up when cooking and place a sheet of parchment on top followed by some heavy baking beans or dry raw rice. Push it right up to the edges to keep the parchment down.
  4. Bake blind for 20-25 minutes until the casing if lightly golden and cooked. Remove the beans and baking sheet for the final 5 minutes to brown and cook the base.
  5. Remove from the oven and reduce the heat to 160°C.
  6. Now, warm the golden syrup in a saucepan until molten. Remove from the heat and add the ginger, lemon, breadcrumbs and stir to combine. Mix in the eggs making sure the mixture if not too hot first or these will scramble.
  7. Pour into the pre-baked tart tin and bake in the oven for 30-35 minutes until golden and set.
  8. Serve warm with the rhubarb sorbet and some slow roasted vanilla speckled rhubarb on the side or a good quality vanilla ice cream.

image

Marsala soaked Prune and Chocolate Brownies

image

image

The weather recently (with the odd exception) has been quite frankly horrendous that even the wine samples I bought home from work last week have resorted to their own wetsuits. (Some new Armit wine carriers which were enthusiastically handed out at work). If new to Armit Wines see here….we have a healthy collection of vino.

After a long week, some juicy samples were a welcome bounty to whisk home accompanied with the new sly advertising to an unshameful Friday evening in. Yes, I stayed in. It was bliss.

The wine. This Seresin Estate (Organic) Sauvignon Blanc is a definite crowd pleaser for those who love this NZ favourite. Flawlessly zesty with fresh, acidic and noteworthy mouthwatering and sharp gooseberry flavours. I immediately knew it would please my mum’s taste so off home I went the following day with sample and an extra shiny halo. Its a nice punchy wine but confirms my appreciation for more classic French wines which I’m growing to love more….

In addition to this white I also bought home a downright delicious and luxurious Marsala. My mind instantly went to my favourite wild mushroom, pancetta and marsala baked chicken recipe but I felt the harvest of my kitchen creations should be shared with the office so a baked creation was in order. Rich, moist and deep dark chocolate brownies with plump sweet prunes drunk and bloated on this boozy Marsala…

image

image

image

image

It is also ‘Fairtrade’ week so as a nod to the chaps at Green & Blacks and a toast to the founding of the Fairtrade Foundation I urge you to use their Fairtrade chocolate here or another equally good natured product. This basic brownie recipe (minus the prunes) is courtesy of Bill Granger and is one I’ve been meaning to attempt. Warming – they are very rich!

Marsala soaked Prune and Chocolate Chunk Brownies

Makes about 18-20 large ones

  • 350g caster sugar
  • 80g Green & Blacks Cocoa powder
  • 60g plain flour
  • 1 tsp baking powder
  • 4 eggs
  • 2 tsp vanilla
  • 200g unsalted butter, melted
  • 200g Green & Blacks dark cooking chocolate, chopped
  • 140g pitted prunes
  • 4 tbsp marsala
  1. Begin by soaking the prunes in the marsala for about 6 hours of overnight – the longer you do this the more they will absorb the booze so the less you will have to waste!
  2. Preheat the oven to 160°C and grease and line a brownie tin (mine was)
  3. Sieve the flour, baking powder and cocoa and mix with the sugar.
  4. Add the melted butter, eggs, vanilla and stir to combine.
  5. Chop the prunes into big chunks and add with the chopped chocolate and mix.
  6. Spoon into the lined brownie tin and bake for 40 minutes or less for an molten centre.
  7. Leave to cool in the tin before removing to a wire rack and slicing into decadent chunks.

Lime Meringue Pie

imageimage

This was a last minute creation with the leftover lime curd and egg whites from my Mojito Cake. The lime curd was criminally moreish to waste and after smothering it liberally on warm toasted sourdough for breakfast I still had a healthy jar of this nectar to use up. With the leftover egg whites from the recipe and an orphaned sheet of buttery puff pastry mingling in the fridge, I thought I’d put a tweak on this usual culprit recipe that always seems to remind me of Nigel Slater’s ‘Toast’. Pre-bake your puff pastry case, fill it with lime curd, whisk you egg whites and smother on top and….(naturally…in the voice of Sue Perkins) BAKE!

Makes 1 pie

  • ½ quantity of lime curd (see here)
  • 3 egg whites
  • 170g caster sugar
  • 1 sheet puff pastry
  1. Preheat the oven to 200°C. Line a greased tart tin with the sheet of puff pastry and press the pastry into the mould. Prick all over with a fork and line with greaseproof paper. Now fill with baking beans.
  2. Bake blind for 20 minutes then remove the beans and cook for a further 5 until lightly golden and the base is cooked.
  3. Whisk the egg whites in a large, very clean bowl until soft peaks form. Add the caster sugar, spoon by spoon, whisking in between until stiff, glossy and velvety peaks form.
  4. Fill the tart shell with the lime curd and spoon over the meringue. Spread out evening and then use a fork to create some height and textured peaks to the meringue which will crisp up on cooking.
  5. Bake at 180°C for about 15-20 minutes until set and browned.

image

Mojito Cake


image

Over the weekend I rather indulged in a culinary sense and selfishly used the excuse of a work birthday to make a cocktail inspired cake. After all, I do work at a wine company and it was only natural that booze should appear (albeit subtly) in any birthday creation to grace the office for the prying eyes and hopeful stomachs of the hungry workers. The rum I used was subtle but by all means spoon a few generous splashes over the warm cooked cakes once baked and allow to soak willingly into the sponge whilst cooling….

I have been wanting to try my hand at homemade curd for a while so now seemed like the perfect time! This cake recipe is loosely based on the one by John Whaite (from GBBO 2012) where I borrowed the curd measurements. However, the rest of the cake recipe I altered to my own tastes. But thanks John- the idea was yours.

NOTE: The quantities for the lime curd make double the amount you’ll need for this cake – unless of course you make 4 sponges and make it an extortionate 4 layered number. But making this quantity is easier than halving egg yolks and for me, extra curd and 3 spare egg whites equals one thing- ‘Lime Meringue Pie’.

Serves 1 small office of hungry workers

Cake

  • 220g self raising flour
  • 220g caster sugar
  • 220g butter
  • 4 eggs
  • 1 tsp vanilla
  • 1-2 tbsp rum (I used honey rum)
  • Pinch baking powder

Lime Curd

  • 250ml lime juice
  • 125g unsalted butter, cubed
  • 3 egg yolks
  • Zest 1 lime
  • 175g caster sugar
  • 25g cornflour

Filling

  • 300ml double cream
  • 100g icing sugar, sieved
  • 1 tbsp rum
  • Bunch mint leaves
  1. Start with the lime curd. Place the lime juice, zest and butter in a saucepan and melt over a low heat until combined.
  2. Whisk the egg yolks and the sugar in a bowl and then whisk in the cornflour until thick and creamy.
  3. Now, making sure you whisk continuously so you don’t get lime flavoured scrambled eggs, pour the hot lime and butter over the egg yolks whisking all the time until combined.
  4. Return the mixture to the pan and over a low heat, whisk continuously until it thickens (5-10mins). Keep whisking so the bottom doesn’t catch and scramble. Once thickened enough to coat the back of a wooden spoon, spoon into a shallow dish. Cover with clingfilm and chill.
  5. Preheat the oven to 180°C and grease and line two 20cm cake tins. For the cake, beat the butter and sugar until light and fluffy. Beat in 2 of the eggs and the vanilla and them sift in half the flour and combine.
  6. Add the remaining eggs and the rest of the flour and the baking powder. Mix in the rum and divide the mixture between the baking tins.
  7. Bake for 30 minutes until cooked. If soaking in rum, once cooked prick all over and spoon over a little rum and allow them to cool in their tins before removing.
  8. Meanwhile, whisk the double cream with the icing sugar until thickened but still floppy and light- don’t overmix. Chop the mint leaves and fold in with the rum.
  9. Once ready to assemble, place one sponge halve on your serving board. Spoon over a generous spoonful of lime curd. Layer on top half the cream and place the other sponge half on top.
  10. Mix the remaining cream with 2-3 tbsp of the lime curd and spoon into a piping bag (optional). Pipe a neat decoration of your choosing on top and scatter with the small pretty mint leaves from your bunch of mint!

image

image

Coffee and Date Drizzle Cake


image

image

image

image

This cake is moreish, moist and had me (who has the most pathetic of sweet tooth) eyeing up my second piece as I licked the crumbs clean from my greedy fingers after my first piece. Its not as ‘coffee-ey’ as a traditional coffee and walnut sponge but the use of this Percol fine powdered espresso coffee works wonderfully to create a deep coffee background hum. Super fine and smooth and a good way to get your coffee cake hating friends to relish the joys of this treat.

Feel free to experiment a little here with the icing flavour or dried fruit. Figs or prunes would be effective for example instead of dates. Try soaking them in brandy, cognac or even rum first! Try flavourng your icing with cinnamon or cocoa for a mocha effect. However, I feel the icing needs to be coffee flavoured to really bring out the flavour in this cake!

1 small Cake

  • 110g unsalted butter
  • 220g caster sugar
  • ½ tsp vanilla extract
  • 2 small eggs
  • 75g ground almonds
  • 100g self raising flour
  • ½ tsp bicarbonate of soda
  • 12g cocoa powder
  • 160ml strong coffee (I used Percol espresso powder), cooled slightly
  • 65ml buttermilk
  • 80g dates, sliced (reserve a few for decoration)

Icing

  • 250g mascarpone
  • 80g sieved icing sugar
  • 1 tsp coffee mixed with a splash of boiling water.
  1. Preheat the oven to 190°C. Line and grease 2 cake tins. I used 2 small 6inch tins so the sponges were fairly thick. Make up the coffee and soak the dates in the hot liquid briefly if you like.
  2. Cream the butter and caster sugar together until fluffy. Whisk the eggs and vanilla and add, a bit at a time, until combined with the buttercream.
  3. Sieve together the bicarbonate, flour, almonds and cocoa and fold in to the egg mixture.
  4. Mix in the cooled coffee and the buttermilk to form a smooth batter and divide equally between the tins.
  5. Bake in the oven for about 20 minutes and then turn the temperature down to 180C°. Bake for a further 25-30 minutes or until a skewer inserted comes out clean.
  6. Meanwhile, make the filling. In a large bowl beat the mascarpone with the icing sugar and add the coffee. Chill until needed.
  7. Make the syrup by mixing together about 1 tbsp of coffee with 50ml hot water and a tbsp of caster sugar.
  8. Once the cakes have cooked, remove from the oven and leave in their tins to cool for 10 minutes or so. Prick the cakes and spoon over the syrup and leave to cool completely.
  9. Once cooled, they are ready to ice. I could have got away with cutting each of my sponges in half horizontally to make a 4 tiered cake but do as you please. Divide the icing over the sponges.
  10. Decorate with some slices of dates and some crushed cocoa nibs if you like!

image

image

image

image

Chocolate-torte-mousse-fudge-stlye-brownie-cake


This is an original Green & Blacks recipe with original G&B chocolate from my thumbed and chocolate covered copy of their first recipe book. I cannot take the credit for this decadent creation so I hail the writer of the book and the creator of the recipe….if I ever meet you, you deserve a big kiss….assuming you’re male, tall, dark and handsome that is….

In the original recipe, this ‘cake’ has been royally dusted in a shimmering sheen of gold dust. I didn’t get hold of any in time but to make it as glamorous and irresistible as the famous bond girl then go for it. I also chose to flavour mine with 1/3 ‘Maya Gold’ chocolate as suggested- an orange and spice flavoured bar. However, an orange, lemon or even salted bar (I’m dying to try that as I write) would be amazing too. Served with my marmalade and cocoa nib ice cream, the festive orange was a soothing addition.

image

image

image

Serves about 12

  • 200g dark chocolate, broken into chunks
  • 100g Maya Gold chocolate (or orange, lemon, salt, etc…)
  • 275g caster sugar
  • 165g unsalted butter, cubed
  • 5 eggs
  • 1 tbsp ground almonds
  • Icing sugar to dust
  1. Grease and line a springform cake tin (20-23cm wide). Preheat the oven to 180°C.
  2. Place the butter, sugar and chocolate with a pinch of salt in a heatproof bowl and place it over a pan of barely simmering water and heat gently until all melted and combined. Set aside to cool a little.
  3. Whisk the eggs with the almonds. When the chocolate has cooled slightly, fold the eggs in and mix well to combine. It will look like it won’t combine at first but pursue it until smooth and creamy.
  4. Pour the mixture into the tin and level off. Bake for 35-45 minutes until set but with a small amount of give when touched in the middle.
  5. Leave to cool completely in the tin before removing and serving at room temperature. Scatter with a generous snowy blanket of icing sugar or a bond-girl-style sheen of gold dust and serve voraciously with cream or ice cream.

image

image

Marmalade and Cocoa Nib Ice cream (and a new ice cream scoop)

image

Boxing day- a day to relax with the pressure and expectations of Christmas faded comfortably into the crevices of your cosy sofa. Or in my case, a free kitchen to russell up more delicious and decadent creations. A gloriously sunny and biblically beautiful walk in the crisp Wiltshire morning air to begin the day. Overlooking my precious village covered in a blanket of drifting cloud, it was all I could do not to take off into this pillow-like sea. Back home to the warmth of the kitchen I spent the afternoon in my own sheer bliss. Blogging contently in the sunshine which cast lovely welcome rays over the days creations.

This ice cream goes beautifully with Christmas pudding with its citrusy festive flavours. However, for Christmas 2013 dessert it was paired loyally with a dense, rich slice of chocolatey heaven which can only be described as a chocolate-torte-mousse-fudge-style-brownie-cake (see here for the full recipe). Decadently delicious!

This recipe has been adapted from a Nigel Slater version I have in a recent book. As an extreme dark chocolate fan (90%+ I am religiously found munching at about 9pm most evenings) I love the bitter and pure taste that it offers. Enter cocoa nibs, chocolate’s purest and most wholesome form. On a recent quest to find my similarly dark chocolate appreciating Pa a tasty Christmas treat, I stumbled upon the Rabot 1745 estate collection , a cocoa plantation in Saint Lucia and a branch of Hotel Chocolat. While Hotel Chocolat congers up thoughts of sugary praline and liquer filled chocolates, this range is pure bliss and original. Chocolate shopping by region- from Vietnam to Venezuela I lost blissful hours perusing the shelves only to be helped knowledgably by an enthusiastic assistant who allowed me to try the raw form of the bean used in the shop cafe.

The beans,in their shelled form, are ground like coffee beans in a conching machine until silky, fine and smooth. Little is added for the super dark stuff especially no sugar like your standard Cadbury’s bar which couldn’t taste further from the real thing. I cheekily asked for a couple of bags of the raw beans which I was kindly granted with. One for dad and one for my own personal experiments….

image

image

Marmalade and Cocoa Nib Ice Cream

  • 500ml single cream
  • 4 eggs yolks
  • 2 large tbsp caster sugar
  • 300-400g marmalade (depending on how strong it is. I used half thick cut peel and half thin….this is optional)
  • A handful or cocoa beans/cocoa nibs – available from Hotel Chocolat or some super dark chocolate chopped.
  1. Heat the cream in a saucepan until just below the boil and remove from the heat.
  2. Whisk the sugar and egg yolks together in a shallow bowl and sit it on a tea towel to stop it slipping. Whisking constantly, pour the hot cream over the yolks in a steady stream and whisk until smooth.
  3. Return to the pan and continue to whisk or stir on a low heat to allow it to thicken a little. It will thicken a little, enough to coat the back of a spoon.
  4. Chill thoroughly before stirring in the marmalade.
  5. Churn in an ice cream maker for about 30 minutes until thick and beginning to set. Before decanting into a box, rumble in your cocoa beans/nibs or your chopped dark chocolate.
  6. Alternatively, freeze in a container and whisk every hour or so until set to break up the ice crystals. Once nearly set, stir in the chocolate.

Served with my ‘chocolate-torte-mousse-fudge-style-brownie-cake’ it went down a treat!

image

Chewy Date Slice


image

However delicious, I was unsatisfied with churning out another generic batch of star-topped, icing-dusted mince pies this weekend. Before you bar-humbug me (as those who know me know I a Christmas LOVER) these have the festive touch of chewy sweet dates, punchy orange zest and warming cinnamon that make a welcome alternative to the mince pie. Especially if, like my glamorous Gran, you are raisin hater. Devour after a cold walk with some warm mulled wine to warn off the teasing sniffles of a brewing cold that threatens to sabotage your Christmas day..

Makes about 12 slices

  • 175g plain flour
  • 125g cold unsalted butter, cubed
  • 50g caster sugar
  • 250g dates
  • 1 orange
  • 75g butter
  • 150ml water (maybe a bit more)
  • 1 tsp cinnamon
  • 100g flaked almond
  • 30g caster sugar
  • 1 tsp vanilla extract
  1. Start with the shortbread base. In a food processor, combine the flour, sugar and the cold cubed butter until a dough forms. Alternatively, rub the butter into the dry ingredients until you form a dough.
  2. Line a tin (about 25cm x 16cm) with parchment and mold the dough into the tin pressing it down with the back of a spoon. Chill for 15 minutes in the fridge.
  3. Preheat the oven to 180°C. Bake the shortbread for about 15-20 minutes until golden but it doesn’t matter if not completely cooked as you will cook it again with the topping. Leave to cool while you make the topping.
  4. Put the dates, cinnamon, 25g of butter, water and the zest of the orange in a saucepan. Bring to the boil and then remove from the heat. Leave to cool and puree in a food processor. Add a splash more water if too thick.
  5. Combine the flaked almonds, vanilla, sugar and remaining 50g of butter in a saucepan and heat until the butter melts. Coat the almonds in the melted butter and leave to cool a little.
  6. Spoon the date puree over the shortbread base and spread out evenly. Scatter over the buttery almonds and bake for about 25-35 minutes until golden.image
  7. Leave to cool in the tin before cutting into slices and dusting with icing sugar.

image

image

Chestnut Butter

image

Another little experiment with some free and slyly foraged chestnuts got underway last week. ‘Bonne Mamma’ currently do a chestnut spread but I’m never one to buy when I can make it at home with a little TLC. I’m keen on making nut butters, particularly my pumpkin seed butter which is now a delicious staple in my fridge.

The fresh vanilla seeds make this and are delicious so don’t scrimp on buying a few willing pods for your pantry.

NOTE: For tips on cooking chestnuts, see here

Makes 1 jar

  • About 250g cooked, peeled chestnuts.
  • 90ml honey
  • 1 vanilla pod, seeds removed
  • Pinch salt
  • Water to loosen
  1. Place all in a food processor and blend until smooth, adding water towards the end to thin to your liking.
  2. Store in sterilised, sealed jars and keep in the fridge.

Delicious slathered by the trowel-full on toasted sourdough or soda bread or inside the warm arms of a buttery croissant!

image

Chestnut Bourbon Biscuits


image

image

image

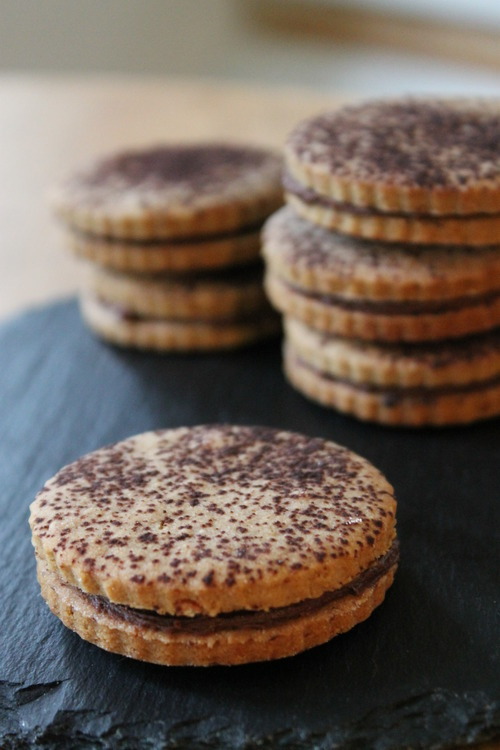
People often ask me where I get inspiration from for the recipes I blog. This one was unusually the Costa Coffee queue. Whilst waiting for my coffee at the counter I saw a giant bourbon and custard cream for sale. It seems these are the latest fad- giant confectionery which had me pondering that surely they are just the same as 5 normal biccies…? Anyway, its Autumn…chestnuts are littering my parents Wiltshire lawn like an unkept golf course so I thought I’d tackle not only the challenge of making something with them but with the challenge of making something sweet that wouldn’t get my mum rolling her eyes…

FYI. If I’d had a willing bottle of bourbon to hand I definitely would have added a splash to the filling instead of milk!

Makes about 15

Chestnut Biscuit

  • 75g raw chestnuts (of precooked vac-packed)
  • 85g dark soft brown sugar
  • 75g softened unsalted butter
  • 110g plain flour
  • 1/8 tsp baking powder
  • Cocoa to dust

Filling

  • 100g butter, softened
  • 85g icing sugar
  • 20g cocoa powder
  • 1 tsp milk
  1. Start by cooking the chestnuts. Score a large cross on the base of each with a knife. Place in a saucepan of water and bring to the boil and boil fast for 3 minutes. Remove from the heat. Drain and you should find the skin is easy to peel off.image
  2. Place in a food processor and blend to a paste with the sugar. Add the butter and puree. Add the flour and baking powder and blend to form a smooth ball of dough.
  3. Form into a disc shape, wrap in cling film and chill in the fridge for 30 minutes.
  4. Preheat the oven to 150°C . Roll out the dough on a floured surface and cut into whatever shape you like, just short of 1cm thick. Place on a lined baking tray and sieve over a sprinkling of cocoa powder.image
  5. Bake for 30-35 minutes until cooked and golden. Remove from the oven and leave to cool.
  6. Next, place the butter, icing sugar and cocoa in a food processor and blend. Add the milk and blend until you have a thick buttercream adding more milk for a thinner consistency.
  7. When the biscuits are cooled, spoon a teaspoon of the chocolate filling onto one biscuit half and sandwich with another.

image