Category Meat

Moroccan Shepherd’s Pie (with quinoa & feta)

I

am back on the blogging train this week it seems! My head space is opening up again to creative mid week recipes as wedding planning is a thing of the past! I’ve had this recipe bookmarked for some time and it was worth the effort to try something new. Credit to ‘delicious.’ magazine where this inspiration is from however I have, as usual, altered it to my instincts but a winner none the less.

More importantly I’ve renamed it. “Spiced lamb crumble” didn’t summon great thoughts for me (sorry Delicious). It sort of reminded me of the Friends episode where Rachel makes an English Triple. Peas, lamb and cream…! So “Moroccan Shepherd’s Pie” it became with an added sprinkle of Ras el Hanout. A must have in your spice rack if you want to be transported to the Middle East or northern Africa.

Serves 4-6

  • 500g lamb mince
  • 1 red onion, finely chopped
  • 2 garlic cloves, crushed
  • Knob ginger, grated
  • 1-2 chillis (as hot as you like), finely chopped
  • 2 tbsp plain flour
  • 1 tbsp ground cumin
  • 1 tbsp ground coriander
  • 1 tsp ground cinnamon
  • 1 tbsp Ras el Hanout
  • Small glass red wine (optional)
  • 250g tomato passata
  • 300-400ml hot chicken/vege stock
  • 1 pomegranate

Topping

  • 190g quinoa, rinsed
  • 200g feta, crumbled
  • Zest 1 lemon
  • Chopped parsley & mint
  1. Preheat the oven to 190 degrees. Take a heavy based casserole dish and heat a tbsp of olive oil on the hob over a medium-low heat. Add the chopped onion and sweat gently for about 10 minutes until soft.
  2. Add the lamb mince and plenty of seasoning and break it up with a wooden spoon, frying gently with the onion until brown. Once brown add the chopped chilli, garlic and ginger, stir to combine and fry for a few minutes.
  3. Add the flour, and all the dried spices and mix well so they coat the lamb and onion mix. They will absorb the juices quickly. Once coated add the glass of wine and stir well, followed by the passata. Stir well to combine.
  4. Add about 300ml of stock and stir to combine. Add enough stock to achieve a thick sauce but it will reduce in the oven so don’t make it thick! This bit is really up to you for your desired consistency. Season to taste.
  5. Pop into the oven for about 25-30 minutes (or simmer on the hob) to help reduce the sauce and concentrate all the lovely flavours.
  6. Meanwhile make the topping. Cook 150g of the quinoa for about 15 minutes. Drain and set aside.
  7. Once cooled, season well and add the rest of the uncooked quinoa, lemon zest, crumbled feta and the chopped herbs. Add about 2 tbsp of extra virgin olive oil and mix well. Check the seasoning.
  8. Once the lamb comes out the oven stir well and transfer to a casserole dish.
  9. Top with the quinoa crumble spreading up to the edges and bake for 30 minutes until just golden on top and the sauce is bubbling round the edges.
  10. Serve with a scattering of pomegranate seeds and fresh chopped herbs is any spare!

I served mine with green beans.

Braised Pork Cheeks with Parsnip Puree

P

ork cheeks are such a delight to braise slowly in wine. After 3 hours quietly stewing they are pleasingly tender with a melt in the mouth texture. Beautiful served atop something creamy and comforting like some garlicy mash potato but I love the sweetness of the parsnips here and their velvety texture.

You can get pork cheeks at any good butcher and they are cheap as chips but are such a show stopper! If you can only get hold of ox cheeks, you can use the same recipe just upping the cooking time to 5-6 hours and adding more stock/wine – they are about 10 times the size after all. Two ox cheeks will easily feed 4 unlike pork cheeks where I usually allow 2-3 per person.

Serves 4

  • 12 pork cheeks
  • 1 tbsp flour
  • 1 carrot
  • 6 banana shallots, finely chop 2, cut the others into halves.
  • 2 sticks celery
  • 2 large garlic cloves
  • 1 bay leaf
  • 1 sprig thyme
  • 1 sprig rosemary, leaves picked
  • 400ml red wine (roughly – I didn’t measure)
  • 1 beef stock cube
  • Flat leaf parsley, finely chopped to serve

Parsnip Puree

  • 500g parsnips
  • 1 bay leaf
  • 200ml milk
  1. Heat the oven to 160 degrees and get a large casserole dish on the hob over a medium heat and add a splash of olive oil and heat.
  2. Coat the pork cheeks in the flour and some salt and pepper and dust off the excess. Add them to the pan and brown quickly on all sides for just a few minutes and then set aside on a plate.
  3. In the same pan, add the finely chopped carrot, celery and shallot and sweat for about 5-8 minutes on a light heat until starting to soften and caramelise.
  4. Add the halved shallots, garlic, bay leaf, thyme and rosemary and some good seasoning and stir for a few minutes.
  5. Return the cheeks to the pan and mix.
  6. Add enough red wine to just come up the sides of the dish. Crumble in a stock cube and top up with enough boiling water to submerge the cheeks but not so they are drowning.
  7. Pop in the oven for about 3 hours. Check the liquid level now and again, it should be reducing so after the 3 hours, you have a nice reduced thick sauce but the meat is by no meats drying out. Top up with more liquid if needed OR remove the lid if its too thin so it can reduce a bit.
  8. After about 3 hours, the cheeks should be beautifully tender, the sauce reduced and the top of the cheeks browning. You can pop the dish back on the hob to reduce some more if needed.

Parnisps

  1. Peel and chop the parsnips into chunks and add them to a saucepan with the milk and then top up with water to cover. Add the bay leaf and some cracked black pepper.
  2. Bring to a simmer and simmer gently for about 15 minutes until they are just tender – don’t over cook of they will be water logged, undercooked and you’ll get a lumpy puree!
  3. Drain the parsnips making sure you reserve the hot milk. Remove the bay leaf.
  4. Blend the parsnips in a blender with some salt and pepper and some of the reserved cooking milk but don’t add all at once. Add more of the milk as you blend to get the desired consistency. Taste and adjust seasoning.

To serve, spoon a lovely pool of parsnips puree onto a warm plate. Top with a few pork cheeks and some of that lovely thick sauce and a scattering of chopped parsley! Serve with some braised leeks and peas or greens of choice!

Hummus B’lahmeh (Crispy lamb topped hummus)

W

e all know and love our hummus especially in England as it lines the shelves in various delicious and odd disguises (Marmite hummus now exists…discuss). This though. This Middle Eastern theatrical version takes it to the next level! Its hard to resist the look of it with a file of warm freshly baked flatbreads and a glass of something cold…

A simple (super speedy) way to ‘pimp’ your hummus if you have some guests round as a nibble with drinks or as a great sharing starter (are we allowed to share food during a pandemic!?).

You can of course use a packet of hummus from the shop if you don’t want to make your own but it really takes seconds (blender permitting) and doesn’t contain half as much oil.

Makes 1 large dish to share

Serve with some lovely toasted pitta or some homemade flatbreads (see here for my recipe) for scooping up all those lovely lamb juices!

  • 1 can chickpeas – I use Napolina as they are the best canned version, creamy and large. I find supermarket versions like little chickpea bullets and won’t give you a creamy hummus
  • 2 lemons
  • 1 tbsp tahini
  • 1 large garlic clove, crushed
  • 1 small red chilli
  • 1.5 tbsp spice mix (see below) OR add in some spices of your choosing. Or, leave off if you want a more authentic hummus
  • Extra virgin/rapeseed oil
  • Minced lamb (about 300g)
  • 1 heaped tsp each ground cumin, coriander, spice mix, smoked paparika
  • Pinch chilli flakes
  • Pinch cinnamon
  • 1 shallot, chopped finely
  • Handful dill/parsely, chopped
  • Handful pine nuts
  1. Put the chickpeas, juice of 1 lemon, tahini, garlic, chilli and spice mix in a blender and add some salt and pepper. Add a good few tbsp’s of good oil and blend well. Add a splash of boiling water to thin this down to your desired consistency (you can also add more oil but I don’t like to make my hummus too oily when water works just fine and helps emulsify).
  2. Blend until smooth, taste and adjust seasoning if needed. Set aside.
  3. Heat a frying pan on high and lightly toast your pine nuts until golden. Remove and set aside.
  4. Add splash of olive/vegetable oil to the pan and lightly soften your chopped shallot for a few minutes.
  5. Turn up the heat and add the minced lamb, using a fork to break it down into pieces. Fry quickly until turning nice and brown and then add your ground spices, chilli flakes, cinnamon and some generous salt and pepper.
  6. Mix well and fry until the lamb is just cooked (taste and adjust seasoning with more spices/S&P) and then remove from the heat so it doesn’t dry out.
  7. Spoon your hummus onto a nice shallow bowl or plate making a slight well in the middle.
  8. Top with your lamb and scatter with your fresh herbs and pines nuts.
  9. Serve drizzled with some good oil, the juice of the 1/2 lemon and with some lovely warm pillowy flat breads or pitta for scooping!

Spice Mix – I make a batch of this and keep in a jar. Made by toasting 1 tbsp each of the following and then grinding in a pestle and mortar: fennel seed, cumin seed, coriander seed, fenugreek and mustard seed with 1 cinnamon stick, 3 cardamon pods and 1 star anise.

Lamb & Guinness sticky (Irish) Stew

T

his recipe from one of Jamie Oliver’s first cookbooks (Jamie’s Kitchen 2002!) has been sitting on my shelf for years with the page turned down as a reminder to cook it and I never have. Shameful. It’s taken me about 10 years but ‘Dark, Sticky Stew’ is a must for January 2021 for reasons I don’t think I need to explain.

This reminds me of an Irish stew with the addition of the soul soothing pearl barley which has an amazing ability to soak up all the meaty stock. However this one has a slight twist with the addition of chipolata sausages! Its still an odd addition I’m not overly sure about (so omit if you like) as the lamb is the hero itself. Given it reminded me of an Irish Stew I thought it the perfect time to add some dumplings and introduce my South African fiancee to this delicious treat. Light, fluffy and moreish, dumpling done this way are the best and remind me of such wonderful home comforts form my childhood. Most millennials probably don’t even know what Suet is !

It seemed fitting that we celebrated Burns Night last week with some haggis to follow it with some Irish Stew. Maybe some eccles cakes are next on the agenda…

Serves 4-6 (Adapted from here)

  • 800g stewing lamb, diced into big chunks (I used neck fillets, you want something that will slow cook nicely)
  • 1 red onion, chopped
  • 1 punnet mushrooms (of choice) roughly chopped
  • 3 large carrots, chopped into horizontal chunks
  • 2-3 sprigs rosemary, leaves picked
  • 2 garlic cloves, chopped
  • 8 tbsp pearl barely (of a big handful)
  • 1 tbsp marmite/Bovril
  • 300ml Guinness/Ale
  • Hot beef/chicken stock (300-500ml)
  • 12 chipolata sausages (optional)
  • Parsley, chopped to serve
  • 1 lemon, zest to serve

Dumplings (makes 4 average sized, double it for more)

  • 100g self tasing flour
  • 50g vegetable suet
  • Handful chopped parsley
  • Cold water
  1. Preheat the oven to 180 degrees.
  2. Sprinkle the lamb in a tablespoon of flour and some salt and pepper and mix. Heat a heavy based casserole dish with a splash of oil. When hot, add the lamb and seal on all sides until beginning to brown and create a lovely caramelised outside. Remove from the pan and set aside.
  3. To the pan juices and oils, add the carrot, onion, garlic and mushrooms and cook gently until soft for about 8-10 minutes. Season well and add the chopped rosemary.
  4. Stir all to combine and add the lamb back.
  5. Add the Guinness/Ale, marmite, pearl barely and mix all to combine. (take a sip of Guinness for your hard work…)
  6. Add the sausages if using making sure they are on top.
  7. Top up with as much stock as you need just to cover the mixture but don’t drown it. This will reduced down in the oven but you want to add enough moisture so its doesn’t dry out and leaves enough moisture to cook those dumplings.
  8. Cook in the oven for 1 hour with a lid on.
  9. Before the hour is up, make the dumplings by mixing the flour, suet, parsley and salt and pepper in a bowl. Add a few tablespoons of cold water and mix with a fork until it comes together. Don’t be tempted to add too much water but add enough until it just forms a dough.
  10. Once you have a nice dough ball (don’t knead/ overwork it) cut into 4 pieces and roll into balls.
  11. Remove the casserole after 1 hour and turn the heat up to 200 degrees.
  12. Place the dumplings into the casserole so they are half submerged and half exposed.
  13. Pop back in the hot oven for 20 minutes to brown on top and get those sausages all golden.
  14. Serve with a scattering of parsley and some lemon zest with a big ladleful into warmed dishes!

If you aren’t adding dumplings, a nice hunk of fresh sourdough is lovely for dipping and soaking up those juices! However, its perfectly filling and satisfying just on its own.


Sticky Hoisin Pork & Homemade Coriander Noodles

Y

ou might have guessed but I recently bought a pasta machine as a lockdown past time! I’m not even a big pasta fan! I’d go so far as saying I’m not really a fan at all, eating it only about 2-3 times a year! Alas, I like to expand my skillzzz. Plus, turns out you can really easily make noodles, which are growing on me!

I’ve always rather turned my nose up at dried packed noodles. Probably because I associate them all with pot noodles and instant university food. I still remember my first pot noodle when I was about 7 and I wasn’t even impressed then. Aliet not much impressed me in the kitchen when I was younger apart from alphabites and fish fingers!

You can absolutely skip the homemade noodles. Like fresh vs dried pasta, I’ll admit there isn’t a huge amount of difference. The main advantages here being that I know exactly what went into mine and it was only 3 ingredients and no preservatives! Secondly you can flavour with things like coriander to make them a beautiful vibrant green. Use the dried or fresh noodles of your choice here, I know everyone has a preference.

Note: A pork fillet if quite big and this may feed 3-4 but we eat a lot of protein and are growing young adults…ahem.

Serves 2

  • 1 pork loin/fillet (450g approx)
  • Knob ginger, grated
  • 2 garlic cloves, chopped finely
  • 3 tbsp hoisin sauce
  • 2 tbsp honey
  • 2 tbsp soy sauce
  • 1 red chilli, chopped
  • 2 red peppers, chopped
  • Handful green beans, top and tailed, halved
  • 2 tsp sesame oil
  • Garnish – Sesame seeds & chopped coriander
  • Dried egg noodles/odon noodles OR below noodle recipe. If using dried noodles, skip to the pork method steps!

Noodles (if making)

  • 125g flour
  • 1 egg
  • Large handful coriander
  1. Begin with the noodles if making. Blend the coriander in a food processor with the flour.
  2. Add the egg and blend until the dough comes together. Add a touch (be very reserved!) of cold water to help bring it together but don’t be tempted to add too much. Touch the dough if not sure, it should be a bit sticky but not wet.
  3. Roll onto a floured work surface and knead together to form a silky dough for about 5 minutes. Then rest in a ball for 30 minutes in the fridge.
  4. When ready to roll, flatten into a rectangle as best you can and feed through your pasta machine on the thickest setting, getting thinner as you go. You may need to cut your final strip into 2 as it’ll be too long to handle. Once nicely thin, pop through the setting of choice to obtain your desired noodle shape!
  5. Scatter lots of flour over the noodles to stop them sticking until ready to cook.

Pork recipe

  1. Marinade the pork fillet (halved if easier) in the ginger, garlic, hoisin, soy, honey, chilli and set aside in the fridge for about 20 minutes. Preheat the oven to 200 degrees.
  2. Heat a frying pan on a high heat and add a splash of olive/sunflower/plain oil (never heat extra virgin, I’ll keep saying it). Sear the pork on both sides for about 2 minutes until it forms a nice caramelised golden seal.
  3. Top the pork with all but 2 tbsp of the marinade and cover with foil or a lid. Roast in the oven for 10 minutes.
  4. While that is roasting, stir fry the peppers and beans in a little oil in a hot frying pan to begin soften.
  5. Bring a pan of water to the boil at the same time.
  6. When the pork is ready remove from the oven and leave to rest on a board. Add the juices from the roasting pan and the rest of the marinade you reserved earlier to the peppers and turn up the heat.
  7. Add your noodles to the boiling water and cook for about 1 minute for fresh and 2 for the dried. Drain quickly (keep a little cooking water clinging to the noodles to help stop them stick if you can so don’t drain too heavy handedly!). Drizzle with the sesame oil to stop them sticking.
  8. Add the noodles to the peppers and sauce and mix all really well to combine and coat all the noodles in the sauce.
  9. Remove from the heat and slice your rested pork, adding any juices back to the noodles and pepper pan.
  10. Serve a spoonful of peppers and noodles in a warm bowl and top with the sliced pork, some fresh coriander and some sesame seeds if you like!

Home-made Burgers

D

ate night burgers on a Friday after what has been the busiest work week since lockdown! Its a blessing not to have to waste time commuting home after a busy day so I could move from desk to kitchen to beer in hand within minutes of shutting down the emails! I’m not your classic burger fan but I’m not sure why. I like to eat slowly and find that burgers are often a food that you inhale?! I’ve always preferred to eat mine without the top bun like an open sandwich with a knife and fork!

You can pimp your burger fillings as you like, I’ve listed a few suggestions below. I always try to add a gherkin for the flavour, some lettuce for crunch and some avocado for indulgence and extra healthy fats! Add cheese if you like. When it comes to sauces I’m usually a faithful T sauce user but I recently discovered an amazing burger sauce from M&S (below) that ticked off my craving for both sauce and gherkin!

A few burger tips – don’t go low on the mince fat content. Use minimum 12% which I did here but 20% works well. If you can, get your mince from the butcher where you can be a bit picker on the fat choice. Don’t season the burgers mix too much, rather season the outside well before cooking. Don’t be tempted to overcook, keep checking as you go. Also don’t undercook – call me boring but ideally you should be fully cooking any mince for safety but you also won’t get the same benefit from a ‘pink centre’ as you will a steak so its pointless in my eyes..

Serves 2-4 (makes 2 large, and 2 small burgers)

  • 500g good quality beef mince (minimum 12% fat)
  • Bunch flat leaf parsley, chopped finely
  • 1 shallot, chopped finely
  • 1 heaped tsp smoked paprika
  • Burger buns – whatever your preference.
  1. Combine the ingredients in a large bowl with some pepper and only a little pinch salt.
  2. Do not pound the meat together just gently mix handling lightly or you’ll have dry solid burgers!
  3. Gently bring the meat together into 4 burgers – I make 2 larger ones (2.5cm high) and 2 x smaller ones. Place on a plate and chill for about 20 minutes.
  4. Before cooking (on the grill/BBQ) season the burgers well on the outside with salt. Cook, ensuring a good amount of colouring on the outside as this is where the flavour is. (About 4 minutes each side depending on the size but keep an eye on them.)
  5. I like to lightly grill the burger bun and then dip (inside surface down) in the cooking juices of the burgers before serving.

Side suggestions

  • Sliced avocado
  • Litte gem lettuce
  • Grated mature cheddar cheese
  • Pickled red onion – chop 1 x red onion thinly. Put in a shallow bowl and spoon over 4 tbsp white white vinegar and 1 tsp sugar. Let sit for 30 minutes.
  • Homemade chips – chop 2 large potatoes into chips. Season, scatter over 1 tsp of dried rosemary and drizzle with a little oil. Roast at 190 for about 30 minutes until golden and crunchy.
  • Chopped gherkins. I actually bought the below sauce from M&S which was incredible. I think it made the burgers!

Date Night Tasting Menu

I

‘m really missing hosting dinner parties and generally feeding people! We’re also missing those rare but spontaneous dinners out when we feel like we’re on a real date night. One of our favourite places to frequent is (well now was) in Pop Brixton (about 100m away from our flat!) Smoke & Salt. Excitingly they are relocating to a permeant hide out in Tooting! Its a real gem and a place saved for special occasions. They have a sharing menu concept that changes frequently so it inspired me this evening for our weekly date night.

The first time we went to Smoke & Salt we had this potato and beef dish which was just amazing. We never got the chance to sample it again so I’ve had to create my own version! A creamy, garlic, mustard, cheesy sauce for some salty cooked potatoes and rare beef. 

The salad adds a nice fresh clean contrast to the beef and potatoes on the side. We enjoyed some of the focaccia chopped and dipped into some rosemary flavoured extra virgin oil with G&Ts before the feast.

Dessert ice cream can be found here. Simply add a shot of Amaretto and one of hot coffee and serve !

Serves 2 (…hungry people as a sharing meal)

Seabass & Roasted Red Pepper sauce

  • 2 seabass fillets
  • 2 garlic gloves, finely chopped
  • 2 shallots (or 1 small onion), finely chopped
  • 1 tsp cumin, coriander, chilli flakes
  • 350g flame roasted peppers – I actually used this jar from Odysea. You can make your own but I had these to hand in the pantry.
  • 1 vegetable stock cube
  • Handful basil
  1. Heat a tbsp of sunflower oil in a saucepan on a medium-low heat. Add the shallots and gently cook for about 10 minutes until soft.
  2. Add the garlic and cook for a 2 minutes.
  3. Add the spices and some generous seasoning and cook out for 1 minute, stirring well.
  4. Drain the peppers from the jar, chop roughly and add to the saucepan. 
  5. Add about 100ml of stock and bring to a simmer for about 5 minutes before stirring in the basil.
  6. Using a food processor (or hand blender) pulse the sauce until smooth – add more stock as needed. I did this by eye. It needs to be like a thick soup. Taste and adjust seasoning if needed. Keep warm while you make the fish.
  7. Season the seabass fillets and score the skin side a few times to stop it curling up in cooking. Heat a tsp of sunflower oil in a hot frying pan over a high heat. Add the seabass, skin side down and press into the pan with a spatula quickly to avoid it curling. Cook skin side down for about 3 minutes. Turn onto the flesh side for 30 seconds and then remove from the heat.
  8. Spoon some sauce onto a plate and gently lay the fish onto. Squeeze over some lemon juice and enjoy!

Crispy roast new potatoes, mustard garlic cream sauce, rare beef rump

  • 1 rump steak (or whatever cut you prefer)
  • 1 tbsp whole black peppercorns
  • New potatoes – about 300g but enough for two depending on hunger.
  • 100ml creme fraiche
  • 1 tsp wholegrain mustard
  • 50g roule cheese
  • 1 small handful fresh chives
  • Splash milk
  1. Half the new potatoes and boil for about 5-8 minutes and then drain. Return to their saucepan and put the lid on. Shake the pot to bash the potatoes up a little and get the edges fluffy.
  2. Tip onto a baking tray, season and drizzle with sunflower oil. Toss so they are all coated in oil. Roast in a 220 over for about 20 minutes until golden and crispy. 
  3. Using a pestle and mortar, crush the peppercorns really finely. Season the steak generouslly on both sides with as much pepper as you like – I like a nice crust! Add salt.
  4. BBQ or grill the steak for as long as you like. Let rest for 5 minutes minimum.
  5. Combine the creme fraiche, roule and wholegrain mustard in a saucepan. Gently heat stirring well to combine (Add splash of milk to thin the sauce when needed). Add half the chopped chives. Taste and season.
  6. To serve, put the potatoes in a serving dish and season. Carve the steak really thinly and lay over the potatoes. Drizzle / dollop the sauce over the top and garnish with the remaining chopped chives. Serve extra sauce on the side.

Asparagus, broad bean, pea, lemon & parmesan salad

  • 1 bunch asparagus
  • Large handful broad beans (I used frozen)
  • Large handful garden peas (I used frozen)
  • 1 lemon, zest only
  • 1 small bunch mint
  • Parmesan cheese for serving
  1. Boil the broad beans for about 1 minutes and drain. You will need to tediously pick the beans from their pods into a serving dish. Use your nail to piece the skin and then just pop the bean out.
  2. Boil the peas for 1 minutes, drain and add to the broad beans.
  3. Drizzle the asparagus in a little oil and griddle on the BBQ or in a pan for just a few minutes making sure they are still al dente! Add to the bean/pea bowl.
  4. Chop the mint finely and add to the bowl. Grate the zest of 1/2 the lemon into the bowl and season all well. Toss to combine. 
  5. Finally, using a peeler, peel some thin strips of parmesan cheese over the salad.

Homemade Pizza & Aperol Spritz

H

ow could we go through lockdown without making our own pizzas? With banana bread ticked off the list and endless quiz nights over Zoom completed, pizza making was next and by far the most satisfying! This weekend, when date night rolled around again, we raided our local supermarket for Aperol, oranges and tinned pineapple and made use of that coveted yeast that my mum sent us in the post…turns out you can’t buy yeast easily at the moment unless you live somewhere very middle class like Wiltshire. Ironically we have the enviable flour so I’ll keep an eye out for a grey market for bakers in the local area.

Obviously feel free to top your pizzas with whatever you like! I am unashamedly proud that one of my favourite pizzas is a Hawaiian, followed closely by a Siciliana. This dough makes great thin crust which allows more stomach space for toppings.

Makes 2 large pizzas

Dough

  • 300g strong bread flour
  • 1 tsp instant yeast
  • 1 tsp salt
  • 1 tbsp extra virgin olive oil

Tomato Sauce 

  • 1 can chopped tomatoes
  • 2 tbsp tomato puree
  • 2 garlic cloves
  • Handful fresh basil
  • 1 large tsp chilli flakes

Toppings – choose your favourite! We made 2 pizzas as follows:

  • Pineapple pieces, parma ham, grated cheddar, parmesan and mozzarella
  • 1 tbsp capers, 1 can anchovies, 1 handful olives, 1 tbsp dried oregano, 1 garlic glove (grated), grated parmesan and mozzarella

  1. To make the dough, combine the flour, yeast and salt in a bowl. Make a well in the centre and add the oil and 200ml of tepid water. Using a fork mix well until combined.
  2. Turn the mixture out onto a lightly floured worktop and knead together until you form a smooth elastic dough. Continue kneading for about 5 minutes.
  3. Return the dough to the bowl, cover with a tea towel and leave in a warm place/worktop for 1 hour. (you can actually skip this step if you want and go straight to the pizza making esp if you’re after thin crust).
  4. Make the sauce by putting the tinned tomatoes in a saucepan and add the crushed garlic, chopped basil and chilli. Mix the tomato puree with about 150ml of warm water in a jug then add this too. Simmer gently for about 5 minutes. Taste and season and then blend with a hand blended. Set aside.
  5. When ready to make the pizza, heat the oven to 220 and put your baking trays in there to heat up – or your pizza stones if you’re fancy.
  6. Knock the air out of the dough and knead gently for a few minutes to form a smooth dough again before dividing into two balls. On a floured surface, roll one ball of dough as thinly as possible (about 25cm across) but the thinner the better for a nice crispy crust.
  7. Place the rolled dough onto a large piece of baking parchment before putting on your toppings.
  8. Top you pizza first with the tomato sauce and then with any toppings you wish.
  9. Remove the hot trays from the oven and carefully lift the pizza on the parchment onto the hot tray. Bake in the oven for 8-10 minutes until crispy and starting to turn golden.
  10. Serve chopped with a jug of Aperol Spirtz!

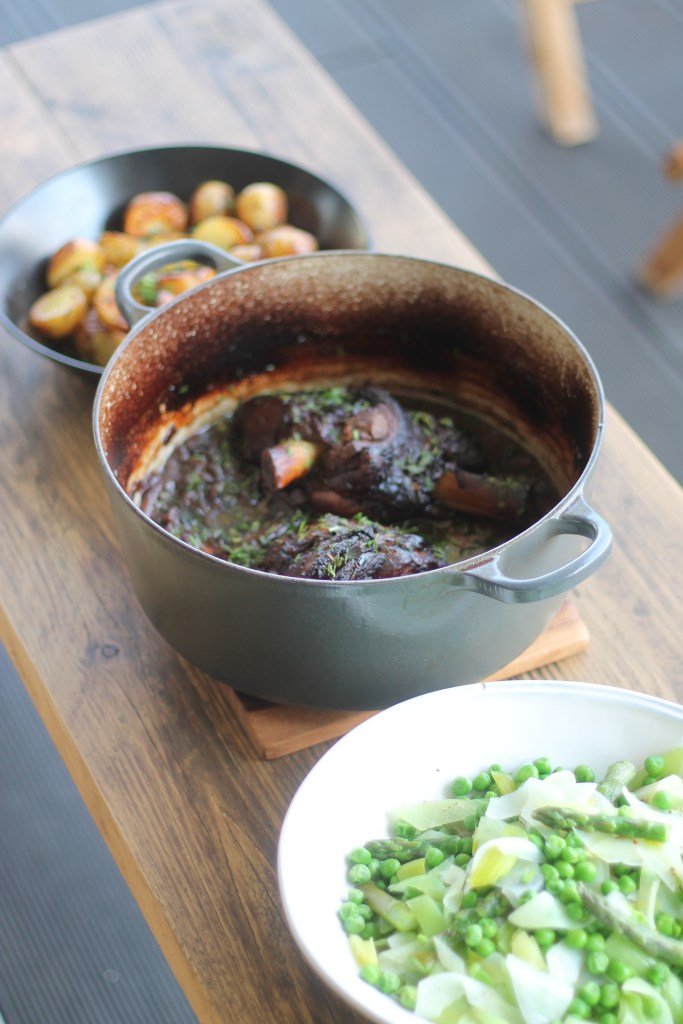
Easter Lamb Shanks in Isolation

H

appy healthy Easter where ever you are…likely and I hope at home.

I’ll breeze over the obvious and get straight to the recipe. Lamb at Easter is an absolute essential for me growing up. So two lamb shanks hidden in our freezer were a winner. I bought them back from a visit home to Wiltshire a few months ago so with some classic vegetables and a special bottle of wine from the archives, we indulgenced elegantly for Easter this year and talked relentlessly about how lucky we are.

The sun was just a bonus on a glorious Easter in our cosy Brixton flat. The balcony was showing at its best and the perfect setting for our late Easter lunch. This lunch feast is a simple one to put together with minimal ingredients.

Serves 2

Lamb

  • 2 x lamb shanks
  • 1 red onions, sliced
  • 2 large garlic cloves, roughly chopped
  • 1 large carrot, roughly sliced
  • 1 sprig rosemary, chopped
  • 1 lamb/beef stock cube
  • 250-350ml red wine
  • Dill & mint to serve (optional)
  • Mint sauce to serve (optional)

Potatoes

  • New potatoes – enough for 2 appetites

Vegetables

  • A mixture of greenery. I used 1 leek, asparagus and a handful peas for 2 people.
  1. Start with the lamb. Preheat the oven to 160.
  2. Heat a little oil in a heavy based casserole pan (like a Le Creuset). Season the lamb shanks and then sear in the pan until browning on the outside – just a few minutes, don’t spend too much time here. Remove and set aside.
  3. Add the onions to the pan and gently brown for about 10 minutes.
  4. Add the garlic, carrot and rosemary and cook for a few more minutes.
  5. Add the lamb back to the pan and increase the heat.
  6. Add the wine and simmer for a few minutes.
  7. Crumble over the stock cube and then top up with boiling water until the liquid just reaches about 3/4 way up the shanks. Not fully submerged.
  8. Cook with the lid on for 1 hour then remove the lid and continue to cook for another 1 hour 30 minutes.
  9. About 30 minutes before the lamb is done turn the oven tup to 190. Cut the potatoes into halves and spread on a baking tray. Season and drizzle with some sunflower oil. Roast in the oven for about 20-30 minutes until golden and crispy keeping an eye on them.
  10. Once done, turn the oven off and let everything sit and wait while you finish the veggie. Boil the vegetables for only 2-3 minutes, drain and then season well and add a knob of butter.
  11. To serve, sprinkle some chopped dill and mint over the lamb and the potatoes.
  12. Enjoy!

Ox Cheek in red wine with Mustard Mash

T

his is completely worth the hours. If you have a free afternoon on your hands at the weekend this is an excellent and effortless feast. Two large cheeks cost just over £5 (£7.99/kg in Waitrose) making it ludicrously cheap. Its just a shame how something that takes so long to cook, takes so little time to eat!

If you’re stuck for time at the weekend and can be organised, this is also a great dish to stick in the oven when you get home from work to then reheat and eat the following evening or serve to any dinner party guests without the last minute stress.

Serve with mash or some lovely soft polenta !

Serves 3 or 2 with leftovers

  • 2 x Ox cheeks
  • 1 red onion, finely chopped
  • 2 stick celery, finely chopped
  • 2 large carrots, sliced on the diagonal
  • 2 large garlic cloves, chopped
  • Bunch rosemary, chopped finely
  • 1 beef stock cube
  • Approx 500ml red wine
  • 2 large potatoes, peeled, chopped
  • 1 tbsp Dijon mustard
  • 50g butter
  • Milk
  • Bunch parsley
  1. Preheat the oven to 150. 
  2. Dust the ox cheeks lightly in seasoned flour and shake off any excess.
  3. Heat a large casserole dish on a medium high heat and add a splash of sunflower oil. Sear the ox cheeks on both sides until golden then remove from the dish and set aside.
  4. Turn the heat down a little and add the onion, celery and carrot and gently sweat for about 8 minutes until starting to soften. Season well.
  5. Add the garlic and rosemary and fry for a further few minutes.
  6. Return the ox cheeks to the pan and turn up the heat. You now want to add the wine and the stock. Add about 3/4 wine and 1/4 stock so that in total the liquid just covers the cheeks but its not swimming in it! Measurements will vary.
  7. Cover with a lid and place in the oven for 4-5 hours, checking on it now and then to spoon juices over the cheeks.
  8. When ready to serve, remove the casserole from the oven. I like to mash 1 tbsp of butter with 1 tbsp flour (to form a paste) and then whisk this paste into the sauce. This helps thicken it slightly and create a lovely shine!
  9. To make the mash, simmer the potatoes for about 15 minutes or until soft but not water saturated. Drain and let them cool slightly.
  10. Use a potato ricer to mash the potatoes into a bowl or use a masher. Add the mustard, butter and a splash of milk as needed to create a nice smooth mash. Season well.

Serve scattered with fresh chopped parsley!