Raspberry and Lemon Goo Brownies


image

image

Coma inducing, artery cloying, heart attack provoking…I could go on. But once in a while a little ‘indulgence’ is necessary. These are best left to be made for you by someone else. Not only for the pure reason that, this way, you won’t be exposed to their contents but because if I’m honest I had rather lost my appetite for all things sweet by the end of this weekends baking session and wasn’t able to enjoy them to their true potential. I am however, one step further away from conducting diabetes…However, if ever there was a gooey brownie recipe then this is it. I thought I’d try a little quirky take on the usual suspects by adding some lemon flavour in the form of the new Green & Black’s lemon bar which, thanks to them, I have generously stashed on the pantry shelf, teasing the rest of my ingredients with its youthful shiny complexion and style. It adds the tiniest of freshness to an otherwise rich brownie and is a nice tang with the rapsberries.

Although these brownies posed extremely sluttily and temptingly in their photo shoot when it came to sampling we actually all ended up cutting them into at least half as they are very rich. Therefore, when attempting this recipe, don’t hesitate to half the quantities used. Its obviously ridiculous but handling smaller quantities does make you feel like they are that little bit less unhealthy…!

Makes…more than enough (about 20)

  • 200g Green & Blacks Lemon chocolate
  • 100g Green & Blacks milk cooking chocolate
  • 250g unsalted butter
  • 400g soft brown muscavado sugar
  • 4 eggs
  • 140g plain flour
  • 50g Green & Blacks cocoa powder
  • 150g raspberries (or blueberries/blackberries/cherries etc)
  • Feel free to add nuts also if you like
  1. Preheat the oven to 180°C and line a 20 x 30cm brownie tin with parchment.
  2. In a large saucepan, combine the butter, chocolate and sugar and melt gently over a medium-low heat until all is melted and combined, stirring from time to time. Set aside to cool slightly.
  3. Making sure the chocolate is not too hot, beat the eggs in, one at a time, stirring vigorously. The mixture will thicken and turn smooth.
  4. Sieve in the flour and cocoa and fold in until well combined (add nuts here if using)
  5. Pour half the mixture into the lined tin, scatter with the fruits and then top with the remaining mixture. Alternatively add the fruit to the batter all at once.
  6. Bake for 30 (for really gooey) or 35 minutes until still soft in the middle. Don’t be tempted to leave them in longer if you think they are not done. They will set a little in the tray on cooling.
  7. Leave to cool in the tin before turning out and cutting indulgently. Serve proudly with a gym membership and a tangy topping of creme fraiche to your adoring, and now loyal, guests!

Delicious with the addition of chopped roasted nuts or different fruits. Serve with a lovely tangy creme fraiche, warm from the oven for extra (excuse the pun) brownie points with your guests.

image

Roasted Tomato Soup


image

This is an extremely rustic soup which fittingly suits the weekend Autumnal lunches that are just a halloween pumpkin away from steeling the warm summer season for another year. Although it has been surprisingly warm recently….its unnerving. With enough tomatoes in the greenhouse to put the Heinz empire to shame, it was time they were used creatively. They were sacrificed and chucked in the oven and roasted with some other tomato friendly ingredients but feel free to change quantities etc to taste or add anything else you like.

Serves 3

  • 700g-1kg very ripe tomatoes, halved
  • 1 large red onion, chopped roughly
  • 3 garlic cloves, crushed
  • Large bunch of basil
  • Balsamic vinegar
  • Olive oil
  • Salt and pepper
  1.  

    Preheat the oven to 200°C.

  2. Simply combine the tomatoes, onion, garlic and the stalks from the basil in a large roasting tin in one even layer. Season generously and drizzle with some olive oil. Spoon oven 1-2 tbsp of balsamic vinegar and roast for 20 minutes until soft.
  3. Leave to cool slightly before placing in a food processor and blitzing with the addition of the basil leaves. You can blend it as coarsely as you like.
  4. If a little thick, add a splash of hot water but the roasting juices from the tomatoes should be enough to get a soup-like consistency.
  5. Serve scattered with basil. I also used some balsamic pearls I had lurking around and some oil-soaked salty croutons…!

My pals at Green & Blcks have just launched two new exciting flavours- lemon and orange! As I was packing for tomorrows warm Grecian holiday this morning, this welcome package arrived on my doorstep! Although a week away in sunny Greece is nothing to complain about, I’m not sure how I will manage waiting a week before getting back into the comfort of my kitchen to experiment with these new wonders! A week away from the blog I’m afraid but I’ll make up for it…promise! Sunbathing can be very productive when it comes to recipe inspiration. Plus, I’m not sure how well these would cope in the Grecian heat…!

Pea, Mint and Black Pudding Fritters


image

If you’re cringing at the thought of black pudding, I’ll be candid- man up. Its no more ‘disgusting’ than eating meat surely?! If you’ve never sampled this cheap and tasty treat, at least try it! And hopefully, like me, on you’re first sample you’ll kick yourself at all the time you wasted not enjoying it! Its deep, rich flavour works amazingly well with the sweet flavour of peas…

This recipe is a bit like a previous post (see here) for pea fritters and if you know me you’ll know that I like to fritter things. Its so easy and you can do it with loads of different ingredients and flavours with whats to hand- as long as you have eggs and flour! Here I have simply added crumbled black pudding instead of the cheese in a previous recipe and some fresh mint. A delicious light lunch.

Serves 4

  • 125ml milk
  • 2 eggs
  • 30g cornflour
  • 100g flour
  • 250g peas
  • 100-150g black pudding (cooked and crumbled)
  • Large bunch mint, leaves picked and chopped finely
  • Handful of chives, chopped finely.
  • Lemon
  1. Boil the peas for a few minutes then run under cold water. Place half the peas in a food processor and puree.
  2. Sieve in the flours, some salt, pepper. Add the beaten eggs and milk and mix until smooth.
  3. Place in a bowl and fold in the whole peas and herbs and mix well with a squeeze of lemon juice. It should be fairly thick, enough to hold its shape in a pan. Finally crumble in the black pudding.
  4. Heat a frying pan to a medium heat and warm some sunflower oil
  5. Fry spoonfuls of the mixture (as large as you like) in the hot oil for a few minutes on each side until golden brown and set in the middle. Pat fry on kitchen roll and devour.

image

image

Caramelised Garlic Tart

I’d seen this recipe in my thumbed copy of Ottolenghi’s ‘Plenty’ too many times to flick past it again. I’d heard good things about it…they’re true by the way. The original recipe calls for puff pastry which I think would have tipped me over the edge into food heaven but I used a lighter flaky shortcrust infused with thyme after an indulgent week that just couldn’t handle the butter content of puff. Either pastry is fine but I suggest puff just to do it justice. Agreed, when you read the recipe and see 3 heads of garlic, separated and peeled you may find yourself navigating away to another site. However, there is no need to contemplate taking a half day off work as it really won’t take long and you’ll be rewarded with the benefits on eating. The garlic is sweet and glazed when cooked and teasingly moreish.

Serves 6-8

  • 375g puff pastry, rolled/ 1 quantity of shortcrust pastry flavoured with thyme (optional)
  • 3 heads garlic, cloves separated and peeled
  • 1 tsp balsamic vinegar
  • 220ml water
  • Pinch sugar
  • 1 tsp each chopped rosemary and thyme
  • 240g goats cheese- a mix of soft and hard or a mix of cheeses if you’re not a goat cheese lover
  • 2 medium eggs, beaten
  • 100ml double cream
  • 100ml creme fraiche
  1. Preheat the oven to 180°C . Grease and line a tart tin (about 28cm) and line with the rolled puff pastry. (You can also use a shortcrust pastry which is what I actually did when I made it). Prick all over with a fork and line with a sheet of parchment and some baking beans. Bake blind for about 15-20 minutes until mostly cooked and then remove the beans and parchment and return the case to the oven for 5-10 minutes to allow the base to brown. Remove from the oven and set aside.
  2. Meanwhile, cook the cloves of garlic in boiling water for 3 minutes and drain.
  3. Return the garlic to a clean pan with the a splash of oil and fry for a few minutes on a high heat. Add the balsamic vinegar and the water, boil and simmer for 10 minutes.
  4. Add the sugar and the herbs and a pinch of salt. Simmer for another 10 minutes until the liquid begins to reduce and turn syrupy. Set aside.
  5. In a jug, whisk the eggs, creams and plenty of seasoning.
  6. In the pre-baked tart case, crumble or grate over your choice of cheese and then top with the garlic cloves and syrup. Add some more thyme leaves also if you like.
  7. Fill the gap of the tart with the cream mixture and bake at 160°C for 35-40 minutes until set and golden brown.

I served mine with a fresh rocket and baby cos salad with some griddled courgette slices, toasted pine nuts, wafers of parmesan cheese all dressed lightly with lemon juice and olive oil. Devine!

image

Green Chicken Curry


image

Its been a busy few weeks and the pantry has been in shameful neglect and I miss it badly. No work on a Sunday so it cannot possibly steal me from my apron and wooden spoon. I love this dish and these flavours. I hate the fact that amongst my travels, I haven’t ventured anywhere where I have been able to master and learn the art and recipe for an authentic Thai green curry paste that would put the salty and sugary rubbish you can buy in a supermarket jar to shame. Therefore with a little research, my (hopefully) good instinct and palate and a huge bomb proof granite pestle and motar this can be appreciated as a good English alternative. Feel free to use different vegetables, more herbs and it is absolutely open to adding a splash of whatever you think it needs. This recipe worked for me (this time) but I find it changes everytime depending on the strength and type of coconut milk, chilli or even the chicken. In this recipe, its important to taste as you go along!

Serves 4

Paste

  • Large knob ginger, peeled and sliced roughly
  • 2 red chillis, deseeded
  • 2 kaffir lime leaves
  • 4 garlic cloves, peeled
  • 1 stick lemongrass
  • 4 spring onions, chopped
  • Bunch of coriander

Sauce

  • 400ml thick coconut milk
  • 200ml chicken stock
  • 1tsp fish sauce
  • 1tbsp soy sauce
  • 50g desiccated coconut
  • 200g sugar snap peas/green beans/mini baby corn
  • 8 chicken thighs, boned (optional)
  • 1 tsp sesame oil
  • Handful of basil, coriander,and 2 spring onions to garnish
  • 2 limes (1 for serving)
  • 6oz wild/brown rice
  • 4 cardamon pods
  • Popadoms to serve
  1. Preheat the oven to 190°C.
  2. Start with the paste. Using a pestle and mortar, firmly pound together the ginger and the chilli. Add the lime leaves and repeat.
  3. Add the garlic, the lemon grass and the spring onions and pound everything together firmly until you form a really mashed and blended paste. Add the coriander leaves and pound in. Reserve your paste to a bowl.
  4. Heat a heavy based pan or casserole dish with a splash of sunflower oil over a high heat. Season the chicken thighs and fry skin side down until a really crisp skin forms.
  5. Add the sesame oil and remove them from the heat. Remove from the pan and reserve to a plate
  6. Over a medium low heat now, add the curry paste and fry for a few minutes until fragrant. Add 2-3 tbsp of the coconut milk and mix. Add a splash more coconut milk and mix in before adding the rest. Add the fish sauce and soy sauce and stir together. Bring to the boil and add about 200ml of hot chicken stock to form a thickish sauce.
  7. Return the chicken to the pan, try to keep the skin above the liquid to retain the crispy skin but don’t panic if not it can be crisped up later.
  8. Cook for 25 minutes in the oven, uncovered. While cooking, cook your rice with the cardamon pods thrown in or a cinnamon stick if preferred.
  9. Once the chicken is cooked and tender, remove from the dish from the oven. Remove the chicken from the pan and, if the skin isn’t crisp, place on a baking tray under a hot grill and crisp it up while you deal with the sauce. Alternatively, remove to a warm place to rest.
  10. Place the sauce over a medium high heat on the hob and bring to a simmer. Add the sugar snaps (or vegetables being used) and the coconut and simmer for a few minutes. Add the juice from ½ lime and taste. Adjust the taste as needed, adding soy for seasoning.
  11. Return the chicken to the pan. Scatter with chopped basil, coriander and thin slices of spring onions. Squeeze over the juice from the other half of the lime and bring to the table to serve with the rice.

NOTE: This can be adapted in many ways. Try topping with toasted coconut for texture of chopped salted peanuts.

Lamb, Mint and Pea Salad


image

Leftover lamb never tasted better. Freshly cut herbs from the garden, a cucumber from the greenhouse and some leftover local lamb. A sunny evening called for a fresh cleansing salad to start the week on a healthy note. Although washed down with a large glass of Cab Sauv it probably had the opposite effect!

Not sure the picture does this dish justice but it is extremely tasty, particularly also crumbled with feta or goats cheese as well as or instead of the lamb for the veges.

Serves 3 as a main, 4 as a lunch or starter

Salad

  • 2 little gems
  • 1 romaine lettuce, shredded
  • 1 small cucumber, chopped on diagonal
  • 1 avocado, chopped
  • 1 lemon, juice
  • Handful pine nuts, toasted
  • Bunch mint, leaves picked and chopped
  • Bunch of chives, chopped
  • Leftover lamb, sliced- mine was rare roast butterflied leg but anything works well, shredded etc
  • 250g frozen peas, blanched

Oregano and Lemon Yoghurt

  • 6 heaped tbsp thick yoghurt
  • 1 small garlic clove, minced
  • Bunch oregano, leaves picked
  • ½ lemon juice and zest
  • 1 tsp extra virgin olive oil
  • Salt and pepper

Sun dried Tomato Bread

  • 250g self raising flour
  • 4 sun-dried tomatoes in oil
  • Bunch basil
  • Salt and pepper
  • Warm water
  1. Make the bread first. Blitz the sun dried tomatoes and basil in a processor until fine. Add the flour and some generous seasoning and blend. Pour in enough warm water until the dough comes together in a smooth ball. Turn out onto a floured surface and knead for a few minutes before leaving covered to rest.
  2. Mix the yoghurt ingredients and chill.
  3. Keep the stalks on the little gems to hold them together. Half each and cut each half into 3 keeping them together at the base.
  4. Mix with the blanched peas, shredded romaine, cucumber and chopped herbs on a large platter.
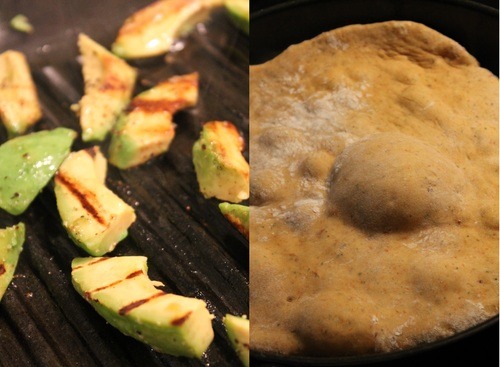
  5. Griddle the avocado on a hot oiled griddle pan until warm and charred. Season well and add to the salad. Squeeze over the juice from the lemon, a good splash of extra virgin olive oil and some seasoning and toss gently to combine.
  6. Sprinkle over the toasted pine nuts and finally the lamb.

image

7.  Heat a large frying pan. Roll the bread out to the thickness of a pound coin and big enough to fit the pan. Fry in the pan for about 5 minutes each side until toasty and beginning to char and crisp. Turn out onto a board and rip up and serve warm with the salad, dunked in the yoghurt or with some salted butter.

image

Blackcurrant Bakewell Macaroons

I’ve been making a lot of macaroons recently….perfecting the skill you might say! These were without doubt the lightest batch I’ve made to date and the super sweet blackcurrant puree (see here) which I made was to die for with the creamy but punchy almond buttercream filling. Sandwiched lovingly between two girly pillows these taste like a mouthful of bakewell tart! Feel free to use a cherry or raspberry jam for a more traditional ‘bakewell’ flavour however.

For me, the excitement of macaroons comes in the endless combinations of flavours but I love taking a traditional dessert recipe and deconstructing it into a light macaroon in an ‘amuse bouche’ style! The possibilites are endless….pecan pie, treacle tart, creme brule macaroons perhaps?

Macaroon Shells

  • 60g egg whites (about 2 eggs)
  • 40g caster sugar
  • 50g ground almonds
  • 110g icing sugar
  • Red food colouring

Filling- Almond Buttercream

  • 80g butter, softened
  • 80g icing sugar
  • Up to 1 tsp almond essence (or to taste)
  • Blackcurrant/cherry/strawberry jam
  • Yellow food colouring (optional)
  1. Preheat the oven to 170°C and line a baking tray with parchment.
  2. Blend the ground almonds and icing sugar together in a food processor until fine and then sieve into a bowl.
  3. In another bowl, whisk the egg whites until soft peaks form, then add the caster sugar a spoon at a time until glossy stiff peaks form. Briefly whisk in a good splash of red food colouring.
  4. Fold in 1/3 of the almond mixture to loosen it. Then fold in the rest, being gentle not to knock the air out.
  5. Spoon into a pipping bag with a round ended nozzle and pipe consistent circles of mixture evenly. Give the tray a sharp slap on the surface to level the mixture and leave for 20 minutes, uncovered to form a skin.
  6. Bake for about 12 minutes. They are ready when they come away easily from the tray. Leave to cool.
  7. Combine the butter, icing sugar and almond essence in a food processor or a bowl until smooth and combined. Add a splash of yellow food colouring if you like- the bright yellow colour can look great with the red shells. Spoon into a piping bag.
  8. Pipe some of the buttercream onto a macaroon shell half and top with about ¼ tsp of jam. Sandwich together with another empty macaroon half, squeezing together gently but not so the jam oozes out too much. Enjoy!

NOTE: I didn’t (as I ran out of icing sugar) but for authentic decoration, make up some thick wet icing with icing sugar and a tiny splash of cold water and spoon into a piping bag. Snip off the end and pipe some lines on the macaroons on the outside like a bakewell tart.

image

Gooey Cinnamon Cake Bites

image

If you haven’t already checked out the ’smitten kitchen’ food blog then do. Not only is it one of the first blogs that I was introduced to but it is a prime example of a fantastically interesting, honest, varied and drool-worthy food blog created by a passionate foodie who cooks from the heart simply because, like me, she is addicted- cooking is my happy place. However, more so, she has been one of the lucky ducks to get her humble blog made into a cook book. I can only dream of this priceless achievement! However, this is not going to happen by cooking other peoples recipes but the sound of cinnamon (one of my favourite flavours), gooey promises and the multiple times I had clicked on the recipe link only to mutter ‘I must make that’, prompted this recent cake-tin-filler. Here is the original recipe for those interested.

Base

  • 190g plain flour
  • 2tsp baking powder
  • 115g butter, room temp
  • 150g sugar
  • 1 egg, room temp
  • 60 ml whole milk
  • ¼ tsp salt

Gooey Top

  • 60ml golden syrup
  • 60ml whole milk
  • 1 tbsp vanilla extract
  • 170g butter, room temp
  • 225g sugar
  • ¼ tsp salt
  • 1 egg, room temp
  • 155g plain flour

Cinnamon Crust

  • 2 tbsp caster sugar
  • 1 ½ tsp ground cinnamon
  1. Start by lining a 9inch x 13inch cake tin with parchment. This may seem big but it is a flatish style cake/cake bar. Preheat the oven to 180.
  2. Start with the base by blending the butter and sugar in a processor or with an electric whisk until fluffy. Add the salt.
  3. Combine the egg and milk and mix into the butter and sugar until combined. Finally sieve in the flour and baking powder and stir to form a thick batter.
  4. Spoon it into blobs into the lined tin and spread out evenly and thinly with a spatula
  5. Now for the gooey layer, beat the butter and sugar together (no need to wash the processor) with the salt until fluffy. Add the egg.
  6. Combine the syrup, vanilla and milk.
  7. Sieve in 1/3 of the flour followed by half the syrup-milk mix. Add another 1/3 of the flour and then the final half of the syrup. Finally mix int he final 1/3 of flour and blend until smooth and delectable.
  8. Scrap large spoonfuls of the batter on top of the base and spread out evenly with a spatula until flat.
  9. Combine the sugar and cinnamon for the topping and scatter generously over the top to form a crusty cinnamon coat
  10. Bake for 25 minutes. It should feel slightly soft but gently et in the centre. Remove from the oven and leave totally alone to cool before removing from the pan.
  11. Cut into bite size pieces if you like.

image