Portuguese Cinnamon Tarts with Lavender Caramel


image

These have been adapted from Jamie Oliver’s interpretation of the Portuguese custard tart or- ‘Pastel de nata’. It seemed like a good way of using up a slab of puff pastry and an egg whilst keeping my mind sane and grounded during all this revision…

  • ½ block puff pastry (about 250g ish)
  • Pinch cinnamon
  • 1 egg
  • 120g creme fraiche
  • Zest of 1/2  lemon
  • 5 tbsp caster sugar
  • Seeds from ½ vanilla pod/ a splash of vanilla extract
  • Small pinch of lavender flowers
  1. Preheat the oven to 200°C. Roll out the pastry into a rectangle, about 1 pound coin thickness and about 25cm long. Scatter with the cinnamon and roll into a swiss roll shape down the long side.
  2. Cut into 6 rounds (they should look like uncooked danish pastries) and then liberally press each into a a non-stick or greased muffin tin pushing the pastry down in the middle and up the sides, squashing it to mould it into the tin. Bake for about 10 minutes until just going golden. You may need to use the end of a rolling pin or something round to press the middle down if it puffs up while cooking.
  3. Make the filling by mixing the beaten egg, creme fraiche, 1tbsp of the caster sugar, lemon zest and vanilla in a bowl.
  4. When the pastry seems to have cooked enough pour in the filling and cook for another 10 minutes or so until set with a slight wobble. Remove from the oven and quickly make the caramel.
  5. Melt the meaning sugar in a dry frying pan until beginning to melt. As soon as it begins to turn golden and liquidy, remove from the heat, add a scatter of lavender flowers and then quickly pour or spoon generously over the top of the tarts before the caramel becomes to hard. Allow to cool and harden.

image

Salmon and Dill Ravioli, Lemon Buerre Noisette


image

Only a few weeks after returning from my gap year travels I was disappointed in myself that I had gone all my (then) 18 years and one hearty gap year without ever having been to Italy! Venice and Florence had always been on my list of destinations……the land of food. So a quick ticket and a hostel bed later I found myself in the middle of Italy with a heavy bag and apron for company. Naturally with my priorities in the right place) I had both a Venetian and Tuscan cookery class booked and under my belt.

If I’m honest, I’ve never been a huge pasta fan but what could be better than making it yourself in the sunny Tuscan hills? I spent what has to be the most charming, authentic and relaxing day in a Tuscan cookery school just outside Florence on their magical estate. With wine in hand on arrival (their priorities were right) I cooked a 4 course meal using wines and rich olive oils from their own estate and learned how to make pasta. It was a day to remember. (For details see below).

However, not being a pasta fan I have not revisited the pasta section of the charmingly translated and authentic cookery book from the school- until now. I thought I’d deviate from the traditional spinach and ricotta variety I made in Florence and invented my own. For pasta lovers, making it could not be easier- I don’t even have a pasta machine! Whilst I would recommend one, as rolling it to a thin consistency did shamefully strain and unearth some hibernating arm muscles, but it was delicious. Fill your ravioli with whatever you like and coat in any sauce that takes your fancy! I’m now off to re-make the other dishes I so greedily enjoyed back in those sunny hills….watch this space

Serves 2-3

  • 200g ‘OO’ flour
  • 2 eggs
  • Pinch salt
  • Small handful of chopped dill
  • 2 salmon fillets, smoked (Mine were raw but lightly smoked which was a nice addition, alternatively used precooked smoked trout for the same texture and flavour but non-smoked salmon fillet work fine also)
  • 2 heaped tbsp creme fraiche/ricotta
  • 1 lemon, zest and 1 tbsp juice
  • 25g butter
  • 1 tbsp capers
  • Bunch of asparagus, chopped

1. Start with the pasta. Make a heaped mound of flour on a clean surface and make a well in the centre. Break in your eggs and a pinch of salt. Use a fork to whisk the eggs in a circular motion and then gradually bring in the flour from the sides bit by bit to incorporate it into the doughimage
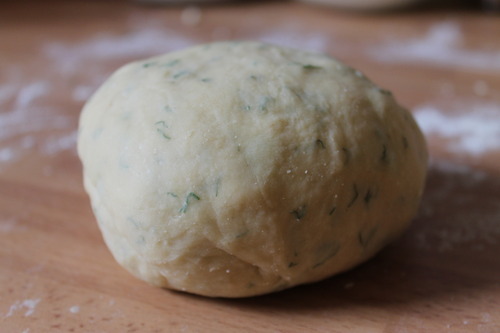
2. Once it has all be added (its may need a splash of water or wine to add a bit more moisture) knead into a ball. Add the chopped dill and then knead with the heal of your hand for a good 15-20 minutes until the dough is really smooth and it feels elastic.image

3. Wrap in cling film and rest in the fridge for at least 30 minutes.

4. Meanwhile, cook the salmon in a hot oven for about 10 minutes until just cooked but still moist. Discard the skin and flake into a bowl with some seasoning, the finely grated zest of the lemon and a squeeze of the juice. Leave to cool before stirring in the creme fraiche.

5. Once the dough has rested, remove from the fridge and use either a pasta machine or some elbow grease and a rolling pin to roll out so it is really thin.

6. Cut out circles with a pastry cutter and spoon teaspoons of cold salmon into the middle. Fold over into a half moon and sandwich together and seal with a fork.image

7. Place onto a lightly floured/.polenta coated plate.

8. Cook your asparagus spears for a few minutes and then drain and keep warm. Additionally, heat a splash of oil over a high heat and fry the capers until crisp and drain on kitchen paper.

9. Bring a large heavily salted pan of water to the boil and drop in your pasta. Simmer briskly until cooked to your liking (about 3-5 minutes depending on the thickness of the pasta) and they will rise to the surface when they are nearly ready.

10. Meanwhile, heat the butter in a large frying pan on a high heat. When it starts to sizzle, stir and allow it to turn a brown nutty colour and release a nutty aroma. Remove from the heat and stir in the lemon juice

11. Drain the pasta and serve, with the asparagus spears and drizzle generously with the lemon butter sauce. Scatter with the capers and a grating of lemon zest.

Buon Appetito!

The cookery course I did in Florence was ‘The Good Taste of Italy’ day course found here. I didn’t stay in the accommodation on the estate but I wish I had, its worth a look as they also do cookery holidays where you are housed in their stunning villa and fed silly.

image

image

imageimage

The Venetian course I did was outside of Venice and was very different. It took a more homely and casual approach set in the house of an Italian Mama. Advertised to teach you to ’cook like an Italian Mama’ it was certainly the most authentic course I could have done and there were only 3 of us in the class. After being collected, we shopped for our ingredients and picked our vegetables and herbs form their own healthy allotment before being welcomed generously to their kitchen to cook up a feast.

image

imageimage

Fried Halloumi with Minted Cous Cous

This week I am wholeheartedly and gratefully embracing the warm sunny weather we’ve been having after a looooooooong refreshing and bracing spring. I can start work on my tan which currently can only be compared to a Farrow & Ball white paint chart where I am bordering the ‘Wimborne White’ with an aim of becoming more in keeping with a natural shade of ‘Cat’s Paw’. I love the excuse to bring out all the flavourful salads I crave which just don’t meet the winter demands….

Minty Cous Cous Salad (adapted from ‘What Katie Ate’)

  • 1 tsp ground cumin
  • 100g giant cous cous
  • 200g cous cous
  • 100g pumpkin seeds
  • 60g pine nuts
  • 100g flaked and/or whole almonds
  • 2 courgettes, peeled into ribbons or sliced thinly with a mandolin
  • 4 spring onions, chopped
  • A generous handful of chopped mint, basil, parsley and coriander or a mixture of these herbs you prefer chopped finely
  • Light vegetable stock
  • Handful of rocket, watercress or leaves
  • 1 lime
  • Extra virgin olive oil
  • Halloumi to serve
  1. Heat a splash of oil in a pan and add the cumin to fry for a minute. Then add the giant cous cous and toast until fragrant for a few minutes.
  2. Add a good splash of stock to cover and cook the cous cous for about 15 minutes until soft. Drain.
  3. Toast the pumpkin seeds, pine nuts and flaked almonds in a dry pan until fragrant.
  4. Add another splash of oil to a hot frying/grill pan and add the courgette strips and char for a few minutes until crisp.
  5. Season the small grain cous cous and add a knob of butter. Pour over 300g of stock, cover and allow to absorb. Then using a fork, fluff up the grains.
  6. Now to assemble, combine the giant drained cous cous and the fluffed cous cous. Add the courgette ribbons, seeds and nuts, a generous handful of the herbs and the salad leaves
  7. Add a squeeze of lime and a drizzle of extra virgin olive oil to loosen and scatter with the spring onions.

This is delicious served with some fried halloumi and a minted lime yoghurt and flatbreads and a lovely addition to a BBQ.

image

Bloody Mary Prawn Salad

One of the reasons I have a huge but justified love of Jamie Oliver is his casual, instinctive and rustic approach to cooking which is what inspired me at a young age to cook. This recipe is just those things, rustic and casual and can be instinctively thrown together with a few alterations in flavours or ingredients that you love. Using his basic concept, I tweaked a few bits to make it the perfect starter at a recent dinner party. If you’ve got guests who enjoy fish, nothing excites and pleases them more than being presented with a platter of succulent shellfish with a tangy dressing and lemon for all. This is light and perfect to kick start the meal although in greater quantities it was all agreed we could have eaten it for mains as well…..

(Serves 6-8 as a sharing starter)

  • 2 small cos lettuce
  • 2 red chicory
  • 1 punnet cress
  • 1 large handful chopped dill
  • Celery leaves from celery tops
  • 2 ripened avocados
  • 2 slices of stale bread, cubed into croutons size
  • 400g cooked, juicy prawns
  • 200g brown shrimp
  • Crevettes (enough for one each)
  • Green lip mussels (enough for one each)
  • 200ml ‘Big Tom’ spiced tomato juice
  • 2 heaped tbsp mayonnaise
  • Juice of 1 lemon
  • 3 heaped tsp creamed horseradish
  • Salt and pepper
  • Extra virgin olive oil
  • Splash of vodka
  1. Clip the leaves off the lettuces so that you get ‘edible cups’ from the leaves to nestle your prawns and dressing. Scatter these over a couple of serving dishes.
  2. Scatter the prawns and brown shrimp over the top filling the cups.
  3. Make the dressing by placing the big tom juice, mayonnaise, lemon juice, horseradish, vodka, a good drizzle of extra virgin olive oil and some seasoning in a processor and blend to combine. Taste and add a touch of whatever it is lacking for your tastes like Tabasco. However, make sure it is a bit too punchy and a bit over the top as when it is combined with everything else it will be blunted slightly and hold its own.
  4. Get a griddle pan on a high heat and drizzle with olive oil. Cut the avocados into thick slices and char on the griddle, seasoning generously with salt and pepper, for a few minutes each side to warm through and soften. In another pan, heat some more oil and add your cubed bread with some seasoning and fry until golden and crisp. Drain on kitchen paper.
  5. Scatter the hot avocados and croutons over the salad and prawns. Drizzle with the Bloody Mary dressing and scatter with the chopped dill, cress and celery leaves. Place the crevettes and mussels boldly on top and serve with lemon wedges as a sharing platter for an indulgent starter or light lunch…..

Cinnamon Madeleines


imageimage

Today I wish I was in France….on a sunny beach in Cannes, drinking French wine and tanning on the golden sands…..Damn I am in cold England revising for some pretty impossible approaching university finals with no current future job prospects lined up and ready….anyone looking for a keen foodie employee? I can make a good cuppa….???

That leads me onto these madeleines which are the perfect match to a comforting brew. The French atmosphere was easy to implicate by the simple addition of a batch of these light and sweetly spiced French madeleines (However you will need a madeleine tray mould experience France this way…). And to add another shine to my day, my mum’s return from the supermarket with a bulging bag of obese and bearded mussels and some skinny frites was enough to satisfy my French envie. After recently making some ’Carrot Cake Ice Cream’, I was inspired to make something to pair with its creamy flavour which resulted in these spiced madeleines coated in a crunchy cinnamon sugar. Ok so I’ve probably created an American ‘doughnut-style’ finish to what is essentially a classic French treat which I’m sure any Parisian would never admit to approving of. However, revision depression called for it…..icing sugar is your nest best thing….

Makes about 12

  • 100g unsalted butter, melted
  • 100g caster sugar
  • 100g plain flour
  • 1 level tsp baking powder
  • 2 large eggs
  • 1 tsp cinnamon
  • 1 tsp ground ginger
  • 1 tsp mixed spice
  • Grated zest 1 orange
  • 50-100g cinnamon sugar (made with a ratio of 1 large tbsp: 300g golden granulate sugar)
  1. Whisk the eggs and the caster sugar together until pale and creamy.
  2. Add the flour, baking powder, spices and orange zest and lightly whisk in with the melted butter to prevent overdeveloping the gluten.
  3. Set aside in the fridge for anywhere up to 3 hours. Apparently, the longer you leave the batter to chill the better as it chills and hydrates the flour. This helps to give you that bump on the back that is characteristic of a madeleine.
  4. When ready to cook, preheat the oven to 200°C. Grease your madeleine tray with a little melted butter and a dusting of flour if it is liable to sticking..
  5. Fill the moulds making sure you don’t overfill. The mixture will settle into place in the oven so don’t worry about smoothing them out.
  6. Bake for 8-12 minutes depending on how big you made them and how large your madeleine pan is.
  7. Once golden and cooked, remove from the oven and, while warm, coat in a generous blanket of cinnamon sugar and then leave to cool on a wire rack before eating.

In case anyone was wondering where the cake stands were from (from recent photos) I make them…..if anyone wants one, let me know and I can make them to order.

image

image

Serve with a strong cuppa or with some carrot cake ice cream

Mocha Macaroons


image

After my frequent delicious sessions of ice cream making I always find myself making macaroons with the surplus of egg whites that sit patiently in the fridge, aging unnecessarily but making them (apparently) all the better for creating the perfect macaroon. I’d hate to see them be turned into a batch of brittle powdery meringues which are one of my foodie hates. So before they could be whisked up into a stiff peaked meringue hell I stole them for some macaroon experimenting. Results….a cheeky invented edible ‘mocha macaroon’ which was much more satisfying than an expedition to Costa! (I would just like to add that although I hate meringues, my mum’s version are great if there are ever to be any knocking around and would categorically NOT be powdery or brittle). Now with my back covered……..

  • 60g egg whites (about 2)
  • 40g caster sugar
  • 50g ground almonds
  • 110g icing sugar (minus 2 tbsp)
  • 12g Green & Blacks cocoa powder

Filling

  • 75g unsalted softened butter
  • 80g icing sugar
  • 1 tsp coffee dissolved in 1 tbsp boiling water, cooled
  1. Preheat the oven to 170°C and line a baking tray with parchment
  2. Blend the ground almonds, icing sugar and cocoa together in a food processor until fine and then sieve.
  3. In another bowl, whisk the egg whites until soft peaks form, then add the caster sugar a spoon at a time until glossy stiff peaks form.
  4. fold in 1/3 of the almond mixture to loosen it. Then fold in the rest, being gentle not to knock the air out.
  5. Spoon into a pipping bag with a round ended nozzle and pipe consistent circles of mixture evenly. Give the tray a sharp slap on the surface to level them and leave for 20 minutes, uncovered.
  6. Bake for about 12 minutes. They are ready when they come away easily from the tray. Leave to cool.image
  7. Make the buttercream filling by combining the ingredients in a processor and then spooning into a smaller piping bag.
  8. When cool, pipe small amounts onto macaroon halves and sandwich together!

image

Gruyere and Onion tarts

This recipe (that is religiously made every year on Christmas eve in the Wardlaw house), is courtesy of Delia and has always been the most deliciously simple combination. For some reason we didn’t make it this Christmas eve, so feeling cheated I found myself whipping out a batch for a warming lunch in this Christmas provoking weather….

Filling

  • 2 eggs
  • 75ml single cream/creme fraiche
  • ½ tsp mustard powder
  • 75g Gruyere cheese, grated
  • 25g butter
  • 2 onions, finely chopped
  • Cayenne pepper

Pastry

  • 175g flour
  • 75g butter
  • 50g cheddar cheese, grated
  • ½ tsp mustard powder
  1. For the pastry, rub the butter and flour together and add the cheese, mustard and cayenne pepper. Add enough water to bring together to form a dough and then wrap and rest in the fridge for 20 minutes.
  2. Preheat the oven to 180°C and grease some small tart tins. Roll the pastry out thinly and line the tins. Bake the cases blind with baking beans and parchment for about 15-20 minutes until turning a pale brown. Remove the beans/parchment for the last 5 minutes to cook the base. Leave to cool in their tins while you do the filling.
  3. Melt the butter in a frying pan and sweat the onions until soft and beginning to turn a golden colour. Do this slowly to get a good flavour (about 20-30 minutes). Set aside.
  4. Mix the eggs, cream and mustard powder together in a jug adding a pinch of cayenne according to taste.
  5. Fill the tart cases with the onion and grated gruyere and fill with the egg mixture. Scatter over a pinch of cayenne pepper.
  6. Bake for about 15-20 minutes until set. Remove from the oven and leave to cool slightly before tucking in.

I made a tomato salsa to top mine by finely chopping a mixture of coloured cherry tomatoes, some bruised thyme leaves, salt and pepper and a good glug of extra virgin olive oil. Leave to infuse and serve at room temperature atop your tarts with a green salad.

Carrot Cake Ice Cream


image

What could be better than combining the forces of a good cake and its  slutty partner in crime ice cream? This recipe is adapted from the Babel Restaurant in South Africa, Babylonstoren, whose ‘cookbook-come-brochure’, is to die for. As a spicy ice cream, they suggest serving it with chilli grilled pineapple slices, but hey, whats wrong with serving it with a slice of carrot cake….?

  • 500ml double cream
  • 180ml milk
  • 180ml caster sugar
  • 5 egg yolks
  • 1 vanilla pod
  • 125g carrot, boiled and grated
  • 5ml ground cinnamon
  • 2ml ground nutmeg and ginger
  • 125g walnuts/pecans toasted and roughly chopped
  1. Start with the custard base. Heat the milk in a saucepan with 90ml of the sugar and the seeds from the vanilla pod until just coming to the boil.
  2. Whisk the egg yolks in a bowl (a wide shallow bowl helps) with the remaining 90ml of sugar until combined.
  3. When the cream is hot, tip a third of it in a slow stream into the egg yolks whisking continuously and vigorously to prevent it scrambling. Make sure it is all combined then add the rest and whisk together for a few minutes.
  4. Tip the mixture back into the saucepan and place over a low heat stirring with a wooden spoon continually until the mixture begins to thicken and it coats the back of the spoon and leaves a mark when you run your finger through it. keep the heat low and keep stirring to prevent getting scrambled eggs….
  5. Strain through a sieve into another wide shallow bowl. Whisk in the ground spices.
  6. Peel about 2-3 carrots (depending on their size) and boil whole in water for about 5 minutes, until soft. Cool under cold water and then grate into the custard base and mix to distribute. Leave to cool and then place in the fridge.
  7. Meanwhile, toast the nut in a dry frying pan for a few minutes or in a hot oven for 5 minutes and leave to cool.
  8. When the custard is cool, churn in an ice cream maker for about 15-20 minutes until thick and beginning to freeze. Once it begins to thicken during churning, tip in the toasted nuts. Place in a container and freeze.

Coffee Ice Cream


image

A perfect Easter lunch dessert to keep everyone awake in front of the roaring fire………although this year the cold weather seems to be doing that for us brrrrrrr! If you’re a coffee fan then this ice cream is an instant (see what I did there) and satisfying winner!

(Serves 8)

  • 1 can condensed milk
  • 300ml single cream
  • 2 heaped tbsp instant coffee
  1. Warm the cream in a pan over a medium heat. When it looks like it is just beginning to simmer, remove from the heat and whisk in the coffee until it had dissolved.
  2. Pour the condensed milk into the cream and stir to combine
  3. Chill and then put into a container and freeze overnight…no churning needed! Although if you want an instant ice cream, churn for about 30 minutes and eat!

image

I served mine with a mini version of my hazelnut frangipane tartlet (see here) drizzled with dark chocolate, half a lightly poached vanilla pear and some teeth shattering hazelnut praline. For the vanilla pear, lightly poach half a cored and peeled pear in sugared water for about 20 minutes with a splash of vanilla extract or a halved and de-seeded vanilla pod, until soft.

image

Hazelnut Praline

  • 60g caster sugar
  • 40g hazelnuts
  1. Toast the hazelnut in a hot oven for about 6 minutes. Then remove, wrap in a towel and rub the skins off
  2. Lightly bash in a pestle and mortar or in a plastic bag with the back of a rolling pin to coarse crumbs. Sprinkle sparsely over a piece of greaseproof paper
  3. Heat the caster sugar in a dry frying pan over a high heat and leave to melt, stirring every so often until the sugar turns liquid and golden brown. Watch it as it will easily burn.
  4. As soon as it is a pale golden brown and the sugar has all dissolved, remove from the heat and quickly pour over the hazelnuts in a thin layer. It will set fast so work quickly (it will be EXTREMELY hot though so make sure you don’t touch it)
  5. Leave to cool in a cool place or place the caramel on a hard marble surface to speed it along. When cool, break in shards and mind your teeth.

image

Green Risotto with Crispy Parma ham and Almonds

Risotto is such a versatile and satisfying meal even when, like last night, I was simply using up loose ends from the cupboard because I’d run out of food for the week. It can be made fancy and gourmet by the easy addition of some little tasty toppings which are totally open to interpretation….a poached egg on top is always a favourite of mine! As a risotto lover (and sane person) I always have risotto rice, parmesan cheese and butter in the house and with white wine never more than a stones throw away these few ingredients can always be used to make an endless amount of different variation on a risotto with whatever ingredients are to hand.

I tend to make risottos by instinctive quantities. It really doesn’t matter how much rice or stock you have weighted out as long as you taste as you go along and make sure that the consistency resembles that of loose porridge when ready. I usually use a large handful of rice per person and a pinch more for luck as cold risotto is perfect for arancini (see here).

Serves 2 generously

  • 2 large handfuls of risotto rice
  • 40g butter
  • 1 small onion, diced
  • 1 garlic clove, chopped finely
  • 2 sprigs thyme, leave picked
  • Small glass dry white wine
  • Hot chicken/vegetable stock
  • Handful of finely grated parmesan
  • 2 handfuls of frozen peas
  • Small bunch mint, chopped
  • Handful of rocket leaves
  • ½ lemon
  • 2 slices of parma ham
  • Small handful of flaked almonds
  • Creme friache
  1. Begin by boiling the peas for a good 5 minutes. (Keep a handful aside for garnish if you like) and blend the rest in a food processor with a splash of the stock until really smooth. Set aside.
  2. Continue by melting half the butter in a pan with a teaspoon of oil. Soften the onion gently until translucent. Add the garlic and thyme and cook for another 5 minutes or so.
  3. Turn the heat up a little and add rice and fry until really hot. Add the white wine to let the rice simmer to absorb the wine.
  4. Now add ladelfuls of the hot stock as each addition of liquid becomes absorbed by the rice, simmering gently over a low heat. The rice takes about 18 minutes to cook so keep adding as much stock as needed until the rice is just cooked and soft. Keep stirring all the time to make sure the starches are released and you get a really creamy texture.
  5. As soon as the rice almost appears to plump up and double in volume and it is just cooked and soft to taste, add the lemon juice and season.
  6. Now stir in the pea puree and mix evenly. If it thickens too much, add a splash of stock to keep it loose.
  7. Add the other half of the butter, cut into cubes, and the grated parmesan. Cover quickly with a lid and take off the heat to rest.
  8. While it rests for 5 minutes, fry the parma ham and flaked almonds in a little oil until crispy and golden and then drain on kitchen paper.
  9. Now stir the melted cheese and butter evenly through the rested risotto and add the rocket and mint and stir to wilt down in the residual heat. If it thickens, add a splash of stock again to get a loose oozing consistency.
  10. To serve, pour a generous portion into a warmed bowl. Top with a few whole peas, the crispy parma ham and toasted flaked almonds and a few teaspoons of creme fraiche if you like!

For tips on the perfect risotto or more definitive measurements, see here.

image