Category Vegetables and Salads

Pea and Smoked Ham Tart with Parmesan parsnips

image

This is a pleasingly alternative and delicious use of Christmas leftovers after exhausting the usual recipes with the turkey. My brief from the family for dinner was a light, fresh but tasty meal after a heavy week of Christmas delights, rich meats and glasses of guilt. So, with a fridge full or assorted cheeses, a cooked smoked ham and a few of our giant allotment parsnips that were looking very sorry for themselves, I enthusiastically took up the mission.

Cheesey Shortcrust pastry

  • 100g wholemeal flour
  • 150g plain flour
  • 125g unsalted butter, cubed
  • 70g cheddar cheese, grated plus and reserved handful
  • Salt and pepper
  • Cold water

Filling

  • 250g frozen peas
  • 3 eggs
  • 75g creme fraiche
  • Juice of half lemon
  • 1 tbsp wholegrain mustard (optional)
  • A few large handfuls of smoked ham, cubed or flaked into pieces
  • Salt and pepper
  • Splash of milk
  1. Begin with the pastry. Preheat the oven to 200°C. In a food processor, combine all the pastry ingredients, except the water, and blitz to form a breadcrumb-like texture. Or rub the butter into the flour by hand.
  2. Tip out into a bowl and add cold water, spoonful by spoonful, and mix in with a knife until you have a mixture that forms a dough when your gently press together with your hands. Form a ball of dough.
  3. Roll into a disc shape, wrap in cling film and chill in the fridge for 30 minutes.
  4. Meanwhile, line a tart tin (I used one about 23cm wide but use whatever is to hand) with parchment and butter the sides. This recipe in my case lined two tart tins so I made two and froze one for another time.
  5. After 30 minutes, thinly roll out your pastry on a floured surface and use it to line the tin, pressing the pastry up the sides. Prick all over with a fork to prevent it rising up while baking.
  6. Line the tine with parchment and fill snugly with baking beans or rice if your don’t have any beans.
  7. Blind bake for about 20 minutes until the edges are golden.
  8. Remove the beans and parchment and bake for another 5-10minutes until the base is cooked and crisp. Brush with a bit of beaten egg to seal the fork pricks and return for 1 minutes. Remove and leave to cool.
  9. Make the filling. Boil the peas for a few minutes until cooked. Drain and cool thoroughly with cold water.
  10. Reserve a handful of the peas and puree the rest in a processor or mash with a fork until you form a coarse paste. Add the lemon juice, seasoning, mustard, eggs and creme fraiche. Blitz again in the processor to mix thoroughly.
  11. Add a splash or so of milk to form a texture that is loose but not too watery, a bit like custard.
  12. Sprinkle the base of the pre-baked tart case with the flaked ham and the reserved whole peas.
  13. Fill this with the egg custard until distributed evenly and full but making sure it dose not overflow the edges of the pastry case. You may not need it all.
  14. Scatter over the remaining grated cheddar and bake in the oven at 190°C for about 25-30 minutes until the middle is cooked and set.
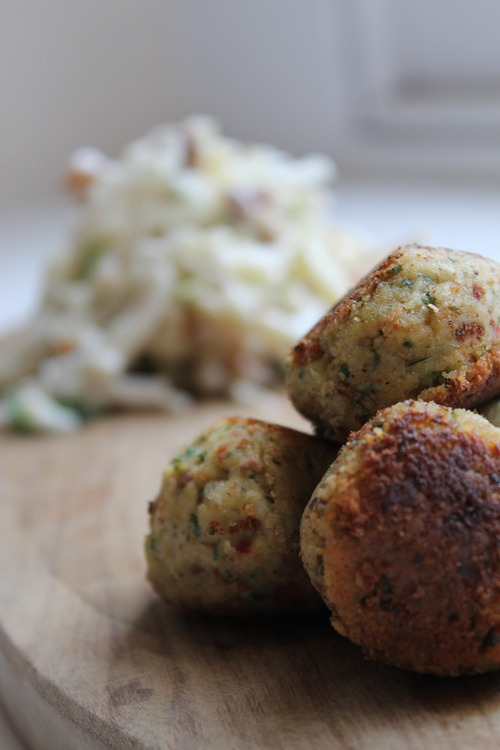
  15. Grate over a bit of lemon zest and serve with a green salad and some crispy baked Parmesan coated parsnips in my case….!

image

Parmesan Parsnips

  • 2-3 parsnips, peeled and cut into batons shaped
  • 200g brown bread crumbs
  • 100g finely grated Parmesan cheese
  • Handful of flour
  • 2 beaten eggs
  • Sunflower oil or light olive oil
  1. Preheat the oven to 190°C
  2. Boil the parsnips in water for about 4-5 minutes until tender and soft when pierced with a knife but still with a bit of resistance.
  3. Drain and allow to steam for a few minutes.
  4. Set up 3 bowls. Fill one with seasoned flour, another with beaten egg and the third with the breadcrumbs combined with the grated cheese.
  5. When the parsnips have cooled slightly, dip into the flour, then the beaten egg and finally coat in the breadcrumb mix.
  6. Repeat this with the remaining parsnips and place them on a lined baking tray.
  7. Drizzle generously with sunflower oil and bake in the oven, turning halfway through, for 30 minutes until crisp and golden

image

Kohlrabi, Apple and Celeriac Winter Coleslaw with Falafel

What the hell do you do with a kohlrabi you ask….What does it taste like…..? Its a lovely refreshing root vegetable with a similar taste to celery and mild celeriac. Shaved raw it went really nicely with some apple, celeriac and crumbled toasted walnuts, tossed with a tangy creamy yoghurt dressing for a winter coleslaw. I served my cool coleslaw stuffed generously into the floury arms of a warm pitta bread, some comforting Moroccan spiced falafel, a squeeze of lime and a scatter of coriander…..

Coleslaw

  • 1 kohlrabi, peeled
  • ½ celeriac, peeled
  • 1 Cox apple
  • Handful of toasted, crushed walnuts
  • 120g plain natural yoghurt
  • 1 heaped tbsp mayonnaise
  • 1 teaspoon of fennel seeds
  • Lemon juice
  • Salt and pepper
  • Flat leaf parsley, chopped
  1. I used the blade attachment on my Magimix to get the shaved sticks from the kohlrabi and celeriac (However, you could grate them or slice on a mandolin but the processor makes it a lot easier) I recommend slicing the apple into matchstick by hand as they are quite juicy when put into the processor.
  2. Combine the shredded kohlrabi and celeriac in a large bowl in roughly similar amounts. Add the apple.
  3. Toast the walnuts in a dry frying pan, then crush and add to the vegetables.
  4. Toast the fennel seeds similarly and crush in a pestle and mortar.
  5. To make the dressing, mix the yoghurt, mayo, fennel seeds, chopped parsely and season to taste. Add enough lemon juice to taste to give it a nice punchy flavour.
  6. Toss the dressing with the vegetables. Add as much as you like for the desired texture.

Falafel (makes about 14)

  • 1 can chickpeas
  • 1 red chilli
  • 1 bunch coriander and in addition, either mint, parsley, basil or whatever is in season or takes your fancy
  • 1 garlic clove
  • Juice of 1 lemon
  • 1 tbsp tahini
  • 1 tbsp yoghurt
  • Salt and pepper
  • Splash of extra virgin olive oil
  • 1 ½ heaped tsp of the following mix of ground Spice Mix (toast 1tsp of each fennel, cumin, coriander and fenugreek seed with 1 cinnamon stick, 3 cardamon pods and 1 star anise in a dry frying pan until hot, fragrant and beginning to pop, remove and grind in a pestle and mortar until fine).
  • Approx 50g fine white breadcrumb
  1. Place all the ingredients except the oil into a food processor and pulse until well combined, scrapping the mixture down from the sides every now and then.
  2. Add a splash of oil to loosen but do not allow the mixture to become too loose (This is my hummus recipe too, so if you want hummus and not falafel, simply add more oil to get a spoonable texture)
  3. Now place the mixture into a bowl and mix in enough breadcrumbs until the mixture is stiffer. It should be stiff enough to roll into about 14 golf ball sized falafel. If it is too wet, add some more breadcrumbs.image
  4. Now roll into about 14 falafel balls and fry in hot oil until crisp on the outside and fluffy in the middle.

imageimage

Spinach, Watercress and Pea Healing Soup

Ever feel like your body is screaming for some nutrients? After this soup, I always feel like I’ve eaten my way to adding another few years onto my lifespan! It has a deep, tasty flavour and is delicious with warm toasted soda bread and salty butter.

  • 2 tbsp olive oil
  • 1 onion, chopped
  • 2 sticks celery, diced
  • 1 garlic clove, chopped
  • 750ml hot chicken/vegetable stock
  • 170g peas
  • 150g spinach
  • 170g watercress
  • 150 double cream
  • Chives
  • Dukka
  1. Heat the oil and fry the onion and celery on a low heat until soft. Add the garlic for the last few minutes before adding the hot stock
  2. Add the peas and return to the boil for about 5 minutes
  3. Add the spinach and watercress and simmer for 10 minutes
  4. The blend the soup and add the cream or creme fraiche if you like.
  5. Serve scattered with chives, herbs or more  cream. I sprinkled mine with dukka for added texture and a bit of spice

image

Horseradish Arancini with Roasted Beets

image

Leftovers can be all the more delicious if you give them a bit of time. With some leftover horseradish risotto….arancini were on the list, with some seasonally roasted beets and a vibrant and sweet pea puree.

  • 1 quantity of leftover risotto, cold
  • Large bowl of fine white breadcrumbs
  • 1 egg, beaten
  • 4 tbsp plain flour
  • Small bunch of flat-leaf parsley
  1. Lay out 3 shallow bowls. Place the flour in one, the beaten egg in another and the breadcrumbs in the last.
  2. Chop the parsley finely and add to the breadcrumbs with some seasoning.
  3. Now take a spoonful of your cold risotto and form it into a golf ball. First roll in the flour, then the egg and finally into the breadcrumbs to coat. You can re-roll it into the egg and breadcrumbs again if you like, for a thicker coating.
  4. Do this with the rest of the risotto.
  5. Now heat some olive oil in a pan with a knob of butter. When it starts to sizzle, add the arancini and fry on a medium high heat until golden and the risotto is warm through. If they brown too quickly before they are hot in the middle, pop them in a hot oven for about 10 minutes.
  6. Roast some beetroot in oil, with a scattering of cumin seed, salt and pepper for 45 minutes and serve alongside with some crushed peas.

Cauliflower Cheese Soup With Sage and Chestnuts

Time for another comforting winter soup. I love cauliflower cheese so this soup was sure to please. As chestnuts were also in season and getting ready to be roasted on a humble fire, I thought I’d save them the pain. As they were screaming naughtily at me to eat them, I topped my soup with their creamy, crumbled texture and some crispy sage leaves for some delicate crunch.

  • 1 large cauliflower, cut into florets
  • 1 onion, chopped
  • Large knob of butter
  • 1 garlic clove sliced
  • small bunch of sage leaves, picked
  • 700ml hot stock
  • Salt and pepper
  • 100g or so of strong mature cheddar cheese, grated
  • Sage leaves to fry
  • Olive oil
  • Chestnuts
  1. Begin by getting the chestnuts on to boil. Pop them straight in, they should take about 15 minutes to soften. After this, drain and allow to cool. You can score the top with a cross to make them easier to peel if you like. Once soft, drain and set aside to cool.
  2. Melt the butter with a splash of oil in a pan. Once hot, soften the onion for about 5 minutes until translucent. Add the sage leaves and the garlic and fry for a couple of minutes.
  3. Add the cauliflower florets and stir to coat in the onion. Season.
  4. Add the hot stock and bring to the boil. Simmer for about 10 minutes until the cauliflower is really soft when pierced with a knife.
  5. Remove from the heat and blend with a hand blender.
  6. Add a spoonful of creme fraiche or replace some of the stock for milk for a creamier texture if you like. Add the cheese.
  7. Replace back on the heat on low and stir until the cheese had melted. Season to taste
  8. Now heat a thin layer of oil in a frying pan until really hot. Lightly fry the sage leaves until crispy and drain on kitchen paper. Season with a scatter of salt. This oil can now be kept and used as ‘sage-scented oil’ to top your soup or for other recipes and dressings.
  9. Serve the soup topped with crumbled chestnuts, crispy sage leaves and a drizzle of the fragrant oil!

image

Pumpkin, Pancetta and Sage Risotto with a poached egg

This seasons allotment pumpkin harvest certainly and surprisingly earnt its keep this year which is my excuse for the popular pumpkin theme these last few weeks. As ten chubby, overfed pumpkins sat apprehensively on the wall outside my backdoor, I had originally thought them unsuitable for eating, I had already devised a family tree of characters to make my own set of halloween faces! However, as I cut into their dense, creamy flesh, I realised they were much too good to waste.

So I knocked up a vat of oozing, cheesey, creamy and vibrantly orange halloween-themed risotto. Topped with a poached egg, or as pictured, a cool quinelle of mascarpone, it went down a treat. I roasted my pumpkin to get the most from its flavours with a little added crushed coriander seed to give you a crackle of surprise in every other mouthful.

Serves 4

  • 1 small pumpkin/butternut squash
  • 1 tsp coriander seeds, crushed in a pestle and mortar
  • 3 garlic cloves, left in their skins
  • Olive oil
  • 200g risotto rice
  • Hot chicken or vegetable stock (about 1 pint)
  • 1 glass dry white wine
  • 1 onion, chopped
  • Few sprigs thyme
  • 25g butter
  • Parmesan, grated
  • Handful of sage leaves
  • 150g pancetta or smoked bacon
  • 1 egg/Mascarpone to serve
  1. Preheat the oven to 190°C. Cut the pumpkin in halve and scoop out the seeds and reserve (you can fry these in oil). Cut into small quarters or large chunks and drizzle with oil, scatter with salt and pepper and the coriander seeds. I chucked in a few garlic cloves in their skins here too, as I never miss this opportunity as they go all sweet and sticky.
  2. Roast for about 40-50 minutes until the flesh is soft and scoopable. Use a spoon to scoop the flesh out into a food processor or a large bowl and throw the skins away. Squeeze the sugary garlic from their skins and add to the pumpkin. Mash in a processor with a splash of hot stock to loosen or with a masher in a bowl. Set aside to keep warm.image
  3. Meanwhile or afterwards, begin the risotto base. Melt the butter with a splash of oil in a large pan over a medium low heat. Soften the onion until translucent and then add the thyme leaves and season.
  4. Add the rice and stir until beginning to turn translucent and it is hot to touch. Add the wine and simmer until absorbed.
  5. Now turn the heat down so that it gently simmers and add ladlefuls of your hot stock to the rice, adding another once each had been absorbed. Don’t let it dry out however. (For tips on the perfect risotto see here) The whole process should take about 15-18 minutes with continual stirring.
  6. Meanwhile, heat a hot frying pan and cook the pancetta or bacon until crisp. Add the sage leaves at the end for a minute until crisp then set aside.
  7. After about 15 minutes, test the risotto. The rice should be nearly done or a little al dente.
  8. Now stir in most of the pumpkin puree. It will thicken considerably so add more stock to get a oozy, loose and molten texture.
  9. Stir in the pancetta and sage and season to taste.
  10. Once the consistency is loose enough and the rice is cooked, take off the heat. Add the parmesan and a squeeze of lemon and cover with a lid and let it sit for a minute or so to rest. Then stir together when the cheese has melted.
  11. Spoon into shallow bowls and top with extra sage, and if wanted, a spoonful of creamy mascarpone or a ‘runny-in-the-middle’ poached egg!

This recipe is also lovely with walnuts or chestnuts for added crunchy texture!

Cornbread Fritters with Soured Cream and Guacamole

These little cornbread inspired fritters/pancakes were made with the leftover pulp from the sweetcorn soup I made. I hate waste and this way, the delicious wholesome leftovers were put to good use. You could alternatively use tinned corn which you can blend, the texture may be slightly different so just add more flour/milk to adjust for a drier/wetter batter. The polenta adds a crispy texture, the cheese melts everywhere and the chilli provides that familiar cornbread kick.

  • 300g leftover pureed corn from your Creamy Sweetcorn Soup– see recipe (or tinned sweetcorn, pureed)
  • 3 spring onions, finely chopped including green tops
  • ½ large red chilli, finely chopped
  • 40g grated mature cheddar cheese
  • 40g plain flour
  • 40g polenta/cornmeal
  • ½ tsp baking powder
  • 2 large eggs, beaten
  1. In a large bowl, combine the pureed corn, spring onions, chilli, cheese and season.image
  2. Whisk in the eggs and then stir in the flour, baking powder and polenta until you have a thick batter. If the batter is too runny add a little more flour. It should be fairly thick but will set once cooked.image
  3. Heat a thin layer of sunflower oil in a frying pan over a medium-high heat. Fry spoonfuls of the mixture for 1-2 minutes each side or until golden and crusty from the polenta. The mixture can be a little wet but adding too much flour I’ve found makes them taste a bit ‘floury’ whereas here they will taste solely of sweetcorn.image
  4. Drain on kitchen paper and leave to cool slightly before serving warm with soured cream and guacamole!

Creamiest Sweetcorn Soup with Truffle Oil

I’d never had sweetcorn soup until this beauty, made with 4 large rusks that were bordering edible, cluttering up my fridge. However, it was the creamiest, silky soup I’ve ever made.

I’m never one to sieve anything, especially soups as I think much of the nutrients and goodness are in the skins or roughage and it seems such as waste to chuck the pulp away! However………however…….the sieved version is like eating a shining billowy parachute of silk and is devine. Plus for the waste conscious like myself, the leftover pulp/pureed corn I used economically and deliciously in some amazing cornbread fritters to serve alongside or the next day.

Serves 2 – Sieved, elegant and smooth

Serves 4 – Chunky, rustic and wholesome

  • 4 corn cobs, kernels removed (about 400g)
  • 1.1 litre vegetable stock
  • 50ml double cream
  • 30g butter
  • 1 tsp olive oil
  • 1 small leek, chopped finely
  • 1 garlic clove, crushed
  • 1 bay leaf
  • Truffle oil, to serve
  • Chives, to serve
  1. Begin by heating the butter and oil in a pan. Add the leek and garlic and soften over a medium-low heat until translucent.
  2. Remove the kernels from the corn by standing the cobs on end and use a sharp knife to score them off. Add the bay leaf to the pan and the corn. Cook for about 4 minutes.
  3. Add the hot stock and season. Simmer for 20 minutes.
  4. After this time, remove from the heat and puree with a hand blender or in a food processor.
  5. Add the cream and check the seasoning.
  6. Now if your plan to sieve it, just strain through a fine mesh sieve and retain the silky soup. Use a spoon to get as much of the moisture and starch from the puree as you can. Retain the pulp for some cornbread fritters.
  7. Heat the strained soup and garnish with chives and a drizzle of truffle oil if you like.

image

Bonfire Butternut Squash Soup

Everytime October comes around and Bonfire night approaches, I make endless batches of this idiot-proof, silky and comfortingly seasonal soup. Its a perfect fingertip warmer on a frosty bonfire night while gazing romantically at the fireworks, however there is only room for love here, for this delicious soup. I topped mine with some leftover homemade ’Mixed Seed Pesto’ and the fried, spicy seeds from inside of my squash. Never throw these away, they are delicious and are this soup’s nutritional side kick in helping battle the winter flu…

  • 1 large butternut squash, peeled, halved and cut into 1 inch chunks. Seeds retained
  • 750ml good chicken stock
  • 1 onion, chopped
  • 1 heaped tsp smoked paprika or more if your like your spice
  • 25g unsalted butter
  • Olive oil
  • Pinch of cinnamon/cumin/coriander
  • Salt and pepper
  1. Begin by melting the butter and a splash of oil in a large saucepan. Add the onion and gently fry until soft
  2. Add the paprika and stir for 1 minute. Season with salt.
  3. Add the squash and mix thoroughly. Cover with the stock and bring to the boil.
  4. Simmer for about 20 minutes until the squash is tender and soft.
  5. Meanwhile, fry the reserved seeds in a splash of oil, salt and pepper and a pinch of ground spices of your choice. I used cinnamon here. Once golden and fragrant, drain briefly on kitchen paper and leave to cool.
  6. Once the squash is soft enough, use a hand blender to blend the soup to a thick, smooth, creamy consistency. Add lots of freshly ground black pepper and check the seasoning.
  7. To serve, top with the fried seeds and a spoonful of mixed seed pesto if you like and the fried seeds. Drizzle with some good extra virgin olive oil and prepare to want another bowl!

I tucked into mine with some nutritious, creamy, emerald green pumpkin seed butter’ slathered on crispy oat cakes. My hair, skin and general well being is thanking me in return!imageimage

Mixed Seed Pesto

image

One thing I love about being a student is the necessity to be resourceful with whatever food is to hand. With a need to budget, being economical with your weekly shop is an art, and I am forever searching for ways to make my food go further without EVER skimping on flavour or going hungry. So, today I knocked up a satisfying, tasty and fresh salad which my taste buds were certainly thankful for, after noting the anorexic looking shelves of my dying fridge. I seem to be using pumpkin seeds a lot at the moment in this Autumnal weather, so I decided to use a handful of mixed seeds to create a pesto dressing for the last of my sweet, ripe tomatoes and pessimistic salad leaves. Homemade pesto is always more wholesome and scrumptious than the jarred equivalent in the shops and this one certainly didn’t let me down……

  • 2 tbsp of mixed seeds (I used pumpkin, sesame and sunflower)
  • Small bunch of coriander and flat leaf parsley
  • Small handful of grated parmesan
  • 1 small garlic glove
  • ½ small lemon
  • Salt and pepper
  • Extra virgin olive oil
  1. Start by grinding the garlic to a paste with some coarse salt in a pestle and mortar.
  2. Toast the seeds in a dry frying pan until they release their flavour and begin to crackle.
  3. Add to the pestle and mortar and grind to a chunky paste with the garlic. You can grind it as much as you like. I like to keep the seeds a bit chunky to add a bit of texture
  4. Now add the herbs and parmesan and grind to a green paste.
  5. Add a splash of oil and a squeeze of lemon juice to make a thick pesto or to your desired consistency.
  6. Taste and adjust using salt and pepper and more lemon if you like.

I added a large tablespoon of my pesto to a mix of bitter cos lettuce, sweet tomatoes and some cress for a lovely salad. This would be delicious topped with some salty, fried halloumi cheese…..but, sadly my fridge didn’t deliver on that one.image