Category Extras

Pea, broad bean & Nduja toasts

T

his is a cheeky canapé with a spicy punch of Nduja! With the zesty fresh peas, its a stunning match!

The recipe really is just guess work I’m afraid so you’re going to have to taste as you go to get a good balance. Simple flavours are balanced with a kick from either the lemon or Parmesan so add either accordingly and season well.

Bread options and sizes are endless so I’ve been purposefully vague. This doesn’t even have to be a canapé. It would make an amazing starter/lunch or even breakfast with some eggs. Scale up and experiment with the toppings. If you’re not into Nduja, try crumbled chorizo, black pudding, sun-dried tomatoes, crumbled feta/burrata…the options are endless.

  • 250g frozen peas
  • 100g frozen broad beans (Optional, use extra peas if you like)
  • 1 lemon – zest and juice of 1/2
  • 2 large garlic cloves
  • Parmesan cheese – 1/2 large handfuls grated finely
  • Extra virgin olive oil
  • Handful mint/basil (don’t go overboard here).
  • Bread – any you like. I used a small stone baked baguette cut into rounds.
  • Nduja – fresh or paste or any of the topping suggested above.
  1. Defrost your peas & broad beans in some boiling water and drain (do this separately if using so you can depod the broad beans).
  2. Cool the broad beans in cold water then pinch them out of their skins, discarding these and adding the fresh green bean to the peas.
  3. Put peas, beans, 1 garlic clove, lemon zest, juice of 1/2 lemon, mint/basil leaves and lots of salt and pepper into a food processor. (*You can also bash this all together in a big pestle and mortar if you like).
  4. Pulse until everything is roughly chopped together.
  5. Add the parmesan and a good few glugs of olive oil. Blend until well combined.
  6. Tasting as you go is important here. Taste and adjust seasoning with more lemon/cheese/salt and pepper or oil to help bring the texture together.
  7. Cut your bread however you like and toast/grill until warm and golden. Take you remaining garlic clove and slice it in half lengthways. Rub the cut side over your the warm toasts.
  8. I used fresh nduja so I heated this in a hot frying pan to help warm the spices first before serving but this is optional.
  9. Spoon some crushed peas onto your toast rounds and top with some nduja.

Raw Date & Cashew Energy Bars

L

et’s be honest, energy bars are a real hot topic these days and a bit of a buzz word. Millennial’s all leading such ‘busy’ lives, being on-the-go and needing said energy! There are some great brands out there, most trying hard to keep ingredients lists to a minimum but they can get pricey. So, if you’ve got a blender then chuck everything below inside and make your own! These are really tasty and you can play around a bit with the ingredients depending on your tastes.

My athlete of a husband is adventuring off to Scotland for a 4 day cycling voyage from Carlisle to Glasgow so made these to help fuel his assertive legs. Good luck!

Makes 8 large bars or about 24 small ‘bites’

  • 400g pitted dates
  • 200g cashew nuts
  • 100g salted peanuts (Optional. I like the salt but you can use 300g cashew or 100g of another nut)
  • 4 tbsp cocoa powder (dark)
  • 1 tbsp nut butter of choice
  • 1 tbsp coconut oil
  • 1 tbsp vanilla
  1. Blend everything in a food processor until the nuts are in tiny pieces
  2. Add 1 tbsp of cold water and blend again. The mixture should start to stick together. Add another splash of cold water until it blends into a nice ‘dough’.
  3. Line a 20 x 20cm baking tray with parchment.
  4. Tip the mixture into the tray and press into the tin.
  5. Refrigerate for at least 2 hours.
  6. When ready to slice, makes sure its really cold – i put mine in the freeze for an hour or so before cutting (don’t let it get rock hard though!). Slices into bars.

Mexican Tasting Menu

M

exican inspiration promised and delivered. I’ll take any excuse to create a menu so a family birthday was next in line. Fresh guacamole with pico de gallo christened every evening meal for us in Mexico. We used it as a barometer for each restaurant. Each eatery had their own style but each one we tried was incredible so there was no question about it being on this tasting menu with some mezcalitas to kick things off.

My stand out food memory from the holiday was our first taste of fish tacos on day 2 in Holbox. Blue corn tortilla’s topped with perfectly soft but crunchy green tempura fish and creamy avocado as we dumped the bags and collapsed in front of our idyllic ocean view. And the tacos didn’t stop there, from prawn to chicken but always back to fish. I was skeptical about recreating these at home but relieved to say, these were delicious and offered us a mini escape back to Holbox. I’d encourage you to invest in a taco holder and some proper corn tortilla’s to make these worth their while. Whilst you can use wheat tortilla’s, the corn version (blue or white) take these to their authentic level.

My Mexican menu was created sharing and I’ve shared a few of the recipes here which I hope you enjoy.

A few staples you’ll need for this menu if you’re serious about your Mexican feasting:

  • Taco holder 
  • Corn tortilla – blue or white
  • Hand lime squeezer
  • Mezcal – we bought back 2 bottles from Mexico. Buy the best quality you can afford or use Tequila if you prefer.
  • Every bar in Mexico uses ‘Tajin’ for the chilli-salt rim on their margaritas/mezcalitas. We bought this back in our luggage but you can buy it online.
  • Plain corn tortilla chips for dipping (salted but not flavoured) – don’t even think about buying Doritos. Artisanal are the best if you can shop around. Again, blue or white corn work well. I used these blue corn chips

Mezcalitas

Guacamole with pico de gallo & black corn tortilla chips

Prawns & Mango

Black Bean & Chipotle Empanadas

Fish Tacos with Mango Salsa

Coconut & Lime Ice Cream

Guacamole with pico de gallo & black corn tortilla chips (Serves 4 as a starter and for your fish tacos)

  • 4 large ripe avocados
  • 1-2 large limes
  • Handful coriander, chopped
  • 4 ripe large tomatoes
  • 1 shallot, finely chopped
  • 1-2 chillis, finely chopped
  • Tortilla chips to serve (plain)

I used a blender here but you can mash the avocados by hand with a fork also for a more rustic texture. I usually love making avocado this way but I prefer the creamier texture for serving this as a sharing starter with chips.

  1. Blend the avocado flesh, juice of 1 lime, chopped chilli to taste and all but a handful of the coriander in a blender with a generous pinch of flaky salt and freshly ground pepper until smooth. Taste and add more lime & salt if needed.
  2. De-seed and finely dice the tomatoes and add to a bowl. Season well with flaky salt.
  3. Add the chopped shallot, the rest of the coriander and the juice of half a lime and stir well.
  4. Leave to sit for about 30 minutes to let the salt draw out the lovely tomato juices.
  5. When ready to serve, make sure everything is at room temperature. Don’t serve straight from the fridge. Spoon half the guacamole into a serving bowl or dish and spoon over half of the pico de gallo and tuck in!

Black Bean & Chipotle Empanadas (recipe here)

Fish Tacos with Mango Salsa (Serve 4 – makes about 8)

  • 500g white meaty fish – I used cod
  • 85g flour
  • 200ml sparking water, chilled
  • 1 litre sunflower oil
  • 8 white/black corn tortillas (If you can’t find corn, use wheat tortillas but you’ll benefit from the authenticity of corn!)
  • 1/2 guacamole recipe above
  • 1/2 pico de gallo recipe above
  • Roughly 1/4 of a mango, diced (leftover from your prawn and mango skewers)
  1. Cut the fish into large bitesize chunks  a few inches each and heat the sunflower oil in a large saucepan until around 180℃. (If you have a deep fryer then prepare this)
  2. Make the batter by sifting the flour into a large bowl and seasoning. Whisk in the cold sparkling water, whisking until smooth.
  3. When the oil is hot enough, dip each piece of fish into the bater to very lightly coat and then quickly into the hot oil being careful not to splash yourself with the oil. You can add 3-4 pieces if they will fit at once but don’t crowd the oil. Fry for about 3 minutes until just golden, turning with a slotted spoon to ensure even colouring.
  4. Remove the fish pieces with a slotted spoon onto a plate lined with kitchen towel to absorb the excess and repeat with the rest of the fish until all fried. If there are any crispy bits of batter left in the pan, remove these as they are great to top off the tacos.
  5. Mix the mango with the remaining pico de gallo and set aside.
  6. To assemble the tacos, lightly warm the tortilla’s in a pan or low oven and spread the corn tortilla with 1 tbsp of guacamole. Pop in 2-3 pieces of your tempura fish and place each in your taco holder.
  7. Top each with the mango/tomato salsa and any remaining crispy bater pieces and serve with lots of napkins!

Coconut Ice Cream (recipe here) – Serve with rum roasted pineapple for an extra treat!

Chicken & Black Bean Empanadas

I

promised I’d be inspired from our recent adventures in Mexico. The food and country stole our hearts and we are incredibly lucky to have had such an amazing immersive honeymoon. Whilst I’ve only managed to find one good Mezcal bar in London (Hacha, Brixton/Dalston), I have been creating smoothie bowls, tacos and now, empanadas in the kitchen.

I think empandas are pretty forgiving and adaptable (don’t tell the Mexicans?). Being a very loose cousin to the Cornish pasty in my view, as long as the pastry is fresh and flaky and the filling tasty and moist –  you can’t go wrong. We didn’t eat too many of these in Mexico to know the ‘traditional’ size but I like that you can make these larger or smaller to fit into your menu. Here I opted for the slightly larger than canapé size as part of a Mexican tasting menu.

Makes about 15 (depending on their size)

  • 500g plain flour
  • 2 tsp baking powder
  • 150g cold butter, cubed
  • 1 egg, beaten
  • 4-5 chicken thighs, skin off, deboned
  • 2 large shallots, chopped finely
  • 2 garlic cloves, crushed
  • 2 tsp each ground cumin, coriander, smoked paprika
  • 1 tsp crushed chilli flakes (or as hot as you like)
  • 1 can black beans, drained
  • 1 can tinned tomatoes
  • Handful coriander, chopped

You can use shortcrust pasty or puff if you don’t want to make it yourself. I used a tea saucer size to cut out the pastry circles for size.

Filling

  1. Preheat the oven to 180℃ and get yourself a large casserole dish.
  2. Heat a splash of olive oil over medium heat in your dish and add the shallots. Gently cook for about 8 minutes until soft and translucent making sure they don’t catch. Season well, add the garlic and cook for a further few minutes to soften.
  3. Add the chicken thighs and turn up the heat to brown them slightly on the outside (don’t worry too much, it’ll all go in the oven shortly!)
  4. Add the ground spices and mix everything well to coat for a few minutes.
  5. Add in the tinned tomatoes and mix well. Add half a can of water from the kettle if its looking a bit thick, basically enough to submerge the chicken but not too watery!
  6. Add the black beans and mix well.
  7. Cook in the oven for 45 minutes, lid on. Remove the lid and cook for a further 15 minutes or so. By this time the mixture should have reduced nicely and the chicken tender.
  8. Remove the dish from the oven and leave to cool slightly.
  9. Before it gets cold, take two forks and shred the chicken into bitesize pieces and mix everything to combine before leaving to cool completely before stirring in the chopped coriander.

Pastry

  1. To make the pastry, mix the cold cubed butter and flour and baking powder in a food processor until it resembles breadcrumbs. Season. (You can rub this in by hand but make sure the butter is cold).
  2. Add in a few tbsp of cold water bit by bit with the processor running until the dough just starts to come together in a ball.
  3. Turn the dough out onto a floured work surface and combine into a nice soft ball. Wrap in cling film and refredigate for 1 hour.

Assembly

  1. Remove the pastry from the fridge and leave to warm up for about 15 minutes. Cut into quarters to make it easier to handle. Roll each quarter out on a floured work surface to the ticket of a coin. Use a cutter or an upturned saucer to cut out circles of pastry. Size is totally up to you – you can go large pasty style or small canapé size.
  2. Spoon a small amount of mixture into the centre of the pastry – the amount will depend on the size but be cautious and don’t overfill, its easily done.
  3. Brush beaten egg around the outside of the whole pastry disc.
  4. Turn over the pastry to make a half moon and seal the edges with a fork by pressing the pastry edges together.
  5. Brush the empanada with egg and bake at 200℃ for about 15-20 minutes or until golden brown. 

Cheese Scones

I

f you’ve read my previous blog post you’ll know that I was the greedy and welcome receiver of a box of cheese from Paxton & Whitfield for my Birthday and what a treat! A fantastic comte and a cave aged cheddar (cave aged!!) were nibbled on in the park under the sun with a bottle of celebratory bubbles.

Given I’ve so much cheese still, I thought a warm cheese scone would be the perfect treat for a chillier weekend in the drizzle and a pick me up after a long cycle. A good strong cheddar is a must here – buy the best you can afford or at least a mature/extra mature option. Call me a food snob but I guarantee you won’t feel the full effect with the likes of Cathedral city.  I used half cheddar, half comte but you can use all cheddar if you like.

Adapted from ‘Delicious magazine

Makes 6-7 scones

  • 225g self raising flour
  • 1 tsp baking powder
  • 1/2 tsp salt
  • 1 1/2 tsp mustard powder
  • 55g chilled butter, cubed
  • 50g mature cheddar, finely grated (Best you can afford – I used this one from Paxton & Whitfield)
  • 50g Comte, finely grated (I used this one from P&W)
  • 60ml of warm water and milk (half and half)
  1. Preheat the oven to 220 and put your baking tray inside to warm up.
  2. In a food processor, add the flour, baking powder, salt, mustard and chilled butter. Pulse until you have a fine breadcrumb mixture (you can also do this in a bowl and rub the butter in with your finger tips).
  3. Tip the mixture into a large mixing bowl and mix in the cheese. Make sure you use a fine grater and not a large one or the pieces will be too big.
  4. Add the milk/water mix and, using a knife and a cutting motion, mix thoroughly. Bring everything together with your hands in the bowl or tipped out onto the work surface but don’t overwork or be tempted to knead it like bread, it needs careful handling.
  5. Once you’ve formed a ball, gently press the dough to a 2.5cm thickness. Use a 6cm cutter to cut 4 scones. Combine the dough into a new ball and cut out 2-3 more scones.
  6. Remove the baking tray from the oven and add your scones on your warmed baking tray and brush the tops with some milk. Finally, finely grate over some extra cheese.
  7. Bake for about 12 minutes until golden, smelling delicious and cooked through.

Serve warm with butter and anything else you please! These will without doubt make your house smell devine for the day.

Green Harissa & Cauliflower

T

his surprising condiment needs little introduction.  A fridge of left over herbs and a quick google search led me to this ever so pleasing and fiery paste. Taken from one of my favourite food magazines ‘bon appetit‘ for which makes me wish I was American (there are not many things that make unpatriotic), this recipe needed no amendments.

Fiery, spicy, fresh and packed full of flavour. I can’t wait to devour this on cream cheese laden toast or add it to my next batch of guacamole.

Ingredients

  • 2 tbsp cumin seeds
  • 1 tbsp coriander seeds
  • 2 jalapeños, sliced
  • 2 spring onions, finely chopped
  • 1 small garlic clove, crushed
  • Bunch fresh coriander
  • Bunch fresh flat leaf parsley
  • Juice from 1 large lemon
  • Extra virgin olive oil
  1. Toast the cumin and coriander seeds in a hot dry frying pan until fragrant and set aside.
  2. Add all the ingredients (except the oil) to a food processor and blend to a puree. With the motor running, add enough olive oil to get a nice loose but not too runny consistency. It should be thick like jam.
  3. Store in a jar in the fridge for a week or so. The options are endless…

Uses: Rub for fish, spread on toast with cream cheese, pimp out your guacomole, use in place of pesto for a spicy kick, stir into yoghurt to top soups, refried beans, roasted with vegetables….which leads me to my next point.

Roasted Cauliflower & Sweet Potato Salad

Ingredients (Serves 3-4 as a side dish)

  • 1 whole cauliflower, florets picked and chopped if large
  • 1 big sweet potato (add another if cooking for hungry guests), peeled and cubed into dice size
  • 1 red onion, cut into thin wedges
  • Handful flaked almonds
  • 2 x little gem lettuces
  • 1 tsp each ground cumin, coriander, turmeric, flaked chilli
  • Juice 1/2 lemon
  • Green harissa
  1. Preheat the oven to 200°C.
  2. Mix the chopped cauliflower, sweet potato and onion on a large flat baking tray.
  3. Sprinkle over the ground spices and drizzle with a good glug of sunflower oil. Season and stir to combine and coat everything well.
  4. Roast for about 20 – 30 mins or so in the oven until crisp and deliciously golden. Blast them at 220°C for 5 minutes at the end if you want them really crisp.
  5. While they are roasting, toast the flaked almonds in a dry frying pan until beginning to turn golden. Remove and set aside.
  6. Finely chop the little gem lettuce into thin shreds and scatter oven a large serving dish. Squeeze over the lemon juice. Add a few small spoonfuls of green harissa and mix the lettuce to coat in the paste.
  7. As soon as the vegetables are ready, remove from the oven arrange on top of the salad leaves.
  8. Scatter with the almonds. Finally, add small spoonfuls of green harissa across the roasted platter ensuring that each bite receives some spicy sauce! Serve with some lightly fried fish, or some tender chicken.

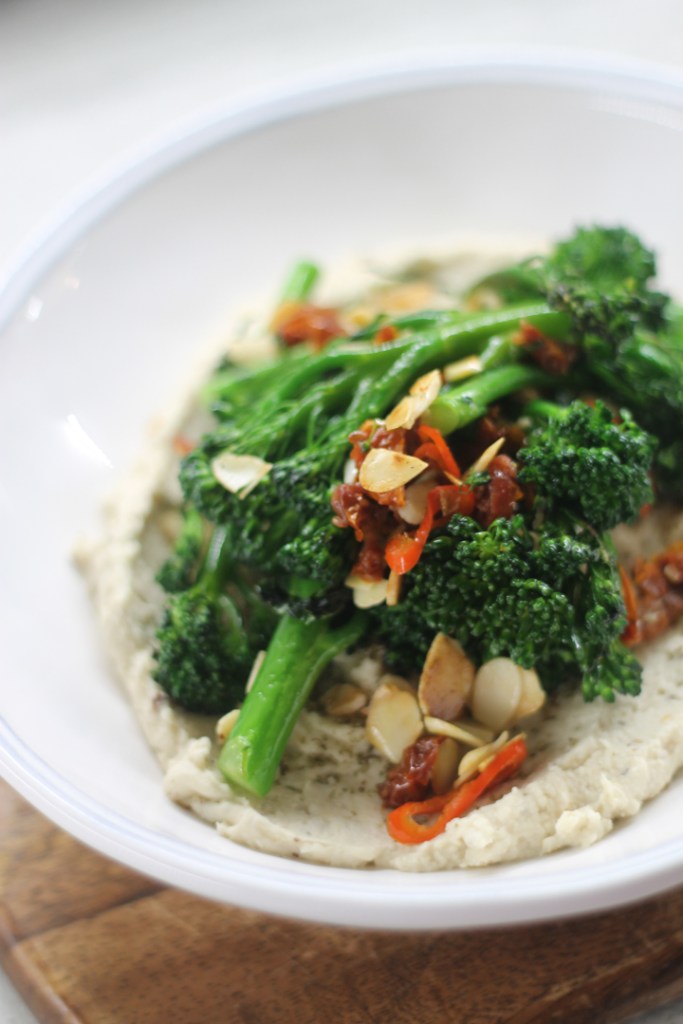
Butterbean ‘Hummus’ with Broccoli, garlic, almonds & chilli

O

ne of the bonus’ for both me and my family & friends is that a cookery book is always a well received gift. Especially if its Middle Eastern inspired. My latest addition is both extremely enlightening and beautifully and factually written! ‘The Jewelled Table’  by Bethany Kehdy.

Having claimed a Middle Eastern ‘style’ to my own food with a heavy twist from almost everywhere, it was interesting to learn some truths about some of the dishes that are now such staples in our UK diets. Hummus most notably. 

  1. ‘Hummus’ means ‘chickpeas’. Hence why this recipe isn’t technically hummus but simply steals the tahini and lemon juice components that make our traditional hummus.
  2. No one country owns hummus. Thus, I think its OK to cook it with your own interpretation.

W

hilst I adore Bethany’s recipes, I’m never one to simply follow and obey. That and I had less time on my hands than a few of her hummus’ called for so I adapted. Mainly from her recommendation to use dried chickpeas. I’ve found a fantastic brand (Napolina) which I will always use so sadly I am a little to lazy to follow this hearty advise.

I’ve have interpreted her ‘Mock hummus’ and added a few bits of my own. I’ve also topped it with the topping from another recipe (‘Butter Hummus’). But admittedly, the delicious and inspiring toppings in this book will make you simply want to create and heat upon a pot of supermarket…’hummus’? 

I hope you’re not confused about hummus. 

Adapted from ‘Mock Hummus, The Jewelled Table’.

Serves 2 (as a side)

Hummus

  • 1 can butter beans, drained.
  • 1-2 garlic cloves
  • 2-3 tbsp tahini
  • 1-2 lemons, juice
  • 1 tbsp spice mix (see tip below). Equally you could use any spices you feel like.
  • Salt and pepper

  1. Blend the butter beans, tahini, juice of 1 lemon, spices and seasoning in a processor until smooth. 
  2. Taste and adjust seasoning or add more lemon if needed.
  3. Transfer to a shallow serving bowl and keep at room temperature.

Braised Broccoli

  • Tenderstem broccoli
  • 1 garlic clove, finely chopped
  • 1/2 red chilli, sliced
  • Handful flaked almonds
  • 3 sundried tomatoes, drained and sliced thinly
  • 1 handful parsley, chopped


  1. Heat a frying pan on medium high and add a splash of rapeseed oil. Stri fry the broccoli for about 5-8 minutes until beginning to cook and crisp.
  2. Add the garlic and chilli and reduce the heat to medium. Cook until just beginning to turn golden (careful not to burn the garlic)
  3. Add the flaked almonds and fry until golden.
  4. Remove from the heat and stir in the herbs and the tomatoes.
  5. Elegantly place on top of the hummus and serve immediately.

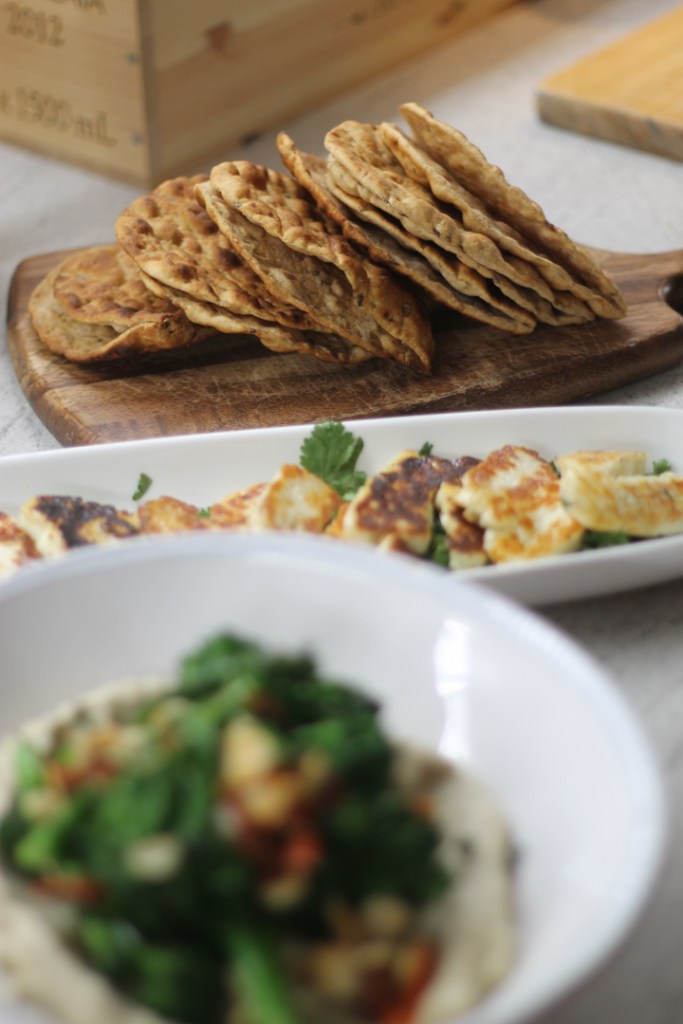
I served mine with fired halloumi and some warm flatbreads for dipping!

Enjoy.

TIP: Spice mix: Made by toasting all whole spices in a hot frying pan until fragrant. Then grind in a pestle and mortar. (The cinnamon can be removed and any empty cardamon pods) 1tbsp of each fennel; cumin; coriander; fenugreek; black/yellow mustard seed; 1 cinnamon stick; 3 cardamon pods; 1 star anise 

Pecan, Cinnamon & PB Energy Balls

C

alling all sports fanatics, runners, lycra glad cyclists and yogis. Energy balls. In the fast paced and immediate society we now live in (London specifically), time is something that we so regularly abuse…’I’m just so busy I didn’t have time’. Which has carved the way for the new found energy ball to eat on the go before that lunch time pilates class or to fill a void between your next avocado. The happy balance being convenience and keeping a healthy lifestyle.

The energy ball currently populates the nation from supermarket to sport shop and will in the oh so near future be a much bigger part of my life (cliff hanger). Many health bars/snacks on the market are unhealthily and sneakily filled with naughty ingredients and additives. But homemade energy balls really are pure and clean. And full of….energy!? And I’m more than pleased to add that these really are as quick to make as they are to gobble down before that spinning class.

Provided you have a food processor (I’m being presumptuous) then all you need to do is pulse it all together! I mean…if you want to squat at the same time then be my guest. And hey…who said they had to be balls? Make them triangles if you have the time.

Adapted from ‘Deliciously Ella’

Ingredients (makes about 20)

  • 400g dates (pitted). I also threw in a handful of prunes for good measure
  • 100g oats
  • 100g pecans
  • 2 tbsp crunchy peanut butter (feel free to use any other nut butter)
  • 1 tsp cinnamon
  • 2 tbsp coconut oil
  1. Blend the oats and pecans until a fine mixture in a food processor.
  2. Add the other ingredients and pulse until you have a sticky mixture.
  3. Roll into balls (golf ball sized) and chill in the fridge (covered) until needed

‘Mini’ Chorizo Scotch Eggs

I

call these ‘mini’ as when referencing a Scotch egg these quail egg equivalent would be considered small which made them the perfect canapé for our New Years Eve party! After a long festive week of cooking for the family and indulging in experimenting in our family kitchen and fully stocked fridge, I was pleased to know that the dinner party I was to be a guest at required me to put down the oven gloves and simply bring a bottle of fizz! However it wasn’t long before I was tasted with canapés! I usually don’t bother with the faff but not one to let a challenge go, I wanted something that would get the guests excited!

I’ve also never jumped on the ‘gooey-in-the-middle’ Scotch egg band wagon. These days you can’t call yourself a Gastropub without proudly and confidently sitting a gooey scotch egg at the top of your bar snacks menu. But since I wanted to make a little extra effort I thought I’d give them a go! I know you won’t believe me when I say it but they are actually really simple to make! They do require some effort but what else was I to do on New Years eve day when the dinner was being prepare elsewhere?

Three simple steps and you’re done. I also made cheese and pineapple on sticks. No recipe required, and no ‘steps’….but caused equal excitement. Who knew?

Makes 12

  • 12 quails eggs (at room temperature)
  • 6 chorizo sausages
  • 2 eggs, beaten
  • 2 handfuls plain flour
  • 150g breadcrumbs
  • 1 litre vegetable oil.

Step 1 – Boil the eggs:

  1. Bring a large saucepan of water to the boil. Gently add the quails eggs and boil for exactly 2 minutes. Drain and run under cold water immediately until the shells are cool to touch.
  2. Tap each egg to break the shell (you can be rougher than you think with these but don’t be too heavy handed) and remove the shell. This can be easier under running water. TIP – when you remove the shell, there is a thin clear membrane beneath the covers the white. If you can get under this, the shell can be removed much easier, sometimes in one go!

Step 2 – Coat the eggs:

  1. Remove the meat from the sausages skins and combine in a large bowl.
  2. Take golf ball sized portions (or divide your meat by 12) and flatten on the palm of your hand into a large disc about 6 cm wide. Place one of your eggs in the middle and wrap the meat around it. This can be fiddly but just ensure its covering the egg. Once wrapped around you can mould it in your hand.
  3. Repeat with all the eggs, setting aside on a plate when done.
  4. Place the flour, beaten eggs and breadcrumbs each in their own bowl.
  5. One at a time, roll the eggs in flour then egg, and finally a good coating of breadcrumbs, moulding in your hand (you can be rougher here) until coated well.
  6. Repeat to finish and set aside on a plate and refrigerate until needed.

Step 3 – Cooking the Scotch eggs:

  1. Preheat the oven to 180°C.
  2. Take a large saucepan and add the oil. Heat on a high heat until hot. Test it by adding a piece of cubed bread. If it sizzles and begins to turn golden, the oil is ready. You’re aiming for 180°C so if you have a thermometer use this. (Alternatively if you have a deep fat fryer, heat to 180)
  3. In bathes of 3-4 (depending on your pan size) lower the eggs into the oil and fry for about 4 minutes by which time your egg should be golden and cooked through. TIP: If you can’t gauge the temperature of your oil and they turn golden too fast before the meat is cooked (like mine) remove from the oil when golden and place in a baking tray and finsih cooking in the oven for about 15minutes.
  4. Drain each egg on kitchen towel to absorb any oil and leave to cool

When ready to serve, scatter with sea salt, slice in two if you wish or if you can manage, each whole dunking into some decedent lemon mayonnaise before hand!


Ultimate Cornbread

T

his recipe comes directly from Brad McDonald’s book ‘Deep South‘. After being lucky enough to dine in his awesome restaurant ‘The Lockhart’ before he packed up to open ‘Shotgun BBQ‘ I experienced the jaw dropping sights and tastes of his signature cornbread. Basted in thick honeyed butter bubbling at the sides in its case iron dish it was brought to the table disguised as a lemon drizzle!? And boy did it taste good. Its a bit simpler in flavour (and perhaps authenticity?) than my own signature version which you can find here which is full of sweetcorn for texture, chilli for spice and a bit of cheeky cheddar for tang. Whilst both have their own style, the winner here is the buttery honeyed topping. Slatered warm with salted butter this makes the perfect accompaniment to a hot bowl of soured cream drizzled chilli or simply a bucket of homemade fresh guacamole as I did here.

Having not yet tried Shotgun BBQ it will be my next fit spot…

jess-hovis

jess-cornbread4jess-cornbread2

I used a mini retro loaf tin to create these cute mini loaves perfect for individual portions. However I would also recommend using small loaf tin, one large one, or failing that a muffin tin! This recipe would make about 8 small muffins I think. But feel free to use any tin available – the depth will just mean the cooking tin will vary but if you stick to 25 minutes or so first starters and a knife inserted into the centre is clean then voila!

Ingredients

  • 150g plain flour
  • 150g polenta/cornmeal
  • 25g soft light brown sugar
  • 4g baking powder
  • Large pinch salt
  • 225ml milk
  • 2 large eggs
  • 20g butter, melted
  • 30g lard
  • 50g unsalted butter & 50g runny honey
  1. Preheat the oven to 200°C and place a small knob of lard in each tin
  2. Combine the dry ingredients in a large bowl
  3. Add the wet and mix well to combine
  4. Spoon into the muffin tins/loaf tin (allowing room for rise)
  5. Bake for about 25 minutes until golden. A knife inserted into the middle should come out clean
  6. While they are baking, combine the honey and butter for the topping in a saucepan and melt to combine
  7. When the loaves are ready baste in the hot honey butter and then return to the oven for a few minutes
  8. After this time, remove from the oven and serve immediately, hot and buttery!

I served mine with guacamole  – see here but a chilli would also go down a treat.

jess-cornbreadhoney

jess-cornbreadavo3