Searched For coconut ice

Rum Roasted Pineapple, Coconut Ice Cream, Mint Sugar

I

‘m not a dessert person or a sweet tooth, unless it comes to ice cream. And this so happens to be my favourite ice cream recipe! Don’t get me wrong I love making desserts. Planning them, creating them and being able to execute a beautiful creation but I usually never eat them. So with guests for supper this weekend, a fuss free dessert was required. With a fatty hearty main on the cards, a fresh and citrus cleansing after was the perfect match. You can take more time over this as I mention below (see notes) by adding some grated coconut to the ice cream, grilling the pineapple towards the end, caramelising with a blow torch or wonderfully charring on the barbeque but fuss free was the aim here.

I made the ice cream in 5 minutes at breakfast and it was ready and set by dinner time and is just as impressive as a classic recipe. The pineapple is sweet and deliciously roasted and with a depth of flavour from the rum that makes this more than a fruit salad finish to a meal. Sometimes the simple ones are the best and this is no doubt a powerful but humble choice.

Serves 6 

Pineapple

  • 1 large pineapple
  • 1 vanilla pod
  • 2 tbsp dark rum
  • 2 tbsp soft brown sugar
  • 6 tsp butter

Coconut Ice Cream

  • 400ml full fat coconut milk
  • 1 can condensed milk
  • Zest 1 lime
  • 1 fresh coconut, grated/ 150g toasted desiccated coconut (optional)

Mint sugar

  • Bunch mint leaves picked
  • 2 tbsp granulated sugar
  1. Start on the ice cream. If you’re after a super fast recipe, simply combine the condensed milk, coconut milk and lime zest, whisk to combine then place in a tupperware in the freezer (untouched) for at least 8 hours. For added flavour though you can add in the grated flesh of one fresh coconut or the desiccated coconut but if you’ve ever tried to grate a fresh coconut you’ll know it takes some commitment…
  2. Preheat the oven to 190°C.. Warm the rum gently in a pan and then add the sugar and the seeds of the vanilla pod. Stir to combine.
  3. Top and tail the pineapple and remove the rind. Cut in half lengthways and then cut each half into thirds. Remove the hard centre segment and then place the slices in a large bowl.
  4. Spoon over the rum mixture and let it sit for about 10 minutes.
  5. Line a baking tray and spoon the marinading pineapple onto the tray evenly with any of the leftover rum marinade. Place a tsp of butter on top of each and roast for about 30 minutes until tender. You can stick them under the grill for the final few minutes to char them slightly if you like but again, the aim here is fuss free!Jess - Pineapple
  6. Once ready remove from the oven and set aside. Bash the sugar and mint in a pestle and mortar until crushed and vibrant green
  7. Top each slice of pineapple with a little mint sugar and serve warm alongside a creamy scoop of your coconut ice cream


NOTE: There are certainly ways to ‘glam’ this up. Grill the pineapple once cooked for a caramelised effect, scorch with a blowtorch for the same effect or beautifully grilled on the barbecue. Add the fresh coconut to the ice cream as mentioned or make a lovely heard of sesame praline (melt caster sugar until golden, add sesame seeds and turn out onto an oiled sheet of parchment). Shortbread would also never go unwanted here.
Jess - Pineapple3

Asian Salmon & Coconut Rice

I

 first made this recipe in 2013 and have been cooking it almost weekly ever since. It’s become such a comfort dish and one that I always crave after a busy day. This rice would even make a great match to a sliced mango as an alternate breakfast!

The recipe hasn’t changed at all over the years but being one of top 5, it needed a revamp and certainly a new image from my student digs days where it offered a LOT of comfort. I have also had to finally admit that white rice makes a much better base for a creamy coconut rice. I will use brown, Thai, wild or any other wholegrain rice in my cooking normally as it has a tastier nuttier flavour and more bite than a bland white equivalent. However, the gelatinous nature of the white rice makes it an obvious choice here. Cook the rice as you would normally cook if you’ve a go-to technique just use coconut milk with a slight dilution due to its thickness instead. Secondly, do NOT forget that lime at the end – you will be amazed how vital that is and how it brings everything together.

This recipe also works well as a base for roasted, soy flavoured veggies or tofu for the vege and vegans.

Serves 2

  • 140g (approx) white rice
  • 1 x can coconut milk
  • 1 lime
  • 2 salmon fillets
  • 1 tbsp dark soy sauce
  • 1 tsp sesame oil
  • 1 tbsp runny honey
  • 1 garlic clove, chopped
  • 1 knob ginger, grated
  • 2 spring onions, chopped
  • 1 bunch coriander, chopped
  • 1 small handful basil, chopped
  • Green vegetables to serve
  1. Mix the soy, sesame oil, honey, garlic, ginger and the spring onions in a bowl. Add the salmon and leave to marinate for as long as you can – around 2 hours but I often only get time for 15minutes!
  2. Preheat the oven to 220.
  3. To make the rice, heat the can of coconut milk in a saucepan with half a can of hot water. Bring to the simmer gently (watch out as coconut milk will bubble over if not watched). Once simmering add the rice and simmer for about 8-10 minutes stirring often.
  4. Line a baking tray with foil and spoon a few tbsp of the marinade onto the lining. Add the salmon, sin side up.
  5. When the rice is a few minutes away from being ready, put the salmon in the oven for 7 minutes. Don’t be tempted to cook it for longer, this timing will give you just pink & cooked in the middle and a crispy soy skin.
  6. Check the rice is cooked – at this stage the majority of the liquid should have absorbed giving a creamy rice. If you’ve had to add water during cooking to stop it drying, just simmer the liquid off.
  7. Add the juice of 1 lime to the coconut and a handful of the coriander, saving a bit for serving.
  8. Remove the salmon from the oven. Serve each fillet on top of some rice with a spoonful of the marinade from the tin if left.
  9. I like to serve mine with roasted al dente broccoli.

Spice Roasted Sweet Potato Soup, Lime-cardamon Yoghurt, Coconut Flatbread


image

image

Some relaxing blogging always starts the weekend off well. After a long week, it was nice to slow down and take my time over lunch instead of dashing home from work and being caped in my apron and up to my eyes in ingredients before I could even take off my coat! I love to constantly use different flavours and it really is the easiest thing to inspire a standard recipe by adding a few flavourful touches. If you haven’t got a stocked pantry of store cupboard ingredients then I highly recommend investing in a few essentials to be at hand and add to your cooking (see here). My store cupboard is by no means complete…storage space and budget don’t allow my dream pantry so for now I stick to the most useful ingredients.

This warming soup is smooth, creamy and cinnamon scented. Sweet potatoes have natural sweetness which goes really well with cinnamon and ingredients like maple syrup so the lime and cardamon yoghurt is a lovely fresh addition to top it off. Coconut flatbreads (just because) are heavenly.

image

Serves 4

Soup

  • 800g sweet potato, peeled, chopped into chunks
  • 2-3 garlic cloves
  • 1 tsp ground cinnamon
  • 1 tsp cumin seeds
  • 1 onion, chopped finely
  • 2 pints of good, hot chicken or vegetable stock

Lime Cardamon Yoghurt

  • 150g plain natural yoghurt
  • ½ lime – zest and juice
  • Few mint/coriander leaves
  • 3-4 cardamon pods

Coconut Flatbreads

  • 15g dessicated coconut
  • 75-80ml coconut milk/water
  • 125g flour
  • Salt and pepper
  1. Preheat the oven to 200°C. Peel and chop you sweet potatoes into chunky pieces and add to a large roasting tray. Throw in your garlic cloves, whole and unpeeled.
  2. Drizzle with a couple of generous tablespoons of olive oil or sunflower oil and scatter over the cumin seeds, cinnamon and some generous seasoning. Mix until coated in the spices and roast for 30 minutes. Toss half way through cooking.
  3. Meanwhile, sweat and soften the onion in a little oil in a saucepan over the hob and prepare your stock.
  4. Make the flatbreads by combining the flour, seasoning and coconut in a large bowl. Add in your liquid and mix with a fork until combined. Bring together to form a smooth dough, adding a little more liquid if needed. Knead for a few minutes and then set aside to rest.
  5. For the yoghurt, combine in a bowl with the lime juice, zest, finely chopped mint and some salt and pepper. Bash the cardamon pods to remove the seeds inside. Grind these as fine as you can in a pestle and mortar and add to the yoghurt. Stir to combine then set aside.
  6. Once the potatoes are ready remove from the oven and pick out the garlic cloves. Add the potatoes to the sweating onion. Squeeze the roasted and sweet garlic pulp from their skins and add with the potatoes.
  7. Add the stock and simmer for 5-10 minutes until the flavours are combined and the potatoes are really tender.
  8. Puree with a hand blender until silky and smooth. Add a little more stock to thin the soup if you like.
  9. Keep warm while you cook the flatbreads. Heat a frying pan over a high heat. Divide the dough into four equal pieces and roll each out thinly on a floured surface. Fry each in a the dry hot pan for a few minutes each side until a lightly charred and they begin to puff up slightly.
  10. Serve warm immediately (or keep warm in the oven) with a generous warming bowl of spiced soup drizzled with the fresh yoghurt.

image

Asian Salmon and Coconut Rice

image

I’ve cooked this recipe far too many times in the past couple of weeks. With revision STILL on the go it is a fresh but really satisfying meal which is also a hopeless attempt at consuming some more oily fish to fuel my brain! I’ve been unhelpfully vague in the method as all depends on the rice, coconut milk and salmon you use which will vary the cooking time and the quantities a little. The timings will vary but use your instincts and aim for a crispy skinned dark soy salmon that is moist and just cooked with a creamy coconut rice. You may not get the timings perfect on the first shot but I guarantee you’ll make it again to get it right!

Serves 2

  • 1 can coconut milk
  • 4 oz brown/wild rice
  • 2 salmon fillets
  • 1 tbsp dark soy sauce
  • 1 tsp sesame oil
  • 1 ½ tbsp olive oil
  • 1 tbsp runny honey
  • 2cm grated ginger
  • 1 lime, zest and wedges for serving
  • Scattering of sesame seeds
  1. Mix the soy, oils, ginger and honey together and leave the salmon to marinade in the mix for at least 1 hour in the fridge.
  2. Bring the coconut milk to the boil with a small cup of hot water and simmer the rice gently for about 20-25 minutes until cooked. The coconut milk you use in terms of thickness will vary so top up with hot water if it starts to look dry or if it is a thick variety, dilute down. What you’re aiming for is for the rice to cook in the time that it takes the coconut milk to reduce so you should end up with a creamy rice. If it is still looking drowned towards the end of cooking, turn the heat up and simmer more strongly. I like to use brown rice for its nutty flavour and texture.
  3. Once cooked, stir in the grated zest of the lime and keep warm.
  4. While the rice is cooking, preheat your grill to high and (skin side up) grill your salmon for about 5 minutes depending on thickness, until just cooked and moist with a dark soy crisp skin.
  5. Simmer the remaining marinade in a saucepan to warm and thicken.
  6. Serve your salmon on top of your coconut rice drizzled with a little of the warm marinade. Scatter with a handful of sesame seeds and a wedge of lime for squeezing. Serve with steamed broccoli.

image

Blackberry, Lime and Coconut Slice

Someone has to stop me. What started as an innocent plucking of the first seasons tempting vulnerable blackberry, has turned into an obsession. On my daily dog walks, the multiple jungle of tangled branches gloat and boast their juicy fruit in my face, saying, ‘pick me!’. Consequently, everywhere I look I seem to see just one more handful that cannot be left untouched. My pocket now permanently contains a bag just in case.

Not helped by my father who – I quote- said – ‘its not enough! We need to fill the freezer!’- I have managed to gather around 6 bags of blackberries. I have chosen to freeze them to lock in their seasonal freshness, make them last longer and most importantly, prevent their disappearance before they have the honour of finding their way to an admirable recipe. My poor father, who is a simple foodie man, loves nothing more than a easygoing, undemanding and straightforward blackberry and apple pie. Don’t get me wrong, a straight crumble is on the top of my pudding list, however, this year……….this year, I have picked more than enough to govern experimental licence….

So if your usual garden birds are looking a little anorexic this year then I’m sorry- I take full blame for having stolen their winter pickings….a juicy, nutty crumble, an almond and blackberry bar, blackberry crumble ice cream, bramble moose, jam, summer pudding, coulis, or with a port sauce served over duck……image

PS. If you do freeze them, the best way is to was them and leave to drain and dry in a colander. Then spread out in a single layer on a baking tray and freeze like this. Then bag them up, this way you prevent getting a huge frozen mass of solid berries.

Base

  • 125g chilled butter, cubed
  • 175g plain flour
  • 50g caster sugar

Topping

  • 35g dessicated coconut, lightly toasted in a dry pan
  • 150g blackberries, and a extra handful to top
  • 2 eggs
  • 140g granulated sugar
  • ¼ cup lime juice, zest from 1 lime
  • 40g flour
  1. Preheat the oven to 180 and line a 9×9 inch tin or larger for a thinner base, with parchment
  2. Begin by making the base. Combine the caster sugar, flour and butter in a food processor. Blend until the mixture form breadcrumbs and then continue until the mixture forms a crumbly dough. Add the coconut and pulse to combine.
  3. Tip the mixture into the prepared tin and use the back of a metal spoon to compress and smooth the dough into a single layer
  4. Bake for 15-20 minutes until golden.
  5. Now make the topping. Puree the blackberries in the processor until they become liquid. Strain this mixture through a fine sieve to remove the seeds.image
  6. Whisk together the eggs, lime juice, zest and sugar in a large bowl. Add 3 large heaped tablespoons of your sieve blackberry puree and whisk again.
  7. Add the flour and stir to combine. [Keep the remaining berry puree for serving but it may need sweetening. Heat and add a little caster sugar to dissolve]image
  8. When the base in cooked, leave to cool for a few minutes, then pour the egg mixture over the top. Scatter with the handful of reserved berries and bake for 20-25 minutes until set.
  9. Once cool, dust with icing sugar and cut into the desired slices.

Chocolate Orange Ice Cream

B

ank holiday weekend is upon us again and the sun is taking part! Another slap in the face bank holiday given we’re still sitting solo in lockdown. Had this been the weekend I’d originally planned, I’d be celebrating the return home of my sister from her escapades in Australia and devouring the beauty that is my family home and garden in Wiltshire with a giant G&T courtesy of Mrs Wardlaw.

Alas! Ice cream was required. It seemed like the only fix here. A sweet, chocolatey refreshing plaster on my painful cancelled plans and the perfect antidote for the weekend.

I

usually always make a crazy or adventurous ice cream (see my current repertoire) but a few years ago (sadly its taken me years!) my fiancee asked if we could just have plain chocolate? Plain chocolate? Was he turning in my Dad! Like my Dad, he is a simple man with his ice cream flavours. Unlike my sister and I however who would opt for walnut, pistachio, toasted coconut or anything other.

That said, as you can see, I have attempted this request. Albeit, I couldn’t keep on the straight and narrow and ‘accidentally’ added some orange zest. Truth be told, chocolate orange holds a very nostalgic place in my childhood heart having eaten chocolate orange angel delight for weekly desserts as a child with my best friend topped with cornflakes and 100s & 1000s. I’m not even sure you can buy that flavour anymore which makes me sad…however, this beats it hands down!

NOTE: If you don’t have an ice cream maker, freeze it in a tupper ware and try to whisk the ice cream every hour or so if you can. Its not the end of the world it just won’t be as smooth and may have some crystals of ice in.

Recipe (adapted from Jamie Oliver)

  • 300ml whole milk
  • 300ml single cream
  • 100g dark chocolate (at least 70%)
  • 85g caster sugar
  • 1 orange
  • 3 egg yolks
  1. Pour the milk into a saucepan. Break the chocolate into pieces and add to the milk. Place over a medium-low heat and gently warm through until the chocolate has melted well, stirring often. Do not let it boil. Once melted, remove the chocolate milk from the hob and leave to cool slightly. Taste for fun.
  2. Whisk the egg yolks and the sugar in a large bowl until creamy. Add the zest of the whole orange.
  3. Place to bowl on a tea towel to keep it from moving as you add the warm milk. Stirring continuously with a whisk in one hand, stir the eggs whilst slowly pouring in the warm chocolate milk with the other hand. Stir well, whisking quickly until well combined. Return the whole mixture to the saucepan.
  4. Place over a low heat (do NOT let it simmer or boil) and stir with a wooden spoon consistently until it begins to thicken a bit and coats the back of the spoon.
  5. Remove from the heat and leave to cool until cold. (You should really sieve the custard here to remove any lumps but then you miss out on the orange pith. I was conscious of this so made sure I whisked really well but if you fear any lumps, sieve your custard and add some more orange zest afterwards).
  6. Once cold, stir in the cream.
  7. Churn in an ice cream machine according to your manual instructions. Failing that, put the mixture in a low tupper ware and freeze. Whisk to break up the ice crystals every hour or so. It will freeze eventually but may not be as smooth as with an ice cream maker.
  8. Serve however you please….spoon and bowl in our house as we didn’t have cones.

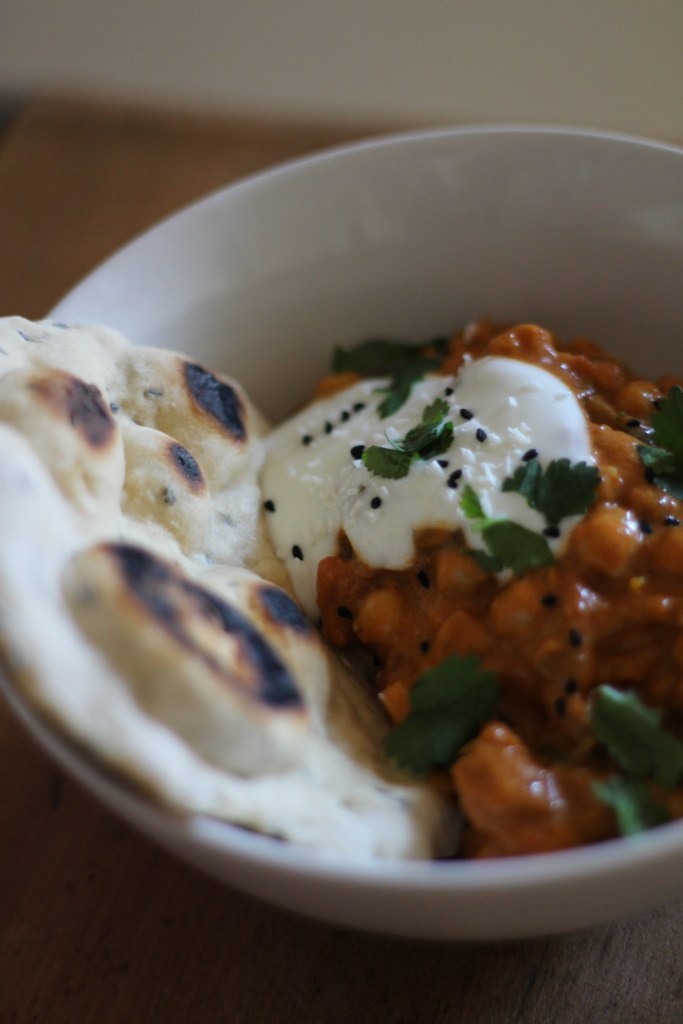
Chickpea Curry, Coconut Yoghurt, Naan and Mango Chutney

jess-chickpea-curry3jess-chickpea-curry2

I

 am not a vegetarian (lets just make that clear) but sometimes meat just isn’t required. When flavour is so prominent there is sometimes no need for it and this curry certainly has a big punch of spice. If you’re going to make a curry, don’t be timid, the more spice the better in my eyes! And I reassure you that you won’t miss the meat in this one – chickpeas make a substantial replacement. However feel free to replace with diced chicken, whole chicken legs, chunky white fish or even lamb. Or keep it vegetarian but pulse free with chunky cauliflower or broccoli or stirring through some spinach at the end.

Homemade flatbreads, sweet mango chutney and a cooling coconut yoghurt are the perfect side dishes. Who needs a takeaway….

Serves 4

Curry

  • 2 x cans chickpeas, drained
  • 1 can (full fat) coconut milk
  • 1 can chopped tomatoes
  • 1 large/ 2 small red onions roughly chopped
  • 2 garlic cloves, crushed
  • 1/2 red chilli, chopped
  • 1 thumb piece ginger, grated
  • 1/2 tsp fennel seeds
  • 1/2 tsp fengrueek seed
  • 1 tsp black mustard seeds
  • 1 tsp cumin seeds
  • 1 tsp each ground cumin, coriander, garam marasal, curry powder, tumeric
  • 5 cardamon pods
  • Bunch coriander
  • 1 lime
  • Spinach or extra vegetable optional

Yoghurt & Flatbread

  • 250g plain yoghurt
  • 2 large handfuls desiccated coconut
  • 500g self raising flour
  • 1 tbsp nigella seeds
  • Milk
  • Mango chutney to serve
  1. Start by mixing the flatbread dough. Add the flour, nigella seeds and some salt and pepper in a bowl. Add a small splash of milk (a little at a time) mixing as you go until you have a smooth dough that is not too wet. If you do add too much milk just counteract with some extra flour. Tip the dough onto a floured surface and knead for a few minutes until combined and smooth. Leave the dough ball to rest in a floured bowl while you make the curry.
  2. Start the curry by toasting the whole spices in a hot dry frying pan for a few minutes to release the fragrance. When you smell them toasting remove from the heat and add to a pestle and mortar and grind well. Add the dry spices and set aside.
  3. Heat a little vegetable oil in a frying pan/saucepan (bear in mind you will need the curry in a saucepan later so use whatever is easiest) and gently soften the red onion for about 10 minutes until soft and translucent. Add the garlic, ginger and chilli and fry for a few more minutes.
  4. Next add the spices to the onion mix and fry for about 2 minutes adding a splash more oil if needed.
  5. Next add the tinned tomatoes and simmer gently for a minute mixing well to incorporate the onion spice mixture before adding the coconut milk to the sauce.
  6. At this stage I recommend transferring the sauce to a saucepan with a lid if you haven’t already. Simmer gently for 5-10 minutes to thicken the sauce before adding the chickpeas. Season to taste and keep on the simmer while you make the flatbreads and yoghurt. Add a splash of water for a thinner sauce or simmer to reduce for a more concentrated texture (depending on preference)
  7. Toast the coconut in a dry frying pan until just turning golden. Remove and add to the yoghurt. Set aside.
  8. Take the rested flatbread dough and divide out into generous golf ball sized rounds. Roll into flatbreads, the thickness of a 10p piece and set each aside. Heat a dry frying pan on high and turn on the extractor fan! Dry fry the flatbreads on each side. They should puff up a little in pockets and char a little. You’ll have to play with your own hob temperature but a high heat is needed. Continue with all the breads, wrapping them in a pile in a clean tea towel to keep them warm and soft after each one.
  9. (If adding any vegetables, add to the hot curry now and simmer until cooked.)
  10. When the breads and yoghurt are done and the mango chutney is at hand and ready to go, chop a large handful or coriander and the stems and add to the curry. Squeeze in the juice of the lime and taste and adjust the flavour as needed.
  11. Serve the curry in large warm bowls topped with the yoghurt, chutney and a scattering of coriander. Dip in your flatbreads to your hearts content.


Coconut Blueberry Yoghurt Loaf

Jess - Coconut yoghurt loafJess - Coconut yoghurt loaf 2

I

was recently lucky enough to receive a generous bounty (excuse the pun) of The Coconut Collaborative’s tasty products to do some experimenting with. As my close friends will know I love all things coconut. I can’t get enough. So any food based with this creamy exotic flavour is in my good books. While targeted at the dairy free among us, you would not know for the lack of it with it creamy moreish taste. I thought I’d attempt to use their delicious flavoured and non flavoured yoghurts in a cake, dairy free, and packed with fruit. Devine.

And I know recipes do tend to write this a lot but this really (truly, honestly) is the EASIEST cake in the world to knock out. I think it took me a 5 minutes. Mixing bowl, spoon and loaf tin. Minimal washing up…more eating time. No scales needed just a ratio of yog-pots!

Jess - Coconut yoghurtJess - Coconut yoghurt2Makes 1 loaf

  • 1x 120g pot of ‘The Coconut Colloborative’ blueberry yoghurt (Here is have used this coconut based yoghurt so this is a dairy free loaf! But feel red to use any yoghurt of choice)
  • 2 pots self raising flour
  • Just under 1 pot caster sugar (dependant on the sweetness of your yoghurt)
  • 1/2 pot of vegetable oil
  • 3 eggs, beaten
  • 1 tsp vanilla extract/ seeds from 1 pod
  • Pinch salt
  • 150g blueberries
  1. Preheat the oven to 180°C. and grease and line a loaf tin
  2. Place the yoghurt in a large mixing bowl and then add the rest of the ingredients except the blueberries.
  3. Mix thoroughly to combine until you have a smooth batter
  4. Mix in the blueberries
  5. Spoon the mixture into a loaf tin and bake in the own for about 45 minutes until cooked. Bake for a little longer if a knife inserted into the middle does not come out clean.
  6. Leave to cool, dust with icing sugar and serve with extra blueberries and a hearty spoonful of Coconut Ice cream (see here for a dairy free option)

Jess - Coconut yoghurt loaf 5

Sticky Salmon-Pineapple Kebabs, Thai black rice salad

I

‘m always surprised at the amount of people who are surprised at the flavour that rice can have on its own without additional added flavours. If you pick the right rice that is. If you’re used to the same old white or even brown rice then venture out! I use red French Camargue rice as my staple now due to its wonderful nutty flavour but after stumbling over some Thai black rice recently which fell into my innocent shopping basket I had a salad on the mind. A dark and nutty flavour goes wonderfully with Thai flavours and fruits. Try mango and prawns, basil and coriander (see here) which was my initial intention. However as a nod to the gorgeous weather this weekend a barbeque inspired kebab was required. Seeing as my garden-lacking London flat could not supply my bbq needs, a sticky, sweet and if you cook the salmon well, oh so tender kebab a top this fresh and herby Thai rice salad suited Sunday evening down to the ground. Cold beer to accompany and the BAFTAS.

Serves 2 (make 4 skewers)

  • 2 salmon fillets, cut into 2cm chunks
  • 1 fresh pineapple, cubed into 2cm chunks
  • Broccoli florets (about 6-8)
  • 2 tbsp soy sauce
  • 1 large tsp sesame oil
  • 1 1/2 tsp runny honey
  • Small knob ginger, grated
  • 4 oz Thai black rice
  • 4 spring onions, sliced
  • 50g desiccated coconut
  • Bunch coriander, chopped (save some for garnish)
  • 2 sheets nori seaweed, cut into small 1 cm wide pieces or strips (optional)
  • 1 lime
  • 4 skewers (soaked in water for 20 minutes)
  1. Combine the soy sauce, sesame, honey and ginger in a bowl and mix well
  2. Marinade the salmon chunks, broccoli florets and pineapple chunks in this mixture for 1 hour in the fridge.
  3. After 1 hour, prepare your skewers. Feed alternating salmon and pineapple and broccoli chunks onto each. Set aside on a line baking tray and chill. Preheat the oven to 180°C.Jess - Salmon Asian KebabsJess - Salmon Asian Kebabs2
  4. Meanwhile make the rice salad. Simmer the rice for around 25 minutes until just cooked with a little bite.
  5. While this is cooking toasted the coconut in a dry frying pan until just bringing to turn golden. Watch it as it catches easily. When fragrant, remove and add to a bowl.
  6. Combine with the chopped spring onions, coriander and the chopped nori sheets.
  7. When the rice is ready, drain well. Immediately add the bowl of coconut and herbs and squeeze in the juice of the lime. Place a lid on top and keep warm.
  8. Remove the salmon skewers from the fridge and heat a frying pan until hot and add a tsp of oil.
  9. Sear the skewers on both sides to get a lovely caramelised effect all over. Add the rest of the marinade to the pan (it will sizzle) and then immediately transfer the skewers and the pan juices to the baking tray. Pop in the oven for 5 minutes to finish the cooking.
  10. Meanwhile, plate up the rice in warm serving dishes. After 5 minutes check the salmon is tender and cooked through but just pink and remove from the oven. Top your Thai rice salad with the kebabs and any extra chopped coriander to garnish.

Jess - Salmon and Thai rice2

Seabass in a Fragrant Coconut Sauce

image

As an avide foodie I crave and adore nothing more than a night in with a new recipe, ingredient, technique or guest to experiment on for the blog! Cheaper, more fun and far more relaxing. However, since moving to London the expanse of diverse, exciting and vibrant culinary pop-ups, restaurants, cafes and bars has stolen part of my attention which had been held hostage to the blog for a long while. I rarely eat out, only really on occasion. And then, nothing pains and bruises me more than ordering (or eating!) something I could have made myself. Be it better, warmer, larger or cheaper! Hence, I choose my dining locations carefully and my menu choices with thought.

However, as a fellow foodie, my willing sister and I venture out on a monthy or so basis to one of London’s restaurants to excite our taste buds, get inspiration and frankly for a girly catch up. Our list of ‘must try restaurants’ is only growning sadly. It seems that once one is ticked off another is added. We’ve had some great food but last Friday, after long frustrating working weeks, a home cooked delicious meal was in order. A few luxurious king prawns, a little love, time and attention and an aromatic riesling guaranteed and certainly delivered a more relaxing, cheaper, (boozier…..ahem…..) and enjoyable evening. This dish was delicious and hit the spot for flavour, decadence (without being time consuming I add, especially if you miss out the stock infusion at the start) and highly satisfying. Followed by a few too many scoops of my cheats salted caramel ice cream it was agreed that an evening in was far more rewarding and enjoyable than filling London’s bars and tills with our hard earned cash!

Serves 4

  • 4 seabass fillets
  • 8-10 large raw whole king prawns (win heads and shell) Optional – if you want to make a flavoursome stock. Raw cleaned prawns are fine if not.
  • 2 tsp coconut oil
  • 2 garlic cloves, crushed
  • Thumb sized piece ginger, grated
  • 20g tumeric root, grated
  • 1 large red chilli (heat according to taste)
  • 350ml fish stock
  • 400ml coconut milk
  • 1 stick lemongrass
  • 1 Kaffir lime leaf
  • 2 tbsp fish sauce
  • Bunch spring onions, chopped
  • Large bunch coriander, chopped
  • 2 limes, 1 cut into wedges to serve
  • Around 8oz rice – I used red Camargue rice
  • Greens to serve e.g. mange tout, pak choi etc.
  1. [This first step is optional and can be skipped. It will add a depth of flavour to the dish by using the shells and heads to enrich your fish stock. Peel the shells and heads from the prawns keeping the prawns for later. Heat a little oil in a saucepan on a medium high heat and add the shells and heads. Fry for about 5-8 minutes until they turn pink and begin to release their flavour and oily orangey juices. After this time, add the hot fish stock and simmer gently for about 4 minutes.
  2. Sieve through a fine sieve into a jug or another saucepan retaining all the liquid but then discard the shells. Keep the stock warm until needed.]
  3. Next, heat a tsp of coconut oil in a heavy based saucepan. Fry the ginger, tumeric, garlic and chilli for a few minutes until fragrant. Add the stock and coconut milk and bring to a simmer.
  4. Bash the lemongrass with the back of a knife a few times to open up the layers and add to the pan with the lime leaf and simmer gently for about 10 minutes to reduce the sauce and let the faours infuse.
  5. Add the fish sauce (I suggest adding it a tbsp at a time and tasting in between as once its in you can’t take it out again!).
  6. I made this a day ahead and I really think it benefitted from some time infusing in the pan while quietly chilling in the fridge (especially using the lime leave and lemongrass which will release thier flavours endlessly). I recommend at this stage to remove from the heat and leave to cool and infuse overnight. If not, continue as below.
  7. Simmer (or reheat, depending on your method) the sauce until you reach the desired creamy consistency you prefer then remove the lemongrass and lime leaf and discard. Stir in the chopped spring onions and coriander. Taste and adjust the seasoning. Keep warm while you prepare the rest.
  8. Cook your rice and add the juice of 1 lime to the drained hot grains and set aside to keep warm.
  9. Heat a frying pan over a medium high heat and add another tsp or so of coconut oil. Cut your seabass fillets in half if you wish, and score the skin to stop them curling up on frying. Fry, skin side down for 2-3 minutes, flipping only whe the skin is crisp and the flesh is almost done which you will see when the majority of it has turned white.
  10. While the seabass is cooking, add your prawns to the hot coconut sauce. Add them when the sauce is barely simmering to gently and lightly cook the prawns. Don’t overcook these or they will go all chewy. They need very little time and heat so a brief blast in the hot sauce until they just turn pink will do sufficiently.
  11. To serve, divide the lime rice among large warmed soup bowls.
  12. Top with the seabass fillets and divide the creamy sauce around the outside. Scatter with any reserved coriander and a juicy zesty wedge of lime!

To serve – I served mine with some briefly blanched sugar snap peas and mange tout. Drained and dressed quickly with a teaspoon of sesame oil while still hot and scattered with nigella seeds.

NOTE: This would also work very well with salmon. Feel free to gently poach the fillets in the coconut sauce for a different technique. Serve with any greens you like. Another addition would be to grate in some fresh coconut for added texture and taste.

WINE: Served with a lovely aromatic riesling to balance with the spice in this dish. Or a beer if you prefer! See here for some lovely suggestions.

image

To follow if you’re feeling like you need a Friday treat…………

  1. Mix 1 can caramel condensed milk, 300ml single cream, 1 ½ tsp flaky maldon salt, crumbled in a tupperware. Freeze until set and then devour! NO CHURNING INVOLVED! (Crumble in some roasted hazelnuts, walnuts peanuts or pecans if you like)
image