Date Archives November 2012

Spinach, Watercress and Pea Healing Soup

Ever feel like your body is screaming for some nutrients? After this soup, I always feel like I’ve eaten my way to adding another few years onto my lifespan! It has a deep, tasty flavour and is delicious with warm toasted soda bread and salty butter.

  • 2 tbsp olive oil
  • 1 onion, chopped
  • 2 sticks celery, diced
  • 1 garlic clove, chopped
  • 750ml hot chicken/vegetable stock
  • 170g peas
  • 150g spinach
  • 170g watercress
  • 150 double cream
  • Chives
  • Dukka
  1. Heat the oil and fry the onion and celery on a low heat until soft. Add the garlic for the last few minutes before adding the hot stock
  2. Add the peas and return to the boil for about 5 minutes
  3. Add the spinach and watercress and simmer for 10 minutes
  4. The blend the soup and add the cream or creme fraiche if you like.
  5. Serve scattered with chives, herbs or more  cream. I sprinkled mine with dukka for added texture and a bit of spice

image

Horseradish Arancini with Roasted Beets

image

Leftovers can be all the more delicious if you give them a bit of time. With some leftover horseradish risotto….arancini were on the list, with some seasonally roasted beets and a vibrant and sweet pea puree.

  • 1 quantity of leftover risotto, cold
  • Large bowl of fine white breadcrumbs
  • 1 egg, beaten
  • 4 tbsp plain flour
  • Small bunch of flat-leaf parsley
  1. Lay out 3 shallow bowls. Place the flour in one, the beaten egg in another and the breadcrumbs in the last.
  2. Chop the parsley finely and add to the breadcrumbs with some seasoning.
  3. Now take a spoonful of your cold risotto and form it into a golf ball. First roll in the flour, then the egg and finally into the breadcrumbs to coat. You can re-roll it into the egg and breadcrumbs again if you like, for a thicker coating.
  4. Do this with the rest of the risotto.
  5. Now heat some olive oil in a pan with a knob of butter. When it starts to sizzle, add the arancini and fry on a medium high heat until golden and the risotto is warm through. If they brown too quickly before they are hot in the middle, pop them in a hot oven for about 10 minutes.
  6. Roast some beetroot in oil, with a scattering of cumin seed, salt and pepper for 45 minutes and serve alongside with some crushed peas.

Red Wine Poached Fillet steak on Horseradish Risotto

image

The first years harvest of our own homegrown (miniature I add) horseradish roots was the most judicious and pleasing reason to bring out the humble roast a few weekends ago. Star of the show, grated generously like hot, fierce confetti for a meaty beef groom and a fluffy, brunette, Yorkshire bride!

However, I love the smack this root gives and thought it would go dreamily in one of my favourite dishes- risotto. So this Sunday, instead of a roast, I opted for a rather extravagant (but all the same, delicious) wine poached steak to top my horseradish risotto. Drizzled greedily with a thick deep red wine reduction and some seasonal kale, I am set for the week!

  • 200ml red wine
  • 2 thyme sprigs
  • 1 sprig rosemary
  • 2 garlic cloves, peeled and crushed
  • 200ml beef stock
  • tbsp butter
  • tbsp flour
  • 100g fillet/sirloin steak per person
  1. Begin by adding together the wine, stock, herbs and garlic and one a medium heat, simmer until reduced by about half the amount.
  2. It is important to ensure that the heat is too high so that the liquid is not boiling but gently simmering so your don’t boil your steak but poach it. Add your steak making sure that it is covered in the liquid but not drowning.
  3. Poach gently for about 7 minutes for medium depending on the thickness of you steak. Mine was about 2cm thick.image
  4. Remove from the heat and allow to rest, covered, while you do the sauce.
  5. Turn up the heat again and simmer to reduce by about half again.
  6. Mix 1 tbsp of butter with 1 tbsp of flour in a bowl until you have a paste. This is called a beurre manie and is a method I regularly use to thicken sauces without the flour going lumpy and as a way to get yet more butter into a recipe!
  7. When you have a soft paste, whisk this into the sauce and allow it to thicken. The addition of the butter will also add a nice creamy shine to your sauce. Once it is to the right texture, taste, season and sieve.
  8. This can be served on anything from butternut squash, potato, celeriac or parsnip puree but I served mine on a horseradish risotto. I simply made a plain risotto recipe (minus the parmesan) with the addition of some rosemary and thyme and added 3 good tablespoons of fierce horseradish sauce (per 200g rice).
  9. Top the risotto with your poached steak and drizzle with a splash of red wine sauce and some nutmeg seasoned kale.

image

Sunflower Seed, Vanilla and Cinnamon Butter

image

I love my seeds and nuts so once again, here is another go at a nut butter. This time sunflower seeds. Whilst reminding me of my friends late hamsters dinner, these little seeds remind me of when I was little as I’d munch them all day long…Feel free to add more oil than I have for a creamiest texture but I like mine with as little as possible to retain their wholesome goodness. They don’t have as much natural oil in them as pumpkin seeds or peanuts so you will need to add some.

Ingredients

  • 200g sunflower seeds, toasted
  • 2 tsp ground cinnamon
  • 2 vanilla pods, seeds scraped (although even more wouldn’t be a crime)
  • 2-4 tbsp mild, light olive or sunflower oil (up to 50ml)

image

  1. Begin by toasting the sunflower seeds in the oven for a few minute or in a dry frying pan until fragrant.
  2. Add them to the bowl of the food processor and begin to blend for a few minutes.
  3. After they are fairly powdery and broken down, add a pinch of salt and continue blending, scraping the the mixture down the sides when necessary.
  4. Add a splash of oil to loosen and add moisture as you go.
  5. Continue to blend, adding as much oil as you like to achieve your desired texture. I like mine with as little as possible but for a spoonable soft butter add up to 50ml.
  6. Add the cinnamon and the vanilla seeds and continue to process. Adjust by adding more to your tastes as you go.
  7. Once you have a mixture that is buttery and tastes to your liking, store in a sterilized jar and keep in the fridge ready to top toast, porridge or with some jam in a bagel…If you come up with any winning combination, let me know!

imageimageimageimage

Its getting a little sad that the highlight of my Sunday evening is a adrenaline filled dash to my local ‘Little Waitrose’ on the triangle in Clifton where if you get in there about 10 minutes before closing you can usually bag yourself some bargains! With a whole grate of asparagus (I hate to admit, imported from Peru) I had to take a load home for dinner to save the unnecessary wastage. So for all you Bristol students out there who think you can’t eat well on a budget, get yourself to Waitrose at 5.50pm on a Sunday!

Cauliflower Cheese Soup With Sage and Chestnuts

Time for another comforting winter soup. I love cauliflower cheese so this soup was sure to please. As chestnuts were also in season and getting ready to be roasted on a humble fire, I thought I’d save them the pain. As they were screaming naughtily at me to eat them, I topped my soup with their creamy, crumbled texture and some crispy sage leaves for some delicate crunch.

  • 1 large cauliflower, cut into florets
  • 1 onion, chopped
  • Large knob of butter
  • 1 garlic clove sliced
  • small bunch of sage leaves, picked
  • 700ml hot stock
  • Salt and pepper
  • 100g or so of strong mature cheddar cheese, grated
  • Sage leaves to fry
  • Olive oil
  • Chestnuts
  1. Begin by getting the chestnuts on to boil. Pop them straight in, they should take about 15 minutes to soften. After this, drain and allow to cool. You can score the top with a cross to make them easier to peel if you like. Once soft, drain and set aside to cool.
  2. Melt the butter with a splash of oil in a pan. Once hot, soften the onion for about 5 minutes until translucent. Add the sage leaves and the garlic and fry for a couple of minutes.
  3. Add the cauliflower florets and stir to coat in the onion. Season.
  4. Add the hot stock and bring to the boil. Simmer for about 10 minutes until the cauliflower is really soft when pierced with a knife.
  5. Remove from the heat and blend with a hand blender.
  6. Add a spoonful of creme fraiche or replace some of the stock for milk for a creamier texture if you like. Add the cheese.
  7. Replace back on the heat on low and stir until the cheese had melted. Season to taste
  8. Now heat a thin layer of oil in a frying pan until really hot. Lightly fry the sage leaves until crispy and drain on kitchen paper. Season with a scatter of salt. This oil can now be kept and used as ‘sage-scented oil’ to top your soup or for other recipes and dressings.
  9. Serve the soup topped with crumbled chestnuts, crispy sage leaves and a drizzle of the fragrant oil!

image

Gingerbread and Apple Pancakes

The perfect start to a sunny Autumnal Sunday morning. I saw a version of these recently on a cookery show, however I always like to get some fruit into my breakfast in some way so I added some grated apple for texture and nourishment!

Pillowy, light and spongy pancakes are always satisfying. I haven’t got a huge sweet tooth so I appreciate homemade pancakes that haven’t been drowned in maple syrup or criminally, bacon…..! I had mine simply with Greek yoghurt and a spoonful of my pumpkin butter jam for sweetness. Drizzled with some sticky honey (the pancakes not me), I was ready to start the day……

  • 225g self raising flour
  • 3 tbsp light muscovado sugar
  • 1 tsp cinnamon
  • 1 tsp baking powder
  • 2 tsp ground ginger
  • 1 tsp mixed spice
  • pinch salt
  • ½ lemon, grated zest
  • ½ vanilla pod, seeds. Or a few drops of vanilla extract
  • 300ml milk
  • 1 large egg
  • 1 apple, grated and drained in a colander
  1. Place the dry ingredients in a large bowl and make a well in the centre.
  2. Add the lemon, vanilla and then whisk in the milk.
  3. Whisk in the egg and then add the apple. My apple was quite moist so it made the mixture a little thinner so I suggest draining the apple in a colander first or patting dry. I just added a little more flour and it still worked out fine!image
  4. Pour a little oil in a hot frying pan and fry large spoonfuls of the mixture for a few minutes until it begins to turn golden brown underneath and bubbles appear on top before flipping and frying for a few more minutes.
  5. Serve warm with yoghurt and honey or any other favourite accompianment!

These are also open to experimentation! Add any flouring, spice or fruit but be aware that wet fruit will add a lot of moisture. Try it with my pumpkin butter jamimage

Pumpkin, Pancetta and Sage Risotto with a poached egg

This seasons allotment pumpkin harvest certainly and surprisingly earnt its keep this year which is my excuse for the popular pumpkin theme these last few weeks. As ten chubby, overfed pumpkins sat apprehensively on the wall outside my backdoor, I had originally thought them unsuitable for eating, I had already devised a family tree of characters to make my own set of halloween faces! However, as I cut into their dense, creamy flesh, I realised they were much too good to waste.

So I knocked up a vat of oozing, cheesey, creamy and vibrantly orange halloween-themed risotto. Topped with a poached egg, or as pictured, a cool quinelle of mascarpone, it went down a treat. I roasted my pumpkin to get the most from its flavours with a little added crushed coriander seed to give you a crackle of surprise in every other mouthful.

Serves 4

  • 1 small pumpkin/butternut squash
  • 1 tsp coriander seeds, crushed in a pestle and mortar
  • 3 garlic cloves, left in their skins
  • Olive oil
  • 200g risotto rice
  • Hot chicken or vegetable stock (about 1 pint)
  • 1 glass dry white wine
  • 1 onion, chopped
  • Few sprigs thyme
  • 25g butter
  • Parmesan, grated
  • Handful of sage leaves
  • 150g pancetta or smoked bacon
  • 1 egg/Mascarpone to serve
  1. Preheat the oven to 190°C. Cut the pumpkin in halve and scoop out the seeds and reserve (you can fry these in oil). Cut into small quarters or large chunks and drizzle with oil, scatter with salt and pepper and the coriander seeds. I chucked in a few garlic cloves in their skins here too, as I never miss this opportunity as they go all sweet and sticky.
  2. Roast for about 40-50 minutes until the flesh is soft and scoopable. Use a spoon to scoop the flesh out into a food processor or a large bowl and throw the skins away. Squeeze the sugary garlic from their skins and add to the pumpkin. Mash in a processor with a splash of hot stock to loosen or with a masher in a bowl. Set aside to keep warm.image
  3. Meanwhile or afterwards, begin the risotto base. Melt the butter with a splash of oil in a large pan over a medium low heat. Soften the onion until translucent and then add the thyme leaves and season.
  4. Add the rice and stir until beginning to turn translucent and it is hot to touch. Add the wine and simmer until absorbed.
  5. Now turn the heat down so that it gently simmers and add ladlefuls of your hot stock to the rice, adding another once each had been absorbed. Don’t let it dry out however. (For tips on the perfect risotto see here) The whole process should take about 15-18 minutes with continual stirring.
  6. Meanwhile, heat a hot frying pan and cook the pancetta or bacon until crisp. Add the sage leaves at the end for a minute until crisp then set aside.
  7. After about 15 minutes, test the risotto. The rice should be nearly done or a little al dente.
  8. Now stir in most of the pumpkin puree. It will thicken considerably so add more stock to get a oozy, loose and molten texture.
  9. Stir in the pancetta and sage and season to taste.
  10. Once the consistency is loose enough and the rice is cooked, take off the heat. Add the parmesan and a squeeze of lemon and cover with a lid and let it sit for a minute or so to rest. Then stir together when the cheese has melted.
  11. Spoon into shallow bowls and top with extra sage, and if wanted, a spoonful of creamy mascarpone or a ‘runny-in-the-middle’ poached egg!

This recipe is also lovely with walnuts or chestnuts for added crunchy texture!

Mission Burrito

One evening last week, I went to a burrito masterclass at ‘Mission Burrito’, Park Street, Bristol. One of five from a small chain of authentic, delicious, moreish and comforting burritos bars. It was brilliant.

I’ve been in burrito eating territory but this was a new and exciting delight. A whistle-stop guide through owner Jan’s motivation to recreate the tastes from his time in San Francisco and the origins of the business were our first look into their love affair with burritos. No sooner, tupperwares of intriguing chipotle, arbol, epazote and pumpkin seed powders imported religiously from Mexico, were wafted under our noses, eliciting stomach tingling excitement and awe. With not a freezer to be found in any of their kitchens, Mission Burrito focuses wholeheartedly on freshly made burritos everyday from scratch using amazing ingredients.

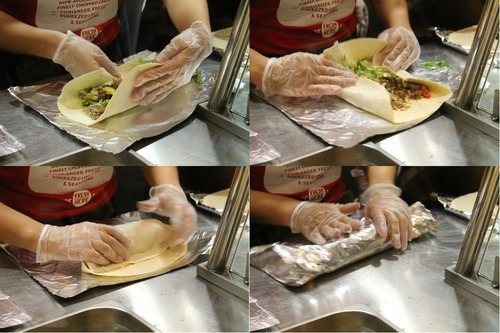
With Corona in hand, and sticky tortilla chip fingers, we knocked up the largest batch of guacamole I’ve ever seen. Then it was ready for the big show. Jan’s expertise and wonderful passion was effectiously contagious as he casually invited us all to dive behind the counter to marry together our own personalised burrito ingredients into a warm, toasted floury tortilla. With a mouthwateringly fresh array of delectable ingredients from black beans, white beans, rice, shredded pork or chicken, peppers, salad, guacamole, soured cream and a dangerous vat of spicy sauces that would make a grown Mexican weep, we were spoilt for choice. We made our burrito’s in the traditional style, to the amusement of the Mexican staff who casually knocked out double our turnover for the loyal but slightly bewildered customers who lined the room!

Jan’s expert method:

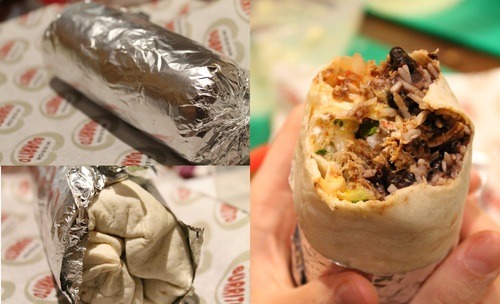
It all begins with a warmed floury tortilla. Next rice…..followed by a good spoonful of creamy beans. Then the shredded pork, salad and in my case, guacamole, soured cream and salad (hold the spice for me)! Mix it together and then craftily and technically fold into a chunky, easily transportable roll of goodness.

Throughout the evening it was apparent of the love that Jan had for good fresh food and for making people happy with it. For many, this is considered fast food, and it is, but not in the way you know it. This is all about freshness and real ingredients which although combined in a speedy ‘subway-style’ manner, you sure won’t taint your precious nostrils with the synthetic wafts of that traditional sandwich bar. So with the lasting take home message that was pinned behind the counter- the difference between a fajitas and a burrito is that a fajitas is filled with grilled meats and vegetables- we said our reluctant farewells and set out to work off our amazing burritos before beginning round two for lunch!

Lapsang Souchong Smoked Salmon

I attempted to smoke my own fish at home and it was a surprising success! You’ll  need a 1940’s gas mask or failing that, an efficient extractor fan- I chose the later- as your kitchen soon gets a little smokey. The taste is worth the trouble though, as it infused this beautiful salmon with a subtle smoky fragrance and a moist, pillowy texture! Following Skye Gyngell’s instructions with a few tweaks here and there, this is how to go about your home smoking…..

  • 45g muscovado sugar
  • 60g caster sugar
  • 135g tea leaves- I used Lapsang souchong which has a bonfire-like smoky taste.
  • Salmon filltets
  1. Using foil, make 2 cups about 3cm deep and divide the above combined dry mixture into both
  2. Place in a deep roasting tin. Place ramekins or pudding moulds in the four corners and rest a wire rack on top of them, covering the foil cups
  3. Place the salmon fillets skin side up on some parchment and wrap and place on top of the wire rack. Place the tin on a medium-high heat and begin to heat. It takes about 10 minutes to begin smoking- extractor fans are essential here.
  4. For salmon, my timings were a bit hit and miss. I smoked it for about 5 minutes and then checked. Then leave to rest for for a few minute still wrapped but off the heat.

image

To let the salmon be the star of the show, I served mine simply with creamy lentils with lots of fresh chopped herbs. The only down fall to this is you don’t get the crispy skin I so love on fish. People find this is strange but it is essentially just like pork crackling! So, you can peal the skin off the salmon and fry in a hot oiled pan for a few minutes and serve as a salty shard on top for added texture and crunch!

image