Date Archives August 2013

Lamb, Mint and Pea Salad


image

Leftover lamb never tasted better. Freshly cut herbs from the garden, a cucumber from the greenhouse and some leftover local lamb. A sunny evening called for a fresh cleansing salad to start the week on a healthy note. Although washed down with a large glass of Cab Sauv it probably had the opposite effect!

Not sure the picture does this dish justice but it is extremely tasty, particularly also crumbled with feta or goats cheese as well as or instead of the lamb for the veges.

Serves 3 as a main, 4 as a lunch or starter

Salad

  • 2 little gems
  • 1 romaine lettuce, shredded
  • 1 small cucumber, chopped on diagonal
  • 1 avocado, chopped
  • 1 lemon, juice
  • Handful pine nuts, toasted
  • Bunch mint, leaves picked and chopped
  • Bunch of chives, chopped
  • Leftover lamb, sliced- mine was rare roast butterflied leg but anything works well, shredded etc
  • 250g frozen peas, blanched

Oregano and Lemon Yoghurt

  • 6 heaped tbsp thick yoghurt
  • 1 small garlic clove, minced
  • Bunch oregano, leaves picked
  • ½ lemon juice and zest
  • 1 tsp extra virgin olive oil
  • Salt and pepper

Sun dried Tomato Bread

  • 250g self raising flour
  • 4 sun-dried tomatoes in oil
  • Bunch basil
  • Salt and pepper
  • Warm water
  1. Make the bread first. Blitz the sun dried tomatoes and basil in a processor until fine. Add the flour and some generous seasoning and blend. Pour in enough warm water until the dough comes together in a smooth ball. Turn out onto a floured surface and knead for a few minutes before leaving covered to rest.
  2. Mix the yoghurt ingredients and chill.
  3. Keep the stalks on the little gems to hold them together. Half each and cut each half into 3 keeping them together at the base.
  4. Mix with the blanched peas, shredded romaine, cucumber and chopped herbs on a large platter.
  5. Griddle the avocado on a hot oiled griddle pan until warm and charred. Season well and add to the salad. Squeeze over the juice from the lemon, a good splash of extra virgin olive oil and some seasoning and toss gently to combine.
  6. Sprinkle over the toasted pine nuts and finally the lamb.

image

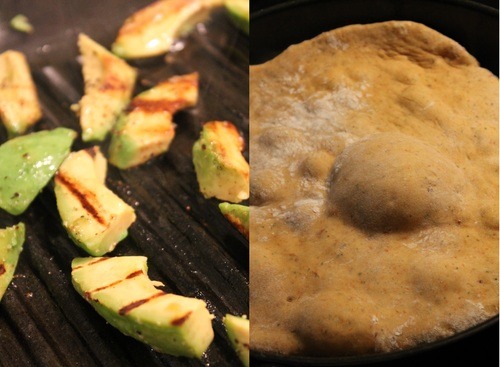
7.  Heat a large frying pan. Roll the bread out to the thickness of a pound coin and big enough to fit the pan. Fry in the pan for about 5 minutes each side until toasty and beginning to char and crisp. Turn out onto a board and rip up and serve warm with the salad, dunked in the yoghurt or with some salted butter.

image

Blackcurrant Bakewell Macaroons

I’ve been making a lot of macaroons recently….perfecting the skill you might say! These were without doubt the lightest batch I’ve made to date and the super sweet blackcurrant puree (see here) which I made was to die for with the creamy but punchy almond buttercream filling. Sandwiched lovingly between two girly pillows these taste like a mouthful of bakewell tart! Feel free to use a cherry or raspberry jam for a more traditional ‘bakewell’ flavour however.

For me, the excitement of macaroons comes in the endless combinations of flavours but I love taking a traditional dessert recipe and deconstructing it into a light macaroon in an ‘amuse bouche’ style! The possibilites are endless….pecan pie, treacle tart, creme brule macaroons perhaps?

Macaroon Shells

  • 60g egg whites (about 2 eggs)
  • 40g caster sugar
  • 50g ground almonds
  • 110g icing sugar
  • Red food colouring

Filling- Almond Buttercream

  • 80g butter, softened
  • 80g icing sugar
  • Up to 1 tsp almond essence (or to taste)
  • Blackcurrant/cherry/strawberry jam
  • Yellow food colouring (optional)
  1. Preheat the oven to 170°C and line a baking tray with parchment.
  2. Blend the ground almonds and icing sugar together in a food processor until fine and then sieve into a bowl.
  3. In another bowl, whisk the egg whites until soft peaks form, then add the caster sugar a spoon at a time until glossy stiff peaks form. Briefly whisk in a good splash of red food colouring.
  4. Fold in 1/3 of the almond mixture to loosen it. Then fold in the rest, being gentle not to knock the air out.
  5. Spoon into a pipping bag with a round ended nozzle and pipe consistent circles of mixture evenly. Give the tray a sharp slap on the surface to level the mixture and leave for 20 minutes, uncovered to form a skin.
  6. Bake for about 12 minutes. They are ready when they come away easily from the tray. Leave to cool.
  7. Combine the butter, icing sugar and almond essence in a food processor or a bowl until smooth and combined. Add a splash of yellow food colouring if you like- the bright yellow colour can look great with the red shells. Spoon into a piping bag.
  8. Pipe some of the buttercream onto a macaroon shell half and top with about ¼ tsp of jam. Sandwich together with another empty macaroon half, squeezing together gently but not so the jam oozes out too much. Enjoy!

NOTE: I didn’t (as I ran out of icing sugar) but for authentic decoration, make up some thick wet icing with icing sugar and a tiny splash of cold water and spoon into a piping bag. Snip off the end and pipe some lines on the macaroons on the outside like a bakewell tart.

image

Gooey Cinnamon Cake Bites

image

If you haven’t already checked out the ’smitten kitchen’ food blog then do. Not only is it one of the first blogs that I was introduced to but it is a prime example of a fantastically interesting, honest, varied and drool-worthy food blog created by a passionate foodie who cooks from the heart simply because, like me, she is addicted- cooking is my happy place. However, more so, she has been one of the lucky ducks to get her humble blog made into a cook book. I can only dream of this priceless achievement! However, this is not going to happen by cooking other peoples recipes but the sound of cinnamon (one of my favourite flavours), gooey promises and the multiple times I had clicked on the recipe link only to mutter ‘I must make that’, prompted this recent cake-tin-filler. Here is the original recipe for those interested.

Base

  • 190g plain flour
  • 2tsp baking powder
  • 115g butter, room temp
  • 150g sugar
  • 1 egg, room temp
  • 60 ml whole milk
  • ¼ tsp salt

Gooey Top

  • 60ml golden syrup
  • 60ml whole milk
  • 1 tbsp vanilla extract
  • 170g butter, room temp
  • 225g sugar
  • ¼ tsp salt
  • 1 egg, room temp
  • 155g plain flour

Cinnamon Crust

  • 2 tbsp caster sugar
  • 1 ½ tsp ground cinnamon
  1. Start by lining a 9inch x 13inch cake tin with parchment. This may seem big but it is a flatish style cake/cake bar. Preheat the oven to 180.
  2. Start with the base by blending the butter and sugar in a processor or with an electric whisk until fluffy. Add the salt.
  3. Combine the egg and milk and mix into the butter and sugar until combined. Finally sieve in the flour and baking powder and stir to form a thick batter.
  4. Spoon it into blobs into the lined tin and spread out evenly and thinly with a spatula
  5. Now for the gooey layer, beat the butter and sugar together (no need to wash the processor) with the salt until fluffy. Add the egg.
  6. Combine the syrup, vanilla and milk.
  7. Sieve in 1/3 of the flour followed by half the syrup-milk mix. Add another 1/3 of the flour and then the final half of the syrup. Finally mix int he final 1/3 of flour and blend until smooth and delectable.
  8. Scrap large spoonfuls of the batter on top of the base and spread out evenly with a spatula until flat.
  9. Combine the sugar and cinnamon for the topping and scatter generously over the top to form a crusty cinnamon coat
  10. Bake for 25 minutes. It should feel slightly soft but gently et in the centre. Remove from the oven and leave totally alone to cool before removing from the pan.
  11. Cut into bite size pieces if you like.

image

Quadruple Tapas

I know the concept behind tapas is to eat each dish as it is ready- picking at little morsels of delicious oily, salty and punchy delights to give all your taste buds a go on the flavour dodgems. A long evening should be spent savouring tapas with no where to be and sipping delicious wine in the summer sun. However, I decided to make a selection for dinner and couldn’t find the relaxing side of constantly running back and forth to the kitchen to fry a croquetas or bake some fresh bread or turn off one of 100 timers. So I made a selection all to be eaten and enjoyed together with some delicious wine. I won’t lie, my way took a strong organisation and a large accommodating hob but I managed it. In addition, I have a new found respect for tapas bars….the amount of work that goes into the prep to bring together all the aspects and flavours of just one small dish is huge,-all requiring those little details to make them perfect. I won’t be opening a tapas bar in the near future but what can be gained from this experiment is that 1) I LOVE tapas but will leave it to the experts and 2) I won’t be so horrified at the staggering prices of a few small tapas dish from now on as I venture out to dine thinking that ‘tapas is just a cheap meal right?’.

image

image

Croquetas (Makes about 9 large croquetas)

I first saw a recipe for these in a Jamie Oliver book which this recipe is based on but they are a common little tapas dish and various flavours and recipe derivatives can be found elsewhere. They are essentially a cheesy flavoured bechamel sauce that is cooled and set and rolled in breadcrumbs and fried so that the inside in a hot molten cheesy mixture hugged lovingly in a crispy coat. You can actually use anything to add flavour to the sauce such as different cheeses, smoked fish, anchovies, different herbs or spices. Go wild!

  • 50g butter
  • 2 tbsp extra virgin olive oil
  • 75g plain flour ( and extra for coating)
  • 300ml milk
  • ¼ tsp ground nutmeg
  • 50g hard cheese- Cheddar/Manchego, grated finely
  • 3 slices of cooked smoked bacon/parma ham, chopped finely
  • Handful of chives, chopped
  • 1 egg, beaten
  • 100g breadcrumbs
  1. Melt the butter and the oil in a pan over a low heat until liquid. Spoon by spoon, incorporate the flour and stir in until you have a thick paste.
  2. Add the milk, splash by splash stirring in vigourously until smooth and lump free. Once all the milk is added, keep on the heat and keep mixing to prevent lumps but to really thicken the sauce.
  3. Once thick, remove from the heat and stir in the nutmeg, lots of seasoning, the bacon, cheese and finally the chives.
  4. Place into a chilled bowl and pop int he fridge until set. (NOTE: Mine was a little loose for moulding into croquetas so I popped it in the freezer about 30 mins before using to make it easier to handle)
  5. Get 3 plates and add the beaten egg, flour and breadcrumbs to each.
  6. Use a spoon to scoop and roll croquetas of your cooled mixture. Coat in first the flour, then the egg and finally the breadcrumbs. Continue you have done all and then cover and chill.
  7. Heat some oil in a pan, or use a deep fryer. When hot enough, fry the croquetas until golden and crisp on the outside. Make sure it is not too hot or the outside will colour before the inside is warm.
  8. Drain on kitchen paper and scatter with flaky salt and serve immediately.

image

Morcilla Broad Beans

This recipe is open to quantities so as long as there is a nice balance it will taste great. Don’t skimp on the morcilla however as it adds bags of flavour and depth and feel free to use black pudding which works just as well.

  • Morcilla, sliced
  • Broad beans, boiled and podded
  • Peas
  • 1 small red onion, finely diced
  1. Heat a little oil in a frying pan and gently fry the red onion until soft
  2. Add the morcilla/black pudding slices and fry until cooked on each side.
  3. Tip in the broad beans and peas and stir to combine, breaking up the morcilla as you stir to distribute evenly. Season and then serve.

image

Crisp Cod and Smoky Aioli

  • 2 cod fillets or any other firm fish
  • Plateful of polenta (seasoned with salt and pepper)
  • 1 egg, beaten
  • Flour for coating
  • 2 egg yolks
  • 1 garlic clove, grated finely
  • 2 tbsp lemon juice
  • ½ lemon, zest
  • 1tsp sweet smoked paprika
  • About 250ml sunflower oil
  • Flat leaf parsley for garnish
  1. Begin with the polenta coated cod which benefits from some time resting once coated. Skin the fish fillets and cut the fillets into chunky strips cutting with the ‘grain’/flakes.
  2. Get 3 plates and place the beaten egg, flour and seasoned polenta onto each.
  3. Coat the fish fillets in the flour, egg and then a good coating of polenta and then place the fillets on a polenta coated plate while you do the rest. Cover and place in the fridge for a few hours once done to allow the polenta to swell a bit and form a good crust.
  4. For the aioli, place the egg yolks, lemon and garlic in the bowl of a food processor and turn it on to blend together. With the motor running slowly and constantly add the oil in a thin stream to allow the yolks and oil to emulsify.
  5. As it starts to thicken, add the paprika and some good seasoning and have a taste. Continue to add as much oil as you like to obtain a thin/thicker texture.
  6. When ready to serve, fry the fillets in a little hot oil with a knob of butter for a few minutes on each side until cooked with a golden crust. Serve immediately garnished with parsley and dipped indulgently into the aioli.

Chorizo

This is now my new favourite way to enjoy chorizo, partly due to this sweet tangy glaze that coats it here. The sauce is wonderful when used a dipping sauce for the olive pittas or some qwilling bread to mop up the juices like an edible sponge.

  • 150g chorizo- raw or cooked
  • 1 ½ tbsp sherry vinegar
  • 1 tsp runny honey
  • Large sprig of rosemary
  • 3 large garlic cloves
  1. Cut the chorizo into chunky horizontal slices and fry in a hot pan (you can add a tiny drop of oil to get it going is needed).
  2. Peel and crush the garlic cloves coarsely with the back of a knife. If using cooking (raw) chorizo, make sure it is nearly cooked but if using cured chorizo, as it starts to colour and crisp add the garlic to the pan in the oily juices and fry for a few minutes.
  3. Add the picked rosemary leaves and fry for a few more minutes.
  4. Remove from the heat and add the sherry vinegar and the honey and stir to coat the chorizo.
  5. Return to the heat and very gently simmer the sauce until a little more syrupy and thick but not too reduced. Remove from the heat, cover and keep warm while you do the rest of your dishes as this one will keep.
  6. Serve with the olive pittas or some fluffy bread dipped into the beautiful oily juices

image

Olive Pitta

  • See here for pittas recipe– Don’t add the nigella seeds but instead, add a good pinch of sweet smoked paprika.
  • Once the dough has risen, add in a small handful of both chopped black olives and sun dried tomatoes.

image

Tomato Consomme

This looks like a bowl of dishwater right? Maybe with a mild tomato flavour? That’s what my mum was thinking as I tried (hard) to convince her that it would taste good. A tomato consomme sounds fancy but this one is simple. It is basically (without sounding pretentious) a clear bowl of tomatoey ‘essence’ or broth that is packed full of natural punchy tomato flavour, chilled and served as a lovely soup/palate cleanser. In the hot summer months when the tomatoes are bursting and ripe it is great alternative recipe for tomatoes if you’re fed up of pesto and mozzarella.

Serves 3-4

  • 1kg ripe juicy tomatoes
  • ½ small clove garlic
  • Large bunch basil (reserve a few small leaves for garnish)
  • 1 tbsp red wine vinegar
  1. Roughly chop the tomatoes and place in a food processor with the garlic, basil (including stalks), salt and pepper and the red wine vinegar and blitz until slushy. Taste and adjust seasoning.
  2. Line a bowl with a couple of pieces of fine muslin and pour in the tomato slush.
  3. Pull together the corners and secure with a knot. Hang above the bowl and leave to juices to drip through. Hang in a cool place or in the fridge (a little impractical so where ever is easiest). Don’t be tempted to squeeze the bag, as you want it to drip naturally in order to get a really clear liquid.image
  4. Leave to drip for about 7 hours or until you think most of the juice has been collected. You can gently push the muslin if you like at this stage.
  5. Once collected, taste and add salt to taste. Pour into a clean jug and chill until needed. Serve in bowls or cups with some small purple or green basil leaves to garnish.

NOTE: This is a stripped back recipe from a Jamie Oliver interpretation where he infuses horseradish and adds a splash of vodka for a Bloody Mary inspired version.

image

image

Lime Layer Drizzle with Blackcurrant and White Chocolate


image

Its been a frustrating week of unknowns but what can be guaranteed- as so rightly put by Julie from ‘Julie & Julia’- is that at the end of the day you can always rely on eggs, sugar, butter and flour producing something delicious. Chuck in some gooey lime syrup, some sharp mouthwateringly-tart blackcurrant puree and the soothing sweet sugary hug of a palate knife of white chocolate buttercream and you’ve got yourself the solution to any first world trauma…(excluding obesity….!) With too many handpicked blackcurrants from the allotment to fit in the freezer- yes the frozen joints of meat and 2 year old pack of fish fingers for those emergencies had to be sacrificed- it was time for the blackcurrants to earn their keep. With a vat of blackcurrant sorbet and enough jam to keep a Frenchman happy, it was time to use them in a new recipe.

If you can’t get hold of blackcurrants (get in touch, our crop would supply international orders) then blackberries would be good too but the tart sharpness of the blackcurrants is really lovely with the white chocolate.

image

image

image

Serves….many!

Cake

  • 225g unsalted butter, softened
  • 225g golden caster sugar
  • 225g self raising flour
  • 4 eggs
  • 1 1/2 zest lime
  • 85g caster sugar
  • 6 tbsp juice (about 1 ½ limes)

Fillings

  • 300g blackcurrants
  • 100g caster sugar
  • 100g white chocolate
  • 140g unsalted butter, softened
  • 140g icing sugar, sieved
  1. Preheat the oven to 180°C and line two small (16cm) cake tins.
  2. Beat the butter and caster sugar together until pale and creamy. Add in the beaten eggs one at a time followed by the lime zest.
  3. Sieve in the flour and fold in to combine.
  4. Spoon into the tins and even out. Bake for about 40-50 minutes until just cooked and springy to touch.
  5. While they are baking, combine the 85g caster sugar, and the lime juice and warm over a low heat to dissolve the sugar. As soon as the cakes come out the oven, prick all over with a tooth pick and spoon the syrup over the two cakes, allowing it to seep into the holes. Leave to cool COMPLETELY in their tins before turning out.
  6. For the blackcurrant puree, wash the blackcurrants so they retain a bit of water on their skins and heat with the sugar in a pan over a medium heat until they begin to burst and soften and turn a little syrupy. Don’t boil and obliterate them, as soon as they start to simmer, remove from the heat. Puree in a food processor or the like until smooth.
  7. Tip into a sieve and strain out the pips and skins to achieve a smooth glossy puree. You should get about 180g (ish).Chill until needed.
  8. For the butter cream, melt the white chocolate in a heatproof bowl over a pan of simmering water. Give it a beating if it is a bit lumpy to get a smooth melted chocolate. Leave to cool a little.
  9. Combine the sieved icing sugar and softened butter until smooth and then beat in the melted chocolate. Set aside until needed.
  10. Only when the cakes are completely cold, slice each into half horizontally to get 4 layers. Place one layer on a cake stand and then spread ¼ of the buttercream evenly over followed by a generous spoonful (just under 1/3) of the blackcurrant puree. Place another layer on top and repeat, finishing with a top layer of buttercream if you like.image
  11. Sit back and admire your effort before devouring.

Coffee and Olive Oil Truffles

image

image

Oh boy, these are dangerous. My mum’s friend recently provided me with a small, harmless and innocent looking bottle of ‘Coffee Extra Virgin Olive Oil’ (strange I know) with the challenge of making something with it!? On smelling it, my mind went to truffles. After a recent visit to William Curley’s chocolate sanctuary in Belgravia I felt inspired to use some of his sensational ingredient combinations. After trying his rosemary and olive oil chocolates I attempted my own version. With a packet of espresso flavoured Green & Blacks sitting on the shelf too, I thought this would add that extra kick of coffee flavour.

The oil in these, as opposed to the traditional cream, really does make  the truffles feel so much smoother without coating and cloying your mouth….they simply melt away.

Makes about 26

  • 80ml coffee olive oil OR plain Extra virgin olive oil
  • 100g Green & Blacks Espresso Chocolate, chopped
  • 125g Green & Blacks dark chocolate, chopped
  • 60g butter, cubed
  • Pinch salt
  • Cocoa for dusting/ chopped hazelnuts or mixed nuts/desiccated coconut
  1. Place the chopped chocolate, butter, oil and a pinch of salt into a heat proof bowl.
  2. Suspend over a pan of barely simmering water (do not let it touch) and heat gently until melted, stirring often.
  3. Once smooth and emulsified, pour into a clean bowl, cover and chill for at least 3 hours or overnight.
  4. Remove from the fridge. Use a spoon or a melon baller to mould out your truffles. Coat them in cocoa powder, chopped nuts or coconut or whatever else you like. Keep somewhere chilled but cover tightly if you are keeping them in the fridge as chocolate absorbs fridge smells….the last thing you want is a cheesy truffle?

imageimageimage

After Eight Macaroons

image


image

I don’t think I’ve ever met anyone who doesn’t like After Eights….or macaroons for that matter. These are, in my opinion, better than the real thing. The only unfortunate thing here is that they don’t come in those tiny little delicately folded envelopes…..oh and that you can’t play the ‘After Eight Game’! (If this is new to you check out this link. Hilarious game, especially after a few bevvies)

Makes about 12

Macaroons

  • 60g egg whites (about 2)
  • 40g caster sugar
  • 50g ground almonds
  • 110g icing sugar (minus 2 tbsp)
  • 12g Green & Blacks cocoa powder

Filing

  • 80g unsalted, softened butter
  • 100g sieved icing sugar
  • 1 tsp peppermint essence
  • Splash green food colouring
  1. Preheat the oven to 170°C and line a baking tray with parchment
  2. Blend the ground almonds, icing sugar and cocoa together in a food processor until fine and then sieve.
  3. In another bowl, whisk the egg whites until soft peaks form, then add the caster sugar a spoon at a time until glossy stiff peaks form.
  4. Fold in 1/3 of the almond mixture to loosen it. Then fold in the rest, being gentle not to knock the air out.
  5. Spoon into a pipping bag with a round ended nozzle and pipe consistent circles of the macaroon mixture evenly. Give the tray a sharp slap on the surface a few times to level them and leave for 25 minutes, uncovered to form a skin before baking.
  6. Bake for about 12-15 minutes. They are ready when they come away easily from the tray. Leave to cool.
  7. Make the buttercream filling by combining the ingredients in a processor and then spooning into a smaller piping bag.
  8. When cool, pipe small amounts onto macaroon halves and sandwich together!

imageimageimage

Keralan Cod (Pollichathu)


image

This dish is cooked in a Keralan style called ‘Pollichathu’ where the fish (usually a traditional Karimeen) is wrapped in a banana leaf and cooked in a tasty marinade to keep it moist and succulent. However, I used foil for mine and cooked it under the grill but a BBQ would be a great alternative! Serve with some homemade warm chapattis and some nice cooling lime infused yoghurt!

Serves 4

  • ½ tsp fresh ground black pepper
  • ¼ tsp turmeric
  • ½ lemon juice
  • 4 cod fillets/seabass fillets
  • 1 coconut, flesh grated OR 2 large generous handful of desiccated coconut
  • 8 spring onions
  • 2 garlic cloves
  • 5cm ginger root
  • 1 large green chilli
  • 1 large tbsp dried curry leaves (or a handful of fresh)
  • 1 tsp black mustard seeds
  • 1 dried red chilli, torn or 1 small tsp of dried chilli flakes
  • Small bunch of coriander

Chapattis

  • 280g wholemeal bread flour
  • 1 tsp salt
  • 200ml cold water
  1. Combine the black pepper, turmeric and lemon juice and marinade the fish for 1 hour in the fridge.
  2. Chop the spring onions, garlic ginger and green chilli and combine with the curry leaves.
  3. Heat a splash of oil in a frying pan and add the mustard seeds until they begin to crackle and then add the red chilli.
  4. Add the onion mixture and stir for a few minutes until beginning to brown but make sure it does not burn.
  5. Add the coconut and the coriander, saving a handful for garnish and season and set aside to cool slightly.
  6. Meanwhile, make the chapattis by placing flour and salt in a bowl and adding the water in a steady stream and mix with a wooden spoon. Knead briefly to obtain a sticky elastic dough and set aside in an oiled bowl to rest.
  7. Place the fish fillets in the middle of a piece of foil or a banana leaf and spoon over a ¼ of the coconut mixture. Wrap the foil up into a sealed parcel. Place on a hot BBQ or under a hot grill for about 8-10 minutes until cooked.
  8. While cooking, teach of golf ball sized pieces of chapattis dough and roll thinly. Either on the hot BBQ or in a hot dry frying pan, fry for a few minutes either side until charred and cooked. Wrap in a tea towel to keep warm and soft until ready to serve.
  9. Once the fish is cooked, serve along side the fish garnished with the reserved coriander and a spoonful of yoghurt seasoned with some lime zest and juice to taste for a nice cooling side.

Rhubarb and Amaretto ‘Cake’


image

The 1st August was ‘forage in the pantry’s’ 1st Birthday, hurrah! Some spritely rhubarb was nestled patiently outside in the garden so I stole it for this sweet celebration cake. However, cake, torte or tart- I don’t know? It has an impressively gooey and unthinkably moreish texture with a layer of juicy rhubarb and a sinful almond paste spooned slutily on top. But, regardless, its one of those recipes that surprises me with its flavour every time I make it (and equally makes me angry as I merrily start and  get everything ready only to get to the step that says ‘leave to dry overnight’ which I always seem to forget). It has a  very moist texture and, like I say, the recipe suggests leaving the rhubarb to drain overnight once cooked. I was too impatient and left it a hour or so which was effective but it was very gooey but still delicious. I thought however, that this recipe was finally worth sharing as it was first kindly shared with me a while ago.

  • 1kg rhubarb, chopped
  • 300g caster sugar
  • 1 cinnamon stick
  • 300g amaretti biscuits
  • 175g butter
  • 90ml Amaretto liqueur
  • 3 eggs
  • 40g plain flour
  • Icing sugar to serve
  • Mascarpone and ground cinnamon to serve
  1. Place the chopped rhubarb, 250g caster sugar, the cinnamon stick and a splash of water in a pan and simmer until tender but chunky. Drain the rhubarb in a sieve to dry out the mixture and set aside covered overnight. (Or for at least 1-2 hours if you can’t resist or want a moisture texture). You want a fairly dry soft rhubarb compote that won’t add to much moisture into the cake.
  2. Preheat the oven to 170°C and line a 23cm spring form tin.
  3. Place the amaretti biscuits in a food processor and blitz to fine crumbs. Add the diced butter, amaretto, eggs, the remaining sugar, and the flour. Blitz to combine to a blended paste and chill.image
  4. Spoon half the mixture into the lined tin, top with the rhubarb and then top with the remaining almond paste and smooth and level off.
  5. Bake for 30-50 minutes until golden and firm to touch. Depending on how wet the rhubarb was it may vary on the timing.
  6. Leave to cool before dusting with icing sugar. Serve with a generous spoonful of sweetened and cinnamon speckled mascarpone. (Keep in the fridge as it is very moist and will go off quickly- especially in this weather!)