Date Archives October 2012

Cornbread Fritters with Soured Cream and Guacamole

These little cornbread inspired fritters/pancakes were made with the leftover pulp from the sweetcorn soup I made. I hate waste and this way, the delicious wholesome leftovers were put to good use. You could alternatively use tinned corn which you can blend, the texture may be slightly different so just add more flour/milk to adjust for a drier/wetter batter. The polenta adds a crispy texture, the cheese melts everywhere and the chilli provides that familiar cornbread kick.

  • 300g leftover pureed corn from your Creamy Sweetcorn Soup– see recipe (or tinned sweetcorn, pureed)
  • 3 spring onions, finely chopped including green tops
  • ½ large red chilli, finely chopped
  • 40g grated mature cheddar cheese
  • 40g plain flour
  • 40g polenta/cornmeal
  • ½ tsp baking powder
  • 2 large eggs, beaten
  1. In a large bowl, combine the pureed corn, spring onions, chilli, cheese and season.image
  2. Whisk in the eggs and then stir in the flour, baking powder and polenta until you have a thick batter. If the batter is too runny add a little more flour. It should be fairly thick but will set once cooked.image
  3. Heat a thin layer of sunflower oil in a frying pan over a medium-high heat. Fry spoonfuls of the mixture for 1-2 minutes each side or until golden and crusty from the polenta. The mixture can be a little wet but adding too much flour I’ve found makes them taste a bit ‘floury’ whereas here they will taste solely of sweetcorn.image
  4. Drain on kitchen paper and leave to cool slightly before serving warm with soured cream and guacamole!

Creamiest Sweetcorn Soup with Truffle Oil

I’d never had sweetcorn soup until this beauty, made with 4 large rusks that were bordering edible, cluttering up my fridge. However, it was the creamiest, silky soup I’ve ever made.

I’m never one to sieve anything, especially soups as I think much of the nutrients and goodness are in the skins or roughage and it seems such as waste to chuck the pulp away! However………however…….the sieved version is like eating a shining billowy parachute of silk and is devine. Plus for the waste conscious like myself, the leftover pulp/pureed corn I used economically and deliciously in some amazing cornbread fritters to serve alongside or the next day.

Serves 2 – Sieved, elegant and smooth

Serves 4 – Chunky, rustic and wholesome

  • 4 corn cobs, kernels removed (about 400g)
  • 1.1 litre vegetable stock
  • 50ml double cream
  • 30g butter
  • 1 tsp olive oil
  • 1 small leek, chopped finely
  • 1 garlic clove, crushed
  • 1 bay leaf
  • Truffle oil, to serve
  • Chives, to serve
  1. Begin by heating the butter and oil in a pan. Add the leek and garlic and soften over a medium-low heat until translucent.
  2. Remove the kernels from the corn by standing the cobs on end and use a sharp knife to score them off. Add the bay leaf to the pan and the corn. Cook for about 4 minutes.
  3. Add the hot stock and season. Simmer for 20 minutes.
  4. After this time, remove from the heat and puree with a hand blender or in a food processor.
  5. Add the cream and check the seasoning.
  6. Now if your plan to sieve it, just strain through a fine mesh sieve and retain the silky soup. Use a spoon to get as much of the moisture and starch from the puree as you can. Retain the pulp for some cornbread fritters.
  7. Heat the strained soup and garnish with chives and a drizzle of truffle oil if you like.

image

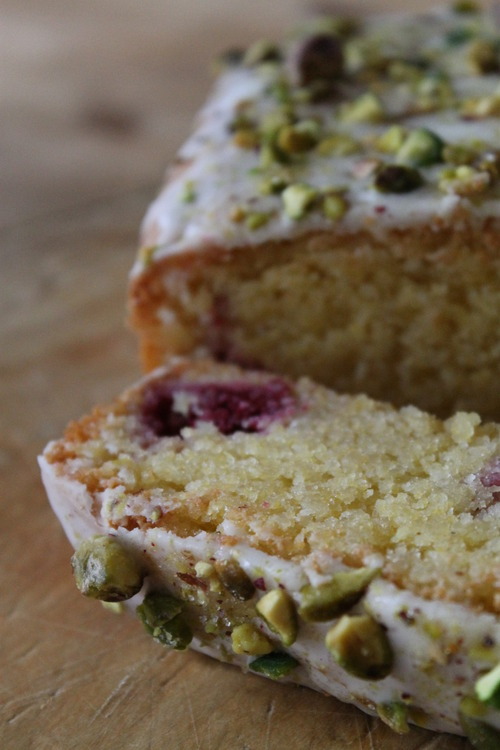
Rose and Raspberry Polenta Loaf

This moist little loaf is so pretty, I stood hovering with a knife for longer than is healthy before plunging in. Made with deliciously tasty almonds, a splash of rose (optional) and the last of this years frozen raspberry harvest, it succeeded in filling the cake tin…….temporarily. I never used to like rosewater’s soapy flavouring but I’ve grown to appreciate it if used subtly. Feel free to leave it out, or add only a few drops but it is lovely with the crunchy contrast of the lemon and pistachio sugar icing slavered obligingly on top like spilt paint.

  • 200g butter
  • 200g caster sugar
  • 3 eggs
  • 100g ground almonds
  • 100g flaked almonds
  • 100g polenta
  • 1 tsp baking powder
  • 10ml or less rosewater
  • 150g frozen raspberries

Icing and Pistachio Sugar

  • Icing sugar
  • Lemon juice
  • Handful of pistachios
  • Granulated sugar
  1. Preheat the oven to 170°C  and line a loaf, cake or baking tin of choice, with baking parchment.
  2. Begin by blitzing the flaked almonds in a food processor until ground. Alternatively you can just use 200g ground almonds to start with but this gives a bit more texture as you can leave them a bit chunkier than the ground packets.
  3. Cream the butter and sugar together until fluffy.
  4. Add the beaten egg bit by bit, mixing in thoroughly after each addition. If it begins to curdle, add a handful of almonds but don’t worry too much.
  5. Add the rest of the almonds, polenta and baking powder and mix well.
  6. Add the rose water if using and the frozen raspberries (coated in a little flour to prevent them sinking)
  7. Spoon the mixture into the prepared tin and bake for 45-60 minutes, depending on the thickness of your mixture in the tin. Check it after 30 minutes. It should be golden and spring back to the touch.
  8. Meanwhile sieve a handful of icing sugar into a clean bowl and add a teaspoon of lemon juice at a time until you get the desired consistency. I wanted a thick icing sugar but still with a good dripping texture.
  9. To make the pistachio sugar, grind a handful of pistachio nuts in a pestle and mortar or crush in a bag with the back of a spoon until coarse.
  10. Then add about 1 tbsp of granulated sugar and grind with the pistachios.
  11. When the cake is ready, leave to cool before icing and scattering with the pistachio sugar. This can also be decorated with rose petals or pomegranate seeds too if you’re feeling very girly.

imageimage

This cake is delicious served with clotted cream, creme fraiche, a glass of bubbly or alone with only a fresh peppermint tea for company.

image

Liquorice Creams with Sea Salt

image

Last night I experimented on my family and poor guest. After my insightful internship at ‘delicious’ food magazine this summer, I was carted away with pantry filling samples of new, free and excitingly original products, sent ambitiously to the editorial team. In this treasure trove of goodies was a small pot of liquorice powder….yes you heard correctly! I like liquorice but what was I supposed to do with this? My first thoughts turned to ice cream (naturally, if you know me well).

However, this week I was watching Nigella strut her gastronomic stuff on TV and there it was…….liquorice pudding! Now,a heads up, these are not like Marmite in their ‘love it or hate it’ sense, but they certainly hold a similar gauntlet. After knocking up this creamy mixture in a matter of minutes, I chilled them in the fridge ready to devour after diner. However………however…

As I announced that ‘tonight you are my guinea pigs’ to my guests, I sampled a thimbleful of this deceiving mixture and declared that I was sorry but they were too horrendous to serve. But to the cries of my guests that they at least try them anyway, I served them up. And, after each smooth mouthful, they became better and better and better until our glasses were empty and we sat amazed at how delightful they were! I’m still surprised! So don’t blame me if you hate them but after a few mouthfuls, I hope you’ll see…. If not, stick to chocolate mousse.

imageimage

This is the powder. Yes it looks like dirt, and just tipping it into this bowl set me off on a marathon worthy sneezing fit but if you love liquorice, this is like gold dust. I used 2 tsp of powder per 300ml of double cream, whereas Nigella used equivalent quantities of liquorice pellets. I think it could do with slightly less powder as they were fairly strong, however, it still works so do as you like.

  • 120ml water
  • 1 ½ – 2 tsp liquorice powder OR 2 tsp liquorice pellets
  • 4 tbsp light muscovado sugar (it is not a sweet dessert so add more if you like)
  • 350ml double cream (I used 300ml and it was fine)
  • 4 tsp cornflour
  • 2 tbsp milk
  1. Combine the liquorice and water in a saucepan and heat until dissolved. Bring to the simmer.
  2. Whisk in the sugar and cream and bring back to the simmer and then remove from the heat.
  3. Mix the cornflour and milk in a little bowl to a smooth paste.
  4. Place the pan on a low heat and whisking all the time, pour in the cornflour paste and whisk until thickened for a minute or so.
  5. Divide it between 4 glasses or serving ramekins. They can be eaten warm which I didn’t try but maybe this is nicer!?
  6. If not, cover with cling film or baking paper that has been soaked in water and rung out, to prevent a skin forming on the top and place in the fridge for about 2 hours.
  7. Eat at room temperature, sprinkled with some sea salt if you like!

Nigella says, I quote- ‘For those of us who love liquorice, this pudding is sheer, spine-tingling joy’! Hmmmm…..persevere!

imageimage

Banana Muffins with a Boozy Rum Icing


In honour of ‘The Great British Bake Off’, my friends and I decided to bake a wholesome feast to devour during the entertainment that was John, James and…..Brendan? Suffocating in the smells of freshly baked goods in my Clifton garden flat, I knocked out a batch of these forever pleasing muffins and added a cheeky little extra topping. I used to make these every weekend when I ran my own breakfast menu at ’The Food Gallery’ (Marlborough) over the summer. They proudly topped my menu (minus the rum icing) served with creamy Greek yoghurt and some sweet, sticky local honey so I confirm, they certainly make a delicious start to the day too! However, tonight called for a little added sparkle so I decorated with some rum cream cheese frosting and walnut praline……

TIP: If you ever have too many bananas turning brown and sugary in your fruit bowl- don’t throw them away! I always peal mine and freeze them in a sandwich bag. Then they are ready to hand and at the perfect ripeness for when baking calls. Bring them out to defrost a little before you use them- they may go all slimy and unappetising looking but I assure you they will taste and bake perfectly!

Makes 10-12 rugby player sized muffins (adapted from Waitrose recipes)

  • 125g unsalted butter, softened
  • 225g light brown muscavado sugar
  • 4 very ripe bananas (300g)
  • 2 free-range eggs
  • 1 tsp vanilla extract
  • Large pinch cinnamon/mixed spice
  • 250g plain flour
  • 1 tsp baking powder
  • 1 tsp bicarbonate of soda
  • 75ml buttermilk
  • 50g crumbled toasted walnuts or pecans

Rum Icing

  • 300g cream cheese
  • 150g icing sugar, sieved
  • A pinch of cinnamon/mixed spice
  • A splash of rum
  1. Preheat the oven to 180°C. Line a muffin tin with cases.
  2. Cream the butter and sugar together in a large bowl.
  3. Add the mashed bananas, vanilla and eggs and mix
  4. Fold in the flour, spices, bicarbonate of soda and baking powder.
  5. Now add the buttermilk and stir thoroughly. Add the walnuts and mix until they are evenly distributed.
  6. Generously fill the muffin cases and bake in the oven for about 25 minutes, checking after about 20 to make sure they are not browning too much.
  7. Meanwhile, make the icing. Cream the cream cheese, spices and sieved icing sugar together. Add a splash of rum and mix. Chill in the fridge to harden until needed.
  8. When the muffins are ready, they will be soft and springy to the touch and a sharp knife inserted into the centre will come out clean. Leave to cool completely.
  9. Once cool, top with icing and decorate with a halved walnut and some walnut praline if you like. The praline I made by melting caster sugar in a dry frying pan until melted and beginning to turn golden. Once it is a pale light colour, remove from the heat and pour quickly and thinly over crumbled walnuts on some baking paper and leave to cool and crisp. Break into shards and top the muffins!

image

Bonfire Butternut Squash Soup

Everytime October comes around and Bonfire night approaches, I make endless batches of this idiot-proof, silky and comfortingly seasonal soup. Its a perfect fingertip warmer on a frosty bonfire night while gazing romantically at the fireworks, however there is only room for love here, for this delicious soup. I topped mine with some leftover homemade ’Mixed Seed Pesto’ and the fried, spicy seeds from inside of my squash. Never throw these away, they are delicious and are this soup’s nutritional side kick in helping battle the winter flu…

  • 1 large butternut squash, peeled, halved and cut into 1 inch chunks. Seeds retained
  • 750ml good chicken stock
  • 1 onion, chopped
  • 1 heaped tsp smoked paprika or more if your like your spice
  • 25g unsalted butter
  • Olive oil
  • Pinch of cinnamon/cumin/coriander
  • Salt and pepper
  1. Begin by melting the butter and a splash of oil in a large saucepan. Add the onion and gently fry until soft
  2. Add the paprika and stir for 1 minute. Season with salt.
  3. Add the squash and mix thoroughly. Cover with the stock and bring to the boil.
  4. Simmer for about 20 minutes until the squash is tender and soft.
  5. Meanwhile, fry the reserved seeds in a splash of oil, salt and pepper and a pinch of ground spices of your choice. I used cinnamon here. Once golden and fragrant, drain briefly on kitchen paper and leave to cool.
  6. Once the squash is soft enough, use a hand blender to blend the soup to a thick, smooth, creamy consistency. Add lots of freshly ground black pepper and check the seasoning.
  7. To serve, top with the fried seeds and a spoonful of mixed seed pesto if you like and the fried seeds. Drizzle with some good extra virgin olive oil and prepare to want another bowl!

I tucked into mine with some nutritious, creamy, emerald green pumpkin seed butter’ slathered on crispy oat cakes. My hair, skin and general well being is thanking me in return!imageimage

Mixed Seed Pesto

image

One thing I love about being a student is the necessity to be resourceful with whatever food is to hand. With a need to budget, being economical with your weekly shop is an art, and I am forever searching for ways to make my food go further without EVER skimping on flavour or going hungry. So, today I knocked up a satisfying, tasty and fresh salad which my taste buds were certainly thankful for, after noting the anorexic looking shelves of my dying fridge. I seem to be using pumpkin seeds a lot at the moment in this Autumnal weather, so I decided to use a handful of mixed seeds to create a pesto dressing for the last of my sweet, ripe tomatoes and pessimistic salad leaves. Homemade pesto is always more wholesome and scrumptious than the jarred equivalent in the shops and this one certainly didn’t let me down……

  • 2 tbsp of mixed seeds (I used pumpkin, sesame and sunflower)
  • Small bunch of coriander and flat leaf parsley
  • Small handful of grated parmesan
  • 1 small garlic glove
  • ½ small lemon
  • Salt and pepper
  • Extra virgin olive oil
  1. Start by grinding the garlic to a paste with some coarse salt in a pestle and mortar.
  2. Toast the seeds in a dry frying pan until they release their flavour and begin to crackle.
  3. Add to the pestle and mortar and grind to a chunky paste with the garlic. You can grind it as much as you like. I like to keep the seeds a bit chunky to add a bit of texture
  4. Now add the herbs and parmesan and grind to a green paste.
  5. Add a splash of oil and a squeeze of lemon juice to make a thick pesto or to your desired consistency.
  6. Taste and adjust using salt and pepper and more lemon if you like.

I added a large tablespoon of my pesto to a mix of bitter cos lettuce, sweet tomatoes and some cress for a lovely salad. This would be delicious topped with some salty, fried halloumi cheese…..but, sadly my fridge didn’t deliver on that one.image

Sweetly Spiced Pumpkin Ice Cream

image

Its cold outside. Autumns here. Most people would NOT be thinking about ice cream, but my obsessed mind always is. I thought I’d attempt a sweetened pumpkin ice cream which would be perfect with a slice of warm, wintery pie on a chilly evening.

Its not a common one, but I like it as I haven’t got a huge sweet tooth. Its wholesome, homemade, pleasing and not too sweet. My mum, who never seems open to the concept of anything alternative in the kitchen, gave me a fearful and timorous glare when I presented it, adding- ‘Is this an invention?’. But don’t fear, its delicious!

  • 250g pumpkin butter (see previous recipe)
  • 375ml whole milk
  • 250ml double cream
  • 5 egg yolks
  • 1 cinnamon stick
  • grating of nutmeg
  • pinch cinnamon
  • pinch ground ginger
  • 80g granulated sugar
  • 40g dark brown sugar
  • pumpkin seeds
  1. First, put some ice in a large bowl with some water. Place an empty bowl inside with a sieve in it for later.
  2. Mix the milk, cream, granulated sugar, cinnamon stick, spices and nutmeg in a saucepan and heat gently, until the mixture begins to bubble at the edges
  3. Whisk the egg yolks in a separate bowl and when the milk is hot, slowly pour the hot mixture over the yolks, while continuously whisking in order to prevent it going lumpy.
  4. Return the mixture to the saucepan and heat very gently on a low temperature. Cook gently, stirring all the time with a wooden spoon until thickened and the mixture coats the back of a spoon and leaves a marked trail when you run your finger through it:image
  5. Now, tip the mixture through the sieve into the chilled bowl to remove any lumps and stir in the dark brown sugar.
  6. Allow the mixture to cool completely in the fridge.
  7. Once cold, add the pumpkin butter and a splash of vanilla if you like (or booze) and churn in an ice cream maker for about 30 minutes.

I topped mine with pumpkin seed praline! To make this, I heated some caster sugar in a dry pan until it began to melt and turn a pale golden and then immediately removed from the heat, tipped onto some parchment and scattered with pumpkin seeds!

Pumpkin Butter (Jam)

image

I’ve been seasonally experimenting with pumpkins recently. They’re versatility and texture mean they are great in sweet recipes and desserts. This recipe is titled ‘butter’ but it doesn’t actually contain any……its more of a sweet, spicy, rich, deep jam that is great with pancakes, my pumpkin muffins, smeared on a toasted bagel or in a compote with yoghurt and granola for breakfast.

  • 1 can pumpkin puree [or you can roast and use the flesh from a pumpkin but this recipe called for the packed canned type….]
  • Approx 90ml apple juice
  • 1 tsp ground ginger
  • 1 tsp mixed spice
  • ½ tbsp cinnamon
  • Grating of nutmeg
  • 140g dark brown sugar
  1. Combine all the ingredients in a heavy based pan and heat. You may need to add a little more apple juice to make it thinner in order to heat it. Bring to the boil and simmer gently for 30 minutes until thick.
  2. Store in an airtight container in the fridge until needed.

image

For the breakfast pots, I layered some pumpkin puree on the bottom, some Greek yoghurt mixed with a splash of vanilla extract and topped with blueberries and my granola!

image

I saw the recipe called for pumpkin puree in a can and have always wanted to try this…..I slightly felt like I was cheating but it was good!

The secret’s out Nigella…..

I am proud to announce I helped on location for the shoot for this stunning cover! Whilst I wish I had been the make-up artist or stylist for the day, I did however help craft the spaghetti curtain…..I never thought I’d say that! In Nigella’s foxy, devilish and enticing eyes, you can probably (dream on) just make out the reflection of my non-curvaceous, blonde, oxymoron-self, watching with admiration in the background as the stereotyped photographer snaps away at her girlish poses. As she manipulated the locks of fresh spaghetti, mastered uneasily by myself and food stylist in the staggeringly warm studio, I couldn’t help but smile at my luck, and wonder whether Nigella would ever read my blog……..

To fill you in, over the summer I undertook the most amazing, inspiring and wonderful 3 week internship at ‘delicious’ food magazine. Working on the November and December issues I was indulged in the world that is food journalism and styling and after a long month of difficultly refraining (and rather terribly I might add) from spilling the Italian beans about this domestic goddess November cover, it has finally graced our supermarket shelves and the secret is out! It was a brilliant internship and a wonderful day and now I have the glossy, printed and eye catching reminder to pin on my wall! So what are you waiting for………..buy it!