Date Archives December 2012

Chocolate Mousse with bling……..

This was the perfect little dessert this Christmas time. A really light, simple chocolate mousse that even a academically and domestically challenged young child could manage, spiked with some extra flavours and accessorized with some crunchy gold shards of honeycomb and melting pecan shortbreads to add the Christmas sparkle. It was perfect to shove onto a big wooden board and plonk into the middle of the table at the end of a tiresome boxing day marathon meal for your guests to greedily help themselves to as they wish.

Chocolate Mousse (Serves 6)

  • 150g dark chocolate, broken into pieces
  • 50g nutella
  • 125ml double cream
  • 50 ml milk
  • 4 eggs whites
  • 25g caster sugar
  • 1 tsp vanilla extract
  1. Heat the cream, milk and vanilla in a pan until just beginning to boil. Then quickly remove from the heat and add the chocolate.
  2. Mix until melted, smooth and shiny
  3. In a clean bowl, whisk the egg whites until stiff peaks form. Add the caster sugar spoonful by spoonful until the meringue is shiny and glossy.
  4. Gently fold the egg whites into the chocolate, a third at a time, keeping as much air in as possible.
  5. Once all has been combined, spoon into individual glasses or ramekins and chill in the fridge for about 2 hours.
  6. I served mine with some shortbread biscuits and some crispy honeycomb!

image

Honeycomb

  • 100g caster sugar
  • 4 tbsp golden syrup
  • 1.5 tsp bicarbonate soda
  1. Begin by spreading out a large sheet of parchment on a cold flat surface and oil lightly.
  2. Mix the sugar and syrup in a pan until dissolved. Do not stir once dissolved but swirl the pan to combine
  3. Bubble for a few minutes until it begins to turn golden brown. It will be very hot so be careful. Watch closely, if it does not boil long enough it won’t set, too long and it will taste bitter
  4. Once it turns golden, remove from the heat and working quickly add the bicarbonate of soda and whisk briefly. It will bubble fiercely. Once it has aerated, quickly tip onto the parchment and leave to cool and set solid.
  5. Break into shards and book a dentist appointment before enjoying, dipped into your chocolate mousse!

Pea and Smoked Ham Tart with Parmesan parsnips

image

This is a pleasingly alternative and delicious use of Christmas leftovers after exhausting the usual recipes with the turkey. My brief from the family for dinner was a light, fresh but tasty meal after a heavy week of Christmas delights, rich meats and glasses of guilt. So, with a fridge full or assorted cheeses, a cooked smoked ham and a few of our giant allotment parsnips that were looking very sorry for themselves, I enthusiastically took up the mission.

Cheesey Shortcrust pastry

  • 100g wholemeal flour
  • 150g plain flour
  • 125g unsalted butter, cubed
  • 70g cheddar cheese, grated plus and reserved handful
  • Salt and pepper
  • Cold water

Filling

  • 250g frozen peas
  • 3 eggs
  • 75g creme fraiche
  • Juice of half lemon
  • 1 tbsp wholegrain mustard (optional)
  • A few large handfuls of smoked ham, cubed or flaked into pieces
  • Salt and pepper
  • Splash of milk
  1. Begin with the pastry. Preheat the oven to 200°C. In a food processor, combine all the pastry ingredients, except the water, and blitz to form a breadcrumb-like texture. Or rub the butter into the flour by hand.
  2. Tip out into a bowl and add cold water, spoonful by spoonful, and mix in with a knife until you have a mixture that forms a dough when your gently press together with your hands. Form a ball of dough.
  3. Roll into a disc shape, wrap in cling film and chill in the fridge for 30 minutes.
  4. Meanwhile, line a tart tin (I used one about 23cm wide but use whatever is to hand) with parchment and butter the sides. This recipe in my case lined two tart tins so I made two and froze one for another time.
  5. After 30 minutes, thinly roll out your pastry on a floured surface and use it to line the tin, pressing the pastry up the sides. Prick all over with a fork to prevent it rising up while baking.
  6. Line the tine with parchment and fill snugly with baking beans or rice if your don’t have any beans.
  7. Blind bake for about 20 minutes until the edges are golden.
  8. Remove the beans and parchment and bake for another 5-10minutes until the base is cooked and crisp. Brush with a bit of beaten egg to seal the fork pricks and return for 1 minutes. Remove and leave to cool.
  9. Make the filling. Boil the peas for a few minutes until cooked. Drain and cool thoroughly with cold water.
  10. Reserve a handful of the peas and puree the rest in a processor or mash with a fork until you form a coarse paste. Add the lemon juice, seasoning, mustard, eggs and creme fraiche. Blitz again in the processor to mix thoroughly.
  11. Add a splash or so of milk to form a texture that is loose but not too watery, a bit like custard.
  12. Sprinkle the base of the pre-baked tart case with the flaked ham and the reserved whole peas.
  13. Fill this with the egg custard until distributed evenly and full but making sure it dose not overflow the edges of the pastry case. You may not need it all.
  14. Scatter over the remaining grated cheddar and bake in the oven at 190°C for about 25-30 minutes until the middle is cooked and set.
  15. Grate over a bit of lemon zest and serve with a green salad and some crispy baked Parmesan coated parsnips in my case….!

image

Parmesan Parsnips

  • 2-3 parsnips, peeled and cut into batons shaped
  • 200g brown bread crumbs
  • 100g finely grated Parmesan cheese
  • Handful of flour
  • 2 beaten eggs
  • Sunflower oil or light olive oil
  1. Preheat the oven to 190°C
  2. Boil the parsnips in water for about 4-5 minutes until tender and soft when pierced with a knife but still with a bit of resistance.
  3. Drain and allow to steam for a few minutes.
  4. Set up 3 bowls. Fill one with seasoned flour, another with beaten egg and the third with the breadcrumbs combined with the grated cheese.
  5. When the parsnips have cooled slightly, dip into the flour, then the beaten egg and finally coat in the breadcrumb mix.
  6. Repeat this with the remaining parsnips and place them on a lined baking tray.
  7. Drizzle generously with sunflower oil and bake in the oven, turning halfway through, for 30 minutes until crisp and golden

image

Green Chutney

image

This green chutney is undoubtedly packed full of herby flavour and is the PERFECT addition to the Indian marinated lamb (or chicken) we scoffed…

  • About 35g coriander, stalks included (or a big bunch)
  • 35g mint leaves
  • 1 garlic clove
  • 2.5cm ginger, grated or chopped
  • ½ small onion
  • 1 green chilli, seeds removed
  • 15-20 pistachio nuts
  • 2 tbsp lemon juice, grated zest of half a lemon
  • salt
  • 3 tbsp water
  • 1-2 tbsp yoghurt
  1. Place all the ingredients in the bowl of a food processor.

    image

  2. Process until thoroughly chopped. I added a couple of heaped tablespoon of natural yoghurt just to make it more ‘spoonable’ but feel free to add lots more if you’re after a more cooling chutney! Toasted coconut is also a nice addition!image

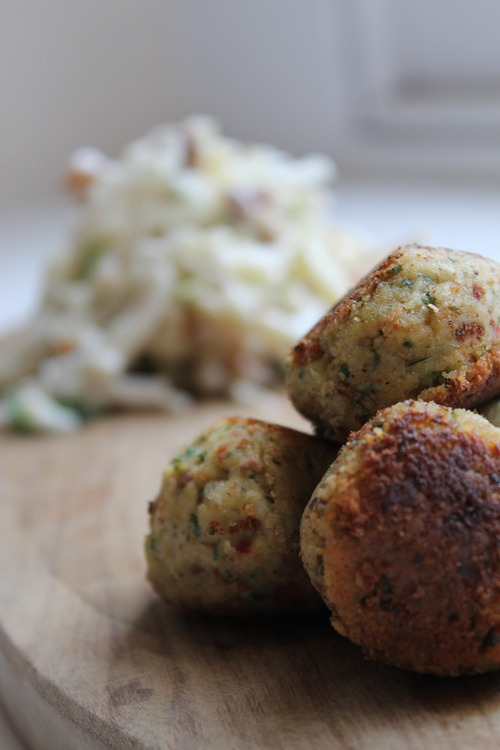
Kohlrabi, Apple and Celeriac Winter Coleslaw with Falafel

What the hell do you do with a kohlrabi you ask….What does it taste like…..? Its a lovely refreshing root vegetable with a similar taste to celery and mild celeriac. Shaved raw it went really nicely with some apple, celeriac and crumbled toasted walnuts, tossed with a tangy creamy yoghurt dressing for a winter coleslaw. I served my cool coleslaw stuffed generously into the floury arms of a warm pitta bread, some comforting Moroccan spiced falafel, a squeeze of lime and a scatter of coriander…..

Coleslaw

  • 1 kohlrabi, peeled
  • ½ celeriac, peeled
  • 1 Cox apple
  • Handful of toasted, crushed walnuts
  • 120g plain natural yoghurt
  • 1 heaped tbsp mayonnaise
  • 1 teaspoon of fennel seeds
  • Lemon juice
  • Salt and pepper
  • Flat leaf parsley, chopped
  1. I used the blade attachment on my Magimix to get the shaved sticks from the kohlrabi and celeriac (However, you could grate them or slice on a mandolin but the processor makes it a lot easier) I recommend slicing the apple into matchstick by hand as they are quite juicy when put into the processor.
  2. Combine the shredded kohlrabi and celeriac in a large bowl in roughly similar amounts. Add the apple.
  3. Toast the walnuts in a dry frying pan, then crush and add to the vegetables.
  4. Toast the fennel seeds similarly and crush in a pestle and mortar.
  5. To make the dressing, mix the yoghurt, mayo, fennel seeds, chopped parsely and season to taste. Add enough lemon juice to taste to give it a nice punchy flavour.
  6. Toss the dressing with the vegetables. Add as much as you like for the desired texture.

Falafel (makes about 14)

  • 1 can chickpeas
  • 1 red chilli
  • 1 bunch coriander and in addition, either mint, parsley, basil or whatever is in season or takes your fancy
  • 1 garlic clove
  • Juice of 1 lemon
  • 1 tbsp tahini
  • 1 tbsp yoghurt
  • Salt and pepper
  • Splash of extra virgin olive oil
  • 1 ½ heaped tsp of the following mix of ground Spice Mix (toast 1tsp of each fennel, cumin, coriander and fenugreek seed with 1 cinnamon stick, 3 cardamon pods and 1 star anise in a dry frying pan until hot, fragrant and beginning to pop, remove and grind in a pestle and mortar until fine).
  • Approx 50g fine white breadcrumb
  1. Place all the ingredients except the oil into a food processor and pulse until well combined, scrapping the mixture down from the sides every now and then.
  2. Add a splash of oil to loosen but do not allow the mixture to become too loose (This is my hummus recipe too, so if you want hummus and not falafel, simply add more oil to get a spoonable texture)
  3. Now place the mixture into a bowl and mix in enough breadcrumbs until the mixture is stiffer. It should be stiff enough to roll into about 14 golf ball sized falafel. If it is too wet, add some more breadcrumbs.image
  4. Now roll into about 14 falafel balls and fry in hot oil until crisp on the outside and fluffy in the middle.

imageimage

Almond, Pear and Amaretto Tart with Salted Caramel Ice Cream

A rich, buttery and almond flavoured frangipane is my most favourite way to fill a crisp, delicate pastry case. This tart is really versatile and the mixture can be topped with any seasonal fruit. Alternatively, you can grind other nuts such as walnuts or hazelnuts (see here) to give your frangipane an original twist. In the summer, I have a huge weak spot for this dessert, topped it with a scattering of the juicy, tart, and punchy blackcurrants from our allotment. However, with pears, apples of blackberries it is delicious too. Just watch that the fruit you add doesn’t have too much moisture which will ooze out and make the filling wetter. This recipe is Christmassy, wintery and extremely satisfying….A variation on this always makes an appearance at my dinner parties topped with some salted caramel ice cream in this case and a good shot of warming Amaretto……

Pastry

  • 125g cold butter, cubed
  • 250g plain flour
  • Splash cold water

Frangipane filling

  • 200g unsalted butter, cubed
  • 200g caster sugar
  • 200g ground almonds
  • 3 eggs, beaten
  • 1 tsp vanilla
  • Splash of amaretto
  • 1-2 pears
  • 15g butter
  • 15g caster sugar
  • Handful of flaked almonds for decoration
  1. Preheat the oven to 180°C.
  2. Begin by making the pastry. For the method, see here. Follow up to step 7.
  3. Next, peel, core and slice the pears into long chunky slices. Melt the 15g of butter in a frying pan until beginning to sizzle, then add the sugar and stir until melted. Add the pears and gently fry for a few minutes.
  4. Turn up the heat and add a splash of amaretto. Let this simmer away and reduce a little before removing from the heat and setting aside.
  5. Now begin with the filling. In a processor or by hand, cream the butter and sugar together until creamy and thoroughly mixed.
  6. Add the vanilla to the beaten egg. Add this, a bit at a time, to the creamed butter, and mix in until well combined (don’t worry if it curdles, it won’t matter)
  7. Now add the ground almonds, a splash of amaretto (optional) and mix
  8. Once your pastry case is cooked and cool, fill with the frangipane and smooth out into an even layer.
  9. Top with the pears in an attractive pattern and press them lightly into the mixture. Drizzle with some of the buttery, sugary, amaretto flavoured caramel from the frying pan. Scatter with the flaked almonds.
  10. Bake for about 30-45 minutes until the mixture is set and doesn’t wobble. Check it after about 30 minutes however, to make sure it isn’t browning too much (like mine unfortunately….) If so, cover with foil and continue to bake.
  11. Once cooked, remove from the oven. Serve warm or at room temperature.

I served mine with some salted caramel ice cream and a shot of Amaretto!

imageimage

Caramel Ice Cream with Salted Almond Praline

image

With December now well and truly here, it must be accepted that the gastronomic season has arrived. This pleasingly warrants the excuse for overindulgent food with an extra special touch or time and care wrapped in a blanket of calories and tied up with vast amount of edible guilt. With a welcome invite to a house Christmas meal approaching, and the responsibility of bringing dessert, my creative mind went into a sugary coma. A need to supply my hosts with something to sooth their taste buds and thank them for their hospitality. So to go with my pear, almond and amaretto tart, my love of ice cream was sure to make a chilly appearance. However, with no ice cream maker in the limited freezer in my home away from home in Clifton, I opted for this cheats recipe which is always a great one to have on tap. It doesn’t require churning as it won’t crystalise when freezing and it gives a very rich and creamy texture. A can of condensed milk and some single cream never looked nicer….

Praline

  • 100g caster sugar
  • 20g flaked almonds
  • ½ tsp Maldon Sea Salt

Salted Caramel Ice Cream

  • 1 can condensed milk
  • 300ml single cream
  1. Begin with the cheats ice cream base. Submerge a can of condensed milk in a pan of water on it side and bring to the boil. Simmer for 2 ½ hours making sure the water does not dry out and that it is covered (otherwise it could explode…worse things have happened)
  2. Meanwhile, make the praline. Begin by lightly oiling a piece of greaseproof paper.
  3. Now heat a dry frying pan and lightly toast the flaked almonds until tinged and fragrant. Scatter densely over the parchment.
  4. Now, scatter the caster sugar in a dry frying pan in an even, thin layer and turn up the heat.
  5. The sugar should begin to melt within a couple of minutes. Use a plastic spatula to mix in any non-melted areas and any lumps. All the sugar will melt and it will start to turn golden and liquid. Watching all the time as it can burn easily, continue to melt until light golden brown but not burnt!
  6. Quickly, using the spatula, tip the caramel over the almonds on the parchment and scatter quickly with the sea salt while still hot. Leave to cool until solid before breaking into shards.
  7. Once the condensed milk has been boiled it will have turned to caramel. Leave the can to cool before handling.
  8. Mix the cooled caramel with the single cream and beat with a whisk until well combined.
  9. Now, using either a food processor, a pestle and mortar or just a bag and a wooden spoon, coarsely crush your praline into chunks. I left some a bit more whole and some into a powder.
  10. Mix this evenly into the ice cream base and place in the freezer overnight. The praline pieces have a tendency to fall to the bottom so if you can be bothered, freeze half your cream mixture, then scatter over your praline and the remaining mixture and freeze again.
  11. Enjoy your ice cream with an added sprinkle of sea salt if required! I served mine with a pear, almond and amaretto tart.

image

PS. This cheats ice cream base is open to interpretation….adding coconut milk instead of cream sprinkling of lime zest is one of my favourites. However, add any other flavours you like. It is quite a soft texture anyway, so adding salt in this case, or alcohol which doesn’t freeze, will make it even softer so bear this in mind before going too heavy handed on the booze!