Date Archives June 2013

Rhubarb Bakewell Tart

image

image

With a bunch of prematurely picked rhubarb from the allotment aging ungracefully in the fridge this week I decided to experiment and make an ever favourite classic- the bakewell tart- with a rhubarb ‘jam’ instead of your traditional cherry or raspberry. Devine…

Note: For a more subtle flavour if you’re not an almond addict, feel free to leave out the extract.

Serves 8 (generously)

Pastry

  • 175g plain flour
  • 75g chilled unsalted butter
  • Cold water

Rhubarb Filling

  • 350g rhubarb
  • 1-2 tbsp caster sugar
  • ½ lemon juice
  • Vanilla extract

Frangipane Filling

  • 110g unsalted butter
  • 110g caster sugar
  • 110g ground almonds
  • 25g plain flour
  • 2 eggs
  • ½ tsp baking powder
  • ½ tsp almond extract
  • ½ lemon, zest
  • Handful flaked almond
  • 70g icing sugar
  1. Preheat the oven to 190°C and grease and line a 20cm tart tin. Start with the pastry and rub the butter into the flour until you have breadcrumbs. Add a few tablespoons of cold water or enough to bring it into a smooth dough. Roll out thinly and line the tart tin. Chill for at least 30 minutes.
  2. Meanwhile, make the rhubarb filling. Chop the rhubarb into pieces and place in a saucepan with the sugar, lemon juice and vanilla. Heat and simmer gently until broken down and ‘jammy’. Set aside
  3. Line the pastry case with parchment and baking beans and bake blind for 15-20 minutes until lightly golden. Remove the baking bean and return to the oven for 5 more minutes or so until the base is also lightly golden.
  4. Make the frangipane topping. Cream the butter and sugar together until fluffy. Beat in the eggs and almond extract followed by the almonds, flour, baking powder and lemon zest and mix until fully combined.
  5. Spread the rhubarb ‘jam’ evenly over the base of the pre-cooked case and top with the frangipane almond paste and smooth evenly, covering all the rhubarb. Scatter oven the flaked almonds and bake for 30-40 minutes until cooked and golden (cover with foil if it starts to colour before it is ready)
  6. Mix the sieved icing sugar with a few splashes of cold water until you form a thick paste. Spoon into a piping bag and, once the tart is cool, drizzle over!

image

Blueberry and Lemon Friands with Cinnamon Creme Anglaise

image

image

image

I’ve been wanting to make these frainds for ages! They are little ‘cakes’ that are make with egg whites and are therefore light and airy and often seen occupying the deli counters in Australia. They are a similar to financiers if you’ve ever had one but without the brown butter. In addition, I couldn’t resist making an accompanying creme anglaise with the 3 spare egg yolks!

Frainds (serve 6)

  • 100g unsalted butter, melted
  • 125g icing sugar
  • 25g plain flour
  • 85g ground almonds
  • 3 egg whites
  • 1 lemon, zest
  • 65g blueberries
  1. Preheat the oven to 200°C and grease a 6 spaced muffin tin or 6 friand moulds with plenty of butter.
  2. Sieve the flour and icing sugar into a bowl and mix in ground almonds and lemon zest.
  3. In another large clean bowl, whisk the egg whites until frothy but by no means are you looking for a meringue-like soft peak. Just mix by hand or with an electric beater until airy and foamy.
  4. Fold in the dry ingredients followed by the melted butter until incorporated.
  5. Spoon into the greased muffin mould and top with a handful of blueberries.
  6. Bake for 15-17 minutes until cooked and firm to touch with a lovely golden crust. Leave to cool in the tins before removing and dusting with icing sugar. Serve with ice cream, a coffee or my cinnamon creme anglaise!

image

Creme Anglaise

  • 6 egg yolks (3 from your friands)
  • 65g caster sugar
  • 1 tsp ground cinnamon (optional)
  • 500ml whole milk
  • 1-2 vanilla pods
  1. Whisk the egg yolks, sugar and cinnamon in a bowl.
  2. Scrape out the seeds from the vanilla and add them and the pod to a saucepan with the milk. Heat until just about to simmer and then remove from the heat.
  3. Whisk the yolks and then gently and slowly pour over the warm milk in a steady stream while continuing to whisk until all is added. Return the mixture to the saucepan and place on a very low heat. Stir continually with a wooden spoon to cook and thicken the custard making sure the heat stays low so it doesn’t scramble the egg.
  4. Continue to heat until it is thick enough to coat the back of the spoon.
  5. Strain through a sieve into a jug and serve.This could also be cooled and churned in an ice cream maker for a lovely cinnamon ice cream!

image

Fennel and Apple Salad


image

This salad is criminally simple and was enjoyed with some BBQ pulled pork, some homemade seeded pitta breads and some re-fried black pinto beans! It works perfectly well as it is so cleansing and fresh!

Serves 3-4

  • 1 large bulb fennel
  • 2 crunchy apples
  • Handful pomegranate seeds
  • Handful pine nuts
  • 1 lemon
  • Olive oil
  • Fresh chopped mint
  1. Using the slicer on a food processor, a mandolin, a speed peeler or just your good old hands and a knife, slice the fennel and apple in wafers (or matchsticks if you prefer) and add to a large bowl.
  2. Cover with the juice of 1 lemon to prevent discolouring and then season well and add a good glug of olive oil to coat lightly. Add the chopped mint.
  3. Toast the pine nuts in a hot dry pan until fragrant and scatter these along with the pomegranate seeds on top of the salad and serve.

image

image

Seeded Pitta Bread

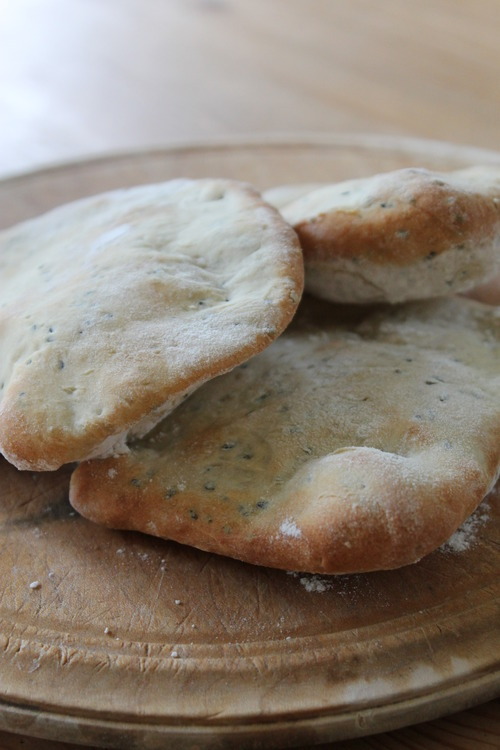
This recipe was courtesy of Paul Hollywood and was also extremely simple which was a welcome attribute considering it was my first attempt at homemade pittas! There are many homemade recipes which the supermarkets just cannot beat and this is certainly one of them. After making these I’m pretty confident in my suspicions that the shop bought pittas are in fact made from recycled cardboard…….

Serves 6

  • 250g strong white bread flour
  • 15g nigella seeds (or any other seed of choice e.g. cumin, caraway)
  • 7g yeast sachet
  • 120-140ml water
  • Salt
  • Olive oil
  1. Mix the flour, salt, yeast and seeds in a large bowl. Add a splash of oil and about 120ml of water.
  2. Use your fingers or a fork and bring it all together to form a dough. I didn’t need to add much more water but it will vary depending on your flour. Combine to form a dough that is sticky-ish but not too wet.
  3. Tip onto a floured surface and knead for 5-10 minutes until the dough is elastic, smooth and soft.
  4. Place in an oiled bowl, cover with cling film and leave somewhere warm to double in size.
  5. Preheat the oven to 250°C and place a baking tray or hot stone inside to warm through. Once doubled in size, knock back the air from the dough and divide into 6 pieces.
  6. Roll thinly into an oval shape. Remove the hot tray from the oven and quickly sprinkle it with flour before placing as many pittas on top as will fit and bake for about 5-7 minutes until they have puffed and are golden but not too crisp. Check after 5 minutes and turn over if they are still too soft on the underside.
  7. Repeat with the remaining dough and when cooked wrap in a tea towel to soften and cool a little. Slice open and fill with a filling of your choice….in this case pulled pork. These are also fantastic dipped into hummus or baba ganoush!

image

Amaretto Cake with Roasted Figs


image

This should really be called ‘booze cake with roasted fruits’ as really it is open to any of your favourite tipples and topped with any complementing fruit. In my recent craving to make a polenta cake and my mum’s imminent birthday, I ended up combining these two irresistible forces and making this amaretto soaked ‘pudding cake’. Courtesy of ‘Vogue Entertaining and Travel’ who’s magazines offer not only fantastic food porn photography but some great original recipes, I replaced masarala for amaretto and it was a huge success! There was also added relief as if you notice, it is in fact egg-less……but yes it sets and eats like a dream! Who’d have thought!?

Makes one large cake (Adapted from ‘Vogue Entertaining and Travel’)

  • 300g self raising flour
  • 110g polenta
  • 60g ground almonds
  • ½ tsp bicarbonate of soda
  • 125g butter, chopped
  • 220g caster sugar
  • 300g soured cream
  • 250ml amaretto (or masala or another booze)
  • 4 large figs
  1. Preheat the oven to 170°C and grease and line a 26cm spring form cake tin.
  2. Sift the flour into a bowl and add the polenta, bicarb and almonds with a pinch of salt.
  3. Beat butter and caster sugar until fluffy and then stir in the soured cream by hand until just combined.
  4. Sift in the dry ingredients alteratively with the amaretto into the butter until just combined but don’t over-mix- it will be quick thick.
  5. Spoon into the tin, level and bake for about 50 minutes until cooked and then leave to cool. (Note: you may feel an urge to put your entire face into the cake and eat it-avoid)
  6. Once cool, top with sliced raw or roasted fresh fig halves, scatter with toasted almonds and dust with icing sugar.

Side Effects: Can cause over-consumption especially when eaten with homemade blackcurrant sorbet (see here)

image

Fennel, Fish, Saffron

A night in by myself, I fancied experimenting a bit. This is not totally refined so give me a break on the measurements if you attempt something similar for dinner. But, here is what I came up with! In this case I used a hake fillet but ideally I would have used my favourtie seabass but any white strong fish will work well here. Additionally, I used Jersey Royals as they were in season but any spud will do. (Serves about 3)

Fennel Puree

  • 3 large fennel bulbs
  • 40g butter
  • 2 tbsp olive oil
  • Light stock
  1. Roughly chop the fennel, removing the tougher outer layers and place. Place in a saucepan and cover with some light vegetable stock or water.
  2. Bring to the boil and then simmer until the fennel is tender and soft (about 10 minutes or so)
  3. Drain, reserving the stock, and place in a blender with some seasoning, the butter and the oil. Blend until smooth adding some of the reserved stock to achieve the desired consistency. Set aside in the pan to keep warm over a low heat.

Saffron Roast Potatoes

  • 500g Jersey Royals pealed and sliced
  • Large pinch saffron stamens
  • Olive oil
  1. Preheat the oven to 200°C. Crush the saffron into a powder in a pestle and mortar.
  2. Just cover the potatoes in cold salted water and add about 1/3 of the saffron. Par-boil until just tender, about 10 minutes, then drain and leave to dry a little.
  3. Mix the rest of the saffron with a good splash of olive oil and coat the potatoes in it in a roasting tray. Roast in the oven for about 20 minutes until crisp.

Fish

  • 3 x white fish fillets such as seabass/hake/halibut
  1. Season your fish evenly with salt and pepper.
  2. Heat a non-stick frying pan until really hot and fry your fish, skin side down, for 3-4 minutes depending on thickness until crisp and nearly cooked. Flip and finish cooking on the flesh side on a lower heat for another minute or so.
  3. Serve with a spoonful of the fennel puree and some of the crispy saffron potatoes. I also caramelised a few wafer thin slices of fennel in a little butter.

Asparagus and Hollandaise

This is summer on a plate. Asparagus from the allotment, fresh eggs from the hens and some tasty fresh fish. Asparagus and hollandaise is a classic summer dish and perfect for a starter. However I served mine with some boiled jersey royals with butter, chives and mint and some fresh fish. You can add herbs to your hollandaise, chives are particularly nice or just have it as it is with no tampering!

Serves 4

  • 2 egg yolks
  • 110g unsalted butter
  • 1 tbsp lemon juice
  • 1 tbsp white wine vinegar
  • Asparagus
  1. Add the white wine and lemon juice to a saucepan and heat until it begins to simmer. Then remove from the heat.
  2. Add the egg yolks to the bowl of a food processor and turn on and blend for a good minute. Then, with the motor still running, add the vinegar reduction and a pinch of salt.
  3. Melt the butter in a pan until liquid and creamy and pour into a jug with a spout.
  4. With the motor still running, pour the warm butter in a very thin steady stream to begin with to emulsify with the egg and thicken. Continue slowly adding the butter (it takes a good few minutes) and the sauce will start to thicken. As it thickens and you have added at least half the butter, you can add it in a quicker stream.
  5. Once all is added, stop the motor and taste. It needs to have a tang so add more lemon juice if needed.
  6. Cook your asparagus in salted simmering water for 2 minutes and drain. Dip deliciously into the hollandaise!

image

Double Happiness

Summer seems to have arrived! Perhaps its temporary but with no more exams and job hunting understandably postponed I’ve been making the most of some refreshing cocktails. This one is aptly named ‘Double Happiness’ enjoyed with the first seasons pickings of my dad’s home-grown asparagus.

Serves 4-6 (Adapted from ‘Vogue- Entertaining and Travel’)

  • 120g caster sugar
  • 125ml boiling water
  • 20 lychees (I used canned ones)
  • 4 mandarins/2 oranges, peeled and chopped
  • 125ml lemon juice
  • Vodka or gin
  • Crushed ice to serve
  1. Mix the sugar and the water to dissolve.
  2. Add the lychees and the orange pieces and leave to cool.
  3. Once cooled, add the lemon juice and a splash of the lychee syrup if you like. Crush the fruits lightly to release some of their flavour.
  4. The original recipe called for this to be divided into 6 and mixed with 60ml of alcohol to each serving….However I did it to taste and added 30ml of gin/vodka to roughly equal parts juice. Add crushed ice and serve in the sun!

image

image

Coconut Layer Cake


image

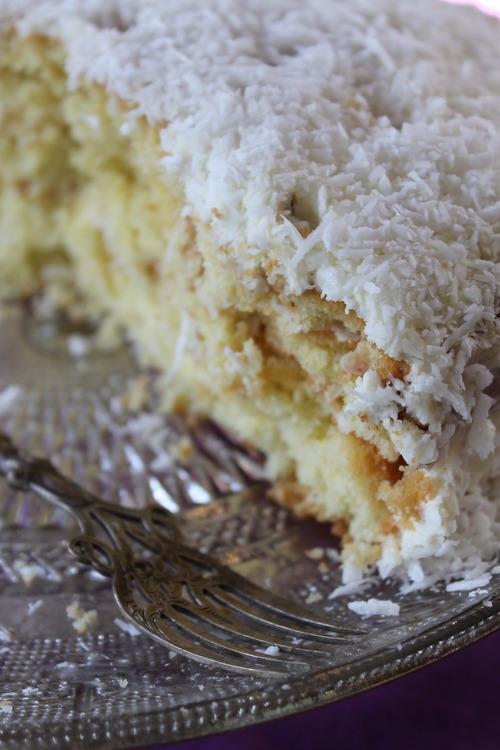
This is my dream cake and the second year running I’ve been treated to it for my Birthday and the second year running that my mum has cursed my name in the kitchen as she tries defiantly to ‘simply grate the coconut flesh’ that the recipe calls for. Never having made my own birthday cake (which would be a little depressing) I’ve never been lumbered with this task but I hear its tricky. The grating seems to be less demanding if you have a good food processor and grater attachment but the mission is getting the coconut flesh out of the shell….I suggest smashing forcefully.

This is a faithful Delia Smith recipe from her ‘How to Cook, Book One’ and I agree with her when she says it really makes a difference if you use fresh coconut….it’ll be worth the grated fingertips and broken floor tiles honest!

Cake

  • 175g self raising flour
  • 1 tsp baking powder
  • 3 eggs
  • 175g unsalted soft butter
  • 175g caster sugar
  • 1tsp vanilla extract
  • 1 coconut, flesh grated

Icing

  • 250g mascarpone
  • 200ml creme fraiche
  • 1tsp vanilla extract
  • 1 tbsp caster sugar
  1.  

    Preheat the oven to 170°C and line 2 cake tins (about 20cm).

  2. Sieve the flour and baking powder into a bowl. Add the beaten eggs, butter, caster sugar and vanilla extract and mix using an electric hand blender until smooth. Alternatively cream the butter and sugar then add the eggs and flour etc.
  3. Mix in 75g of the grated coconut and divide between the two cake tins
  4. Bake for 30-35minutes until cooked then remove from the oven and leave to cool
  5. Make the icing by combing all the ingredients and 40g of the grated coconut.
  6. Once the cakes are cool, use a serrated knife to slice each one horizontally in two so you end up with 4 slices. Now place one slice on your serving plate followed by a layer of icing. Build up the cake with this layering in the same way.
  7. Use the remaining icing to coat the sides and the top of the cake and then cover with the remaining grated coconut. You can add some dessicated coconut here if you want too.

image

Blackcurrant and Almond Tart with Blackcurrant Sorbet


image

If I had to chose my last super then without a doubt this tart would be for dessert as it is literally my downfall. It’s taken from ‘Sarah Raven’s’ allotment inspired cookbook and its a serious crowd pleaser. If you can’t get hold of blackcurrants then other fruit like blackberries will work too.

This tart always makes an appearance during blackcurrant season and is one of those default and faithful desserts that I can be confident will always be loved if I’m stuck for inspiration. I love it served with a creamy coconut ice cream and with that as my last meal I would contently go. However, we have an obscene amount of blackcurrants on the allotment which, after tedious and hand-staining picking, provides us with multiple bags of these little currants. Seeing as I have now exhausted the Cassis and blackcurrant jam making process, I ventured into the world of fruit sorbets to go with the tart. Its super sweet and shiny like a well polished cricket ball and is wonderfully refreshing.

Sorbet

  • 500g blackcurrants
  • 250g caster sugar

Blackcurrant Almond Tart (makes one large or two small tarts)

  • 200g ground almonds
  • 200g caster sugar
  • 200g unsalted butter
  • 3 eggs
  • 1 tsp vanilla extract
  • 200g blackcurrants
  • Icing sugar
  1. Start with the sorbet. Wash the blackcurrants well and tip them, while still wet, into a large pan.
  2. Add the sugar and heat gently. Heat until the sugar melts and the mixture begins to turn dark purple and the berries just begin to burst. I added a few splashes of water to help the process along. Just as the berries begin to burst, remove from the heat and puree in a food processor or liquidiser
  3. Pass through a fine sieve and discard the pulp. Cool in a jug in the fridge then churn in an ice cream maker until frozen and smooth. Alternatively, freeze in a shallow container, forking every 20 minutes or so to break up the ice crystals.
  4. For the cake, preheat the oven to 180°C and line one 23cm round tart tin or 2 smaller tins.
  5. In a food processor, cream the butter and sugar until pale and fluffy. Add the eggs one at a time between handfuls of ground almonds and mix until all is incorporated. Add the vanilla.
  6. Spoon into your lined tart case. Scatter the blackcurrants evenly over the top and bake for 30-40 minutes until cooked. It can take longer depending on the state of your ingredients and the depth of the tin but if it needs longer than 40 minutes, just make sure it doesn’t brown too much and cover with foil if needed.
  7. Cool on a wire rack and allow to firm up a little. Dust with icing sugar and serve with the sorbet (or coconut ice cream alternatively) and a sprig of mint!

image

image