Category Vegetables and Salads

Creamed Spinach & Goats Cheese Crumble


H

appy New Year! This was quite rightly a while ago now. January has come and gone and I’ve yet to even blog a shortbread biscuit or mince pie. But I’ve been sunning myself on South Africa’s beaches, drinking from their vineyards and eating…biltong. I don’t regret my absence. However, it has been a shameful while since I’ve given FITP some loving attention. Importantly I must confirm it is NOT because I’ve stopped cooking or experimenting. My pans continue to earn their keep and my fellow friends kept fed and watered. Its been quite an adventure over the past months and that combined with the lack of natural light, I’ve had limited time to take pictures worthy of my perfectionism and blogging standards. Recent stressful distractions at the later end of 2017 have sucked my what would have been ”recipe daydreaming time” for my blogging creations. More so I have sadly (?) opted for either comfort eats or trusty go-tos. That said there have been some blog worthy comfort eats that will have to grace these pages before the summer…

But this Monday evening in early February once again faded into another dark quiet Monday with nothing to excite me except the idea of coming home for dinner and a round of ‘Silent Witness’ (Judge as you will). That coupled with the tight budgets I’ve restricted myself to in order to fund my tenacious sun worshiping this year means that experimenting is also not such an attractive prospect for the bank balance. This dish therefore fits quite nicely. Its amazing what a £1.20 bag of frozen spinach can make and just how far it’ll go. You’re skeptical about spinach going a long way…I can tell. But this could feed a vegetarian army if such a thing exists.

Tip – opt for a larger more shallow baking dish for a better eat. Mine was a little deep and small.

Serves 4-6 (Adapted from Jamie O’s classic here)

Ingredients

  • 1kg frozen spinach ‘blocks’
  • 1 red onion, chopped finely
  • 2 garlic cloves, crushed
  • Nutmeg
  • 150g soft goats cheese
  • 100g breadcrumbs OR bread
  • 100g oats
  • 100g cold unsalted butter, cubed
  • 50g flaked almonds
  • 250ml creme fraiche
  • 1 lemon
  1. Preheat the oven to 180.
  2. Start by sweating the onion in a little oil in a large frying pan until soft and translucent. Add the garlic and fry for a few more minutes.
  3. Add the spinach ‘blocks’ and turn up the heat to a medium setting. You want to cook out the spinach for a out 10 minutes until the blocks have melted down and you have evaporated the majority of the water.
  4. Meanwhile, blitz the bread in a processor into breadcrumbs. Season well.
  5. Add the oats and pulse lightly just to combine.
  6. Add the cubed butter and blend until you have a crumb like texture.
  7. Stir in the almonds and reserve this topping for later.
  8. Once the spinach has reduced in moisture, grate in a good few gratings of nutmeg. Add the mixture to the food processor and blend until smooth. Taste and season well.
  9. Add the creme friache and the zest of the lemon and pulse to combine. (These steps are optional. If you don’t have a processor you can simply stir the creme friache and spinach together to achieve a more textured mix).
  10. Tip a third of the mixture into a shallow baking dish (In hindsight, the one I used was a little deep). Crumble over a third of the goats cheese.
  11. Repeat with the next layer alternating with goats cheese and spinach. (Alternatively, you could add the goats cheese to the spinach mixture and pulse lightly. I preferred having nuggets of goats cheese rather than an overall flavour throughout).
  12. Once you’ve used up all the mixture, top the spinach evenly with the crumble.
  13. Bake in the oven for about 35-40 minutes until the crumble turns a golden brown and the juices from the spinach are starting to bubble up around the edges.
  14. Dive in!


Raw Citrus Salad

I

f you’ve been (un)lucky enough to experience the heat wave that swept the UK last week then you’ll probably agree that appetites change from being food dominant to a welcome craving for frosty, cold and delicious beers. Iced rose if thats more your thing, or perhaps just a freshly made lemonade in the sunshine. However, food still has its place but freshness, lightness and nothing too heavy takes the culinary crown. This salad was perfect after what was probably the hottest day of the year so far. After trawling over London for a meeting – which at the time felt dramatically reminiscent of a desert voyage – I was in no fit state for cooking anything too warm later that evening….

This therefore seemed the perfect opportunity to make a fresh salad but one to replenish the nutrients. And time to crack out an ingredient that’s been waiting patiently in my pantry for the past few months. A little gift from overseas from the Norwegian’s.  I’ve not seen a oil like this before but have been delighting in it since. Whilst I’ve tried flavoured oils in the past which I’ve found to be either bland or synthetic, this little oil/balsamic combo – mandarin oil with an epic peach and apricot balsamic – served neat and combined in equal measures with some crusty bread for dipping was amazing! I instantly thought seafood, fennel, and raw salads….after thoughts of frosty beers and rose. I did mention it was very hot…

With a lack of garden space or even a balcony in London (sympathy welcomed) there was sadly no place for a BBQ here. But if you do then this would be an amazing salad served with charred barbecued squid or octopus. Or keep it simple and griddle your asparagus or sea bass. The smoky bbq flavour is perfect for anything citrus here.

Like I said, its a meal for a hot day…minimal effort, more an assembly of flavours. Feel free to add in any other ingredients of choice or fish and seafood.

*NOTE – if you’ve no time to pop to Norway for these delights, a really good extra virgin olive oil with either a generous squeeze of lemon/lime/orange would work a treat. Try adding a few very thin slices of orange segments or grated zest too. Blood orange if you’re feeling extravagant.

Serve 2

  • 2 celery sticks, finely sliced
  • 1 bunch asparagus spears
  • 1 bulb fennel, sliced wafer thin (using a mandolin if you have one)
  • 1 handful walnuts, toasted and lightly crushed
  • Small bunch fresh basil and mint, finely chopped
  • 1 lemon/orange/lime
  • Extra virgin olive oil and 1 orange OR flavoured citrus oil or equivalent to above
  • 2 sea bass fillets (or as above, squid, octopus etc)
  1. Hest a frying pan/griddle pan to medium high and add a splash of light olive oil. Griddle the asparagus spears to just take off the rawness for a few minutes until beginning to char. Season and remove from the heat and set aside.
  2. In a large mixing bowl, combine the celery, shaved fennel, toasted walnuts and finely chopped herbs.
  3. When the asparagus spears have cooled a little, add them to bowl.
  4. Season and grate in the zest of half the lemon.
  5. The next bit if up to you. Add the citrus oil, and the juice of half a lemon or add the juice of an orange/lime and some plain, extra virgin olive oil. Its all about taste. You need a fresh citrus flavour but it needs to be balanced.
  6. Set aside once done. Fry your fish and serve atop your fresh salad.

I served mine alongside some roasted carrots …I’ll admit this isn’t supporting the cooling and ‘non hassle’ trend I championed above. What can I say, the frosty beer worked a treat…

  • Slice 2-3 large carrot into chunky diagonal chunks
  • Season and drizzle with olive oil
  • Scatter with 1 tbsp of cumin seeds
  • Roast for about 25 minutes until starting to caramelise and soften. Check after this time and leave in longer if needed.
  • 5 minutes before they look ready, add 1 btsp running honey and combine. roast for 5 more minutes.
  • Remove from the oven and served, slightly cooled, with your citrus salad (also lovely to add chopped parsley and crumbled feta/goats cheese)


Mediterranean Roasted Potato Salad

W

ith a holiday on the horizon it was time to use up the rest of the ingredients littering my fridge…I love this challenge.

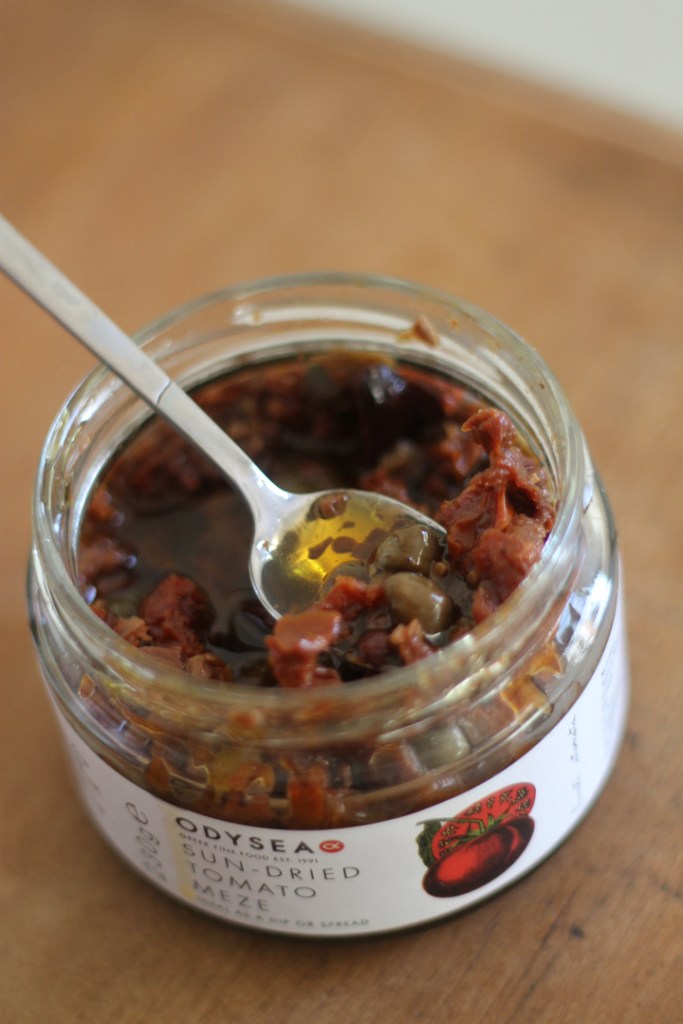
Thats where the excellent ingredients that Odysea Greek produce come in handy – and ironically it was Greece where I would be destined for! Odysea sent me a glorious box of their devious samples last year and from this I have savoured some store cupboard gems, waiting patiently in the back of my cupboard until called upon and ready to pack a punch when called to the spotlight.

This salad was a mixture of fridge leftovers combined with a few cheeky purchases and of course, some glorious Greek flare. I used Odysea’s ‘Sun Dried Tomato Meze’ – a mixture of tomatoes, capers, and olives chopped roughly and combined in a gloriously flavoured oil. Similarily you can use the former ingredients alone and combine in your own combination but since Odysea did it so well, I figured I’d use their convenience pre-holiday….

T

his makes one large chunky roasted salad but feel free to sub in other ingredients to your taste. Serves around 2-3 as a side dish. I served mine with a lovely fillet of grilled sea bass, but some steamed or roasted cod with lemon and parsley would also be delicious.

Ingredients (Serves 2-3)

  • 2 large potatoes, chopped
  • 1 x packet green beans
  • 3 spring onions, chopped
  • Bunch flat leaf parsley, chopped
  • 1 lemon, zest and juice
  • 6 x large sun dried tomatoes (chopped), 1 handful olives (chopped), 1 tbsp capers OR 4 tbsp ‘Odysea Sun-Dried Tomato Meze
  • 10 slices thin chorizo OR 1/2 ring chorizo sausage, sliced
  • 2 handfuls rocket leaves
  • Olive oil
  1. Preheat the oven to 220°C.
  2. Start by par boiling your potatoes for about 10 minutes until just tender. Drain, shake in a pan to rough the edges and then tip into a roasting tray. Season and drizzle over a generous coating of olive/sunflower oil. Roast in the oven for about 30 minutes until golden and crispy.
  3. Meanwhile while they roast, par-boil the green beans for a few minutes. Drain and cool them under cold water.
  4. Chop the spring onions, parsley and combine in a large mixing bowl with the  cooled beans, lemon zest, sun dried tomato mixture and season.
  5. Pan fry the chorizo in a dry frying pan until crispy.
  6. Once the potatoes are ready, remove from the oven. Top into the salad bowl with the beans and herbs. Add the chorizo.
  7. Finely, just before serving, add the rocket leaves and squeeze over the juice of half the lemon.
  8. Serve!


Chana Dahl and Flatbread

W

e all know our favourite comfort foods on a cold, challenging day or just after a bit of a tough one be it winter or summer. They usually consist of English favourites like bangers and mash or a hearty pie. Mine vary throughout the seasons but usually consist of a creamy coconut rice topped with Asian salmon (recipe here) or a big bowl of fish soup. But dahl is another comfort food altogether and one that so effortlessly lives up to the job.

There are many types of dahl, made from varying pulses. Having sampled ‘Dishmoon‘s’ infamous black dahl I’ve been on a quest to make a rival recipe! I religiously order it with every visit to Dishoom. I even have a colleague who orders a portion with the bill so he gets a bowl ‘to go’. Its that good! However, I’ll be confidently honest here and admit that my attempt at a black dahl (recipe here) ticked the box for me in terms of flavour and decadence.

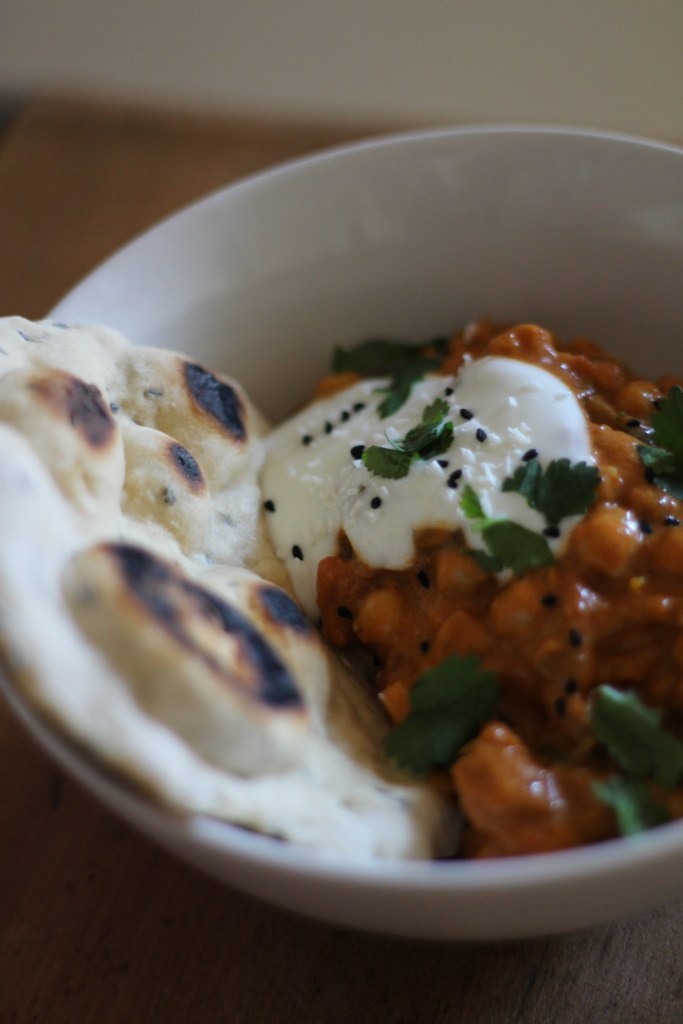
However, this variation is suitably named as ‘Speedy dahl’. The flavour is there but you don’t get the depth that you get from a slow cooked and infused recipe with commitment of time and love. So, after a long run around London last Sunday afternoon, a cold bitter chill in the air and a deserving appetite I set my pan on the hob to master a new recipe. Serve in bowlfuls with roti, naan, chapatis or flatbread alone or refined here with a piece of elegantly friend sea bass, it’ll offer the comfort you need. Its a hug in a bowl…..

Serves 4

  • 3 tsp cumin and coriander seeds
  • 1 tsp yellow mustard seeds
  • 3 tsp garam masala
  • 1 tsp ground turmeric
  • 2 tbsp coconut oil 
  • onion, finely chopped
  • Knob ginger (about 35g), finely pounded with a pestle & mortar/grated
  • 1 large garlic clove, finely pounded with a pestle & mortar/grated
  • 1/2 can chopped tomatoes
  • 600ml coconut milk
  • 250g yellow split peas (rinsed well)
  • 3-4 small green chillies, finely chopped
  • fresh curry leaves
  • 1-2 limes
  • Coriander, roughly chopped
  1. To start, drain the split peas well in 4-5 changes of water then allow them to sit in a bowl of water while you start the dahl.
  2. Dry fry the cumin, coriander and mustard seeds in a hot frying pan until fragrant. Next pound in a pestle and mortar.
  3. Add the turmeric, garam masala and set aside
  4. Heat the coconut oil in a hot frying pan and sweat the onion of ragout 10 minutes until soft and beginning to carmalise.
  5. Next add the ginger, garlic and chopped chillies and cook for a few more minutes.
  6. Add the dry spices (and a touch more coconut oil if needed) and stir all to combine, frying the spiced onions for 2-3 minutes more.
  7. Add the tomatoes, coconut milk and the curry leaves. Drain the split peas and add these too.
  8. Bring to the simmer and then allow to bubble slowly and gently for about 1 – 1.1/2 hours (alternatively pop in a low 150°C oven with a lid on) until the split peas become tender and begin to break down. Keep an eye on it while it simmers so it doesn’t catch on the bottom. Add a touch of water if its drying out.
  9. After this time and the lentils are soft, remove from the heat. Use a potato masher to gently ‘mush’ the lentils into a paste. This is just to make it thicker, you don’t need to aim for a smooth dahl.
  10. Taste and season well and add the juice of at least 1 lime or more if required. It should lift the taste of the whole dahl.
  11. Scatter with the coriander and the dahl is ready to serve!

I served mine with fennel seed flatbreads (recipe here). Amend the spice/seeds as needed.

Porcini and Chestnut Risotto, Truffle Cream

A

fter the indulgence of Christmas sometimes something a little less meat-dominant, goose fat roasted or gravy soaked is required. Although don’t get me wrong, it still is a festive, celebratory and just that – indulgent – season so lets not be eating green salads and spag bol just yet. Risotto is perfect for using up leftover scraps and cheeses but can still be pimped with indulgence and provides a warming hearty bowl of soul food when the fun of Christmas is behind you but the frost and cold still linger outside. Feel free to tag team in any other ingredients you prefer or have hanging around using rice, parmesan, shallots and stock as the foundations in all variations.

This recipe was particularly perfect after Christmas when chestnuts, cheese and leftover mushrooms were lingering in the fridge! And if you were lucky enough to be given a nice bottle of truffle oil..ahem..then a spike of it here goes a long way into disguising even the greediest of carnivores into noticing that this is in fact a vegetarian supper….

Happy New Year everyone. If not made before 2017 this is certainly one to make in the cold and bracing January days!

Serves 4

Ingredients

  • 350g arborio/risotto rice (about 4 large handfuls)
  • 3 shallots/2 onions, finely chopped
  • 3 cloves garlic, chopped
  • 30g butter and tbsp olive oil
  • Large glass dry white wine
  • Hot vegetable stock (about 700ml)
  • 30g dried porcini mushrooms
  • 250g chestnut mushrooms, chopped roughly
  • 100g parmesan, grated
  • 50g butter, diced
  • Large bunch flat leaf parsley, chopped
  • 180g pre roasted and peeled chestnuts, finely chopped or grated.
  • Juice 1/2 lemon
  • 200g mascarpone/creme fraiche
  • Truffle olive oil (You can also use fresh shaved truffle here!)
  1. Begin by soaking the dried porcini mushrooms in a jug with enough boiling water to cover and leave for about 15 minutes until softened and hydrated again.
  2. Next, heat 15g of the butter and a splash of olive oil in a large high sided frying pan or saucepan. Soften the chopped shallot gently on a low heat until translucent and soft. After about 10 minutes, add the garlic and cook for a few more minutes.
  3. Next add the rice and turn up the heat to medium and toast the grains while stirring consistently. The grain should begin to turn translucent too and ‘toast’.
  4. After a minute or so of toasting, add the white wine which will bubble briskly and stir until just absorbed.
  5. Drain the soaked mushrooms, chop and set aside. When draining, reserve the mushrooms soaking liquid but discard the final part that will contain any grit from the mushrooms.
  6. Use this hot liquid first before using the hot stock to add to the rice. Stir in the liquid ladle by ladle absorbing the liquid into the rice before adding the next but ensure it does not dry out. Add the liquid after 3/4 of the ladle before has been absorbed. This should take about 18 minutes stirring consistently.
  7. Meanwhile, heat the other 15g of butter and a splash of oil in another frying pan. Fry the chopped chestnut mushrooms until golden and then set aside until needed.
  8. When the rice is just al dente to taste, add in the chopped porcini and continue adding the stock until the rice is cooked to your liking and the texture is still loose. (Don’t allow it to stiffen). Taste and season as needed with plenty of black pepper.
  9. Once the rice is cooked, add in the fried chestnut mushrooms, the chopped parsley and chestnuts and stir to combine.
  10. Finally, scatter over the parmesan, the 50g diced butter and the juice of the lemon. Cover the pan with a lid and remove from the heat and allow it to rest.
  11. Meanwhile, combine the mascarpone/creme fraiche with about 1 tbsp truffle oil or enough to taste depending on the strength that you like it.
  12. Once done, remove the lid from the risotto and stir in the melted cheese to combine evenly. If the texture is a little stiff, add a splash of hot stock to loosen so you get an ‘oozing’ consistency.
  13. Give the risotto once final stir to combine and then serve in warmed shallow bowls and top with the truffle cream and any reserved chopped parsley.

Chickpea Curry, Coconut Yoghurt, Naan and Mango Chutney

jess-chickpea-curry3jess-chickpea-curry2

I

 am not a vegetarian (lets just make that clear) but sometimes meat just isn’t required. When flavour is so prominent there is sometimes no need for it and this curry certainly has a big punch of spice. If you’re going to make a curry, don’t be timid, the more spice the better in my eyes! And I reassure you that you won’t miss the meat in this one – chickpeas make a substantial replacement. However feel free to replace with diced chicken, whole chicken legs, chunky white fish or even lamb. Or keep it vegetarian but pulse free with chunky cauliflower or broccoli or stirring through some spinach at the end.

Homemade flatbreads, sweet mango chutney and a cooling coconut yoghurt are the perfect side dishes. Who needs a takeaway….

Serves 4

Curry

  • 2 x cans chickpeas, drained
  • 1 can (full fat) coconut milk
  • 1 can chopped tomatoes
  • 1 large/ 2 small red onions roughly chopped
  • 2 garlic cloves, crushed
  • 1/2 red chilli, chopped
  • 1 thumb piece ginger, grated
  • 1/2 tsp fennel seeds
  • 1/2 tsp fengrueek seed
  • 1 tsp black mustard seeds
  • 1 tsp cumin seeds
  • 1 tsp each ground cumin, coriander, garam marasal, curry powder, tumeric
  • 5 cardamon pods
  • Bunch coriander
  • 1 lime
  • Spinach or extra vegetable optional

Yoghurt & Flatbread

  • 250g plain yoghurt
  • 2 large handfuls desiccated coconut
  • 500g self raising flour
  • 1 tbsp nigella seeds
  • Milk
  • Mango chutney to serve
  1. Start by mixing the flatbread dough. Add the flour, nigella seeds and some salt and pepper in a bowl. Add a small splash of milk (a little at a time) mixing as you go until you have a smooth dough that is not too wet. If you do add too much milk just counteract with some extra flour. Tip the dough onto a floured surface and knead for a few minutes until combined and smooth. Leave the dough ball to rest in a floured bowl while you make the curry.
  2. Start the curry by toasting the whole spices in a hot dry frying pan for a few minutes to release the fragrance. When you smell them toasting remove from the heat and add to a pestle and mortar and grind well. Add the dry spices and set aside.
  3. Heat a little vegetable oil in a frying pan/saucepan (bear in mind you will need the curry in a saucepan later so use whatever is easiest) and gently soften the red onion for about 10 minutes until soft and translucent. Add the garlic, ginger and chilli and fry for a few more minutes.
  4. Next add the spices to the onion mix and fry for about 2 minutes adding a splash more oil if needed.
  5. Next add the tinned tomatoes and simmer gently for a minute mixing well to incorporate the onion spice mixture before adding the coconut milk to the sauce.
  6. At this stage I recommend transferring the sauce to a saucepan with a lid if you haven’t already. Simmer gently for 5-10 minutes to thicken the sauce before adding the chickpeas. Season to taste and keep on the simmer while you make the flatbreads and yoghurt. Add a splash of water for a thinner sauce or simmer to reduce for a more concentrated texture (depending on preference)
  7. Toast the coconut in a dry frying pan until just turning golden. Remove and add to the yoghurt. Set aside.
  8. Take the rested flatbread dough and divide out into generous golf ball sized rounds. Roll into flatbreads, the thickness of a 10p piece and set each aside. Heat a dry frying pan on high and turn on the extractor fan! Dry fry the flatbreads on each side. They should puff up a little in pockets and char a little. You’ll have to play with your own hob temperature but a high heat is needed. Continue with all the breads, wrapping them in a pile in a clean tea towel to keep them warm and soft after each one.
  9. (If adding any vegetables, add to the hot curry now and simmer until cooked.)
  10. When the breads and yoghurt are done and the mango chutney is at hand and ready to go, chop a large handful or coriander and the stems and add to the curry. Squeeze in the juice of the lime and taste and adjust the flavour as needed.
  11. Serve the curry in large warm bowls topped with the yoghurt, chutney and a scattering of coriander. Dip in your flatbreads to your hearts content.


Ultimate Cornbread

T

his recipe comes directly from Brad McDonald’s book ‘Deep South‘. After being lucky enough to dine in his awesome restaurant ‘The Lockhart’ before he packed up to open ‘Shotgun BBQ‘ I experienced the jaw dropping sights and tastes of his signature cornbread. Basted in thick honeyed butter bubbling at the sides in its case iron dish it was brought to the table disguised as a lemon drizzle!? And boy did it taste good. Its a bit simpler in flavour (and perhaps authenticity?) than my own signature version which you can find here which is full of sweetcorn for texture, chilli for spice and a bit of cheeky cheddar for tang. Whilst both have their own style, the winner here is the buttery honeyed topping. Slatered warm with salted butter this makes the perfect accompaniment to a hot bowl of soured cream drizzled chilli or simply a bucket of homemade fresh guacamole as I did here.

Having not yet tried Shotgun BBQ it will be my next fit spot…

jess-hovis

jess-cornbread4jess-cornbread2

I used a mini retro loaf tin to create these cute mini loaves perfect for individual portions. However I would also recommend using small loaf tin, one large one, or failing that a muffin tin! This recipe would make about 8 small muffins I think. But feel free to use any tin available – the depth will just mean the cooking tin will vary but if you stick to 25 minutes or so first starters and a knife inserted into the centre is clean then voila!

Ingredients

  • 150g plain flour
  • 150g polenta/cornmeal
  • 25g soft light brown sugar
  • 4g baking powder
  • Large pinch salt
  • 225ml milk
  • 2 large eggs
  • 20g butter, melted
  • 30g lard
  • 50g unsalted butter & 50g runny honey
  1. Preheat the oven to 200°C and place a small knob of lard in each tin
  2. Combine the dry ingredients in a large bowl
  3. Add the wet and mix well to combine
  4. Spoon into the muffin tins/loaf tin (allowing room for rise)
  5. Bake for about 25 minutes until golden. A knife inserted into the middle should come out clean
  6. While they are baking, combine the honey and butter for the topping in a saucepan and melt to combine
  7. When the loaves are ready baste in the hot honey butter and then return to the oven for a few minutes
  8. After this time, remove from the oven and serve immediately, hot and buttery!

I served mine with guacamole  – see here but a chilli would also go down a treat.

jess-cornbreadhoney

jess-cornbreadavo3

Apricot, Thyme, Honey and Goats Cheese Grain Salad

Jess - nectarine

Jess - nectarine3

T

his weekend summer finally arrived! I woke in Wiltshire to gleaming sun rays through my curtains, clear blue skies and the promise of a warm balmy day. I could already taste BBQ in the air and with some thick marbled dexter steaks sitting patiently in the fridge, all we needed was a side dish to accompany.

Now I call this a ‘grain’ salad as its open to using any type of grain or pulse of choice. Cous cous, pearl barely, lentils. Follow your taste buds. But for this creative dish I used quite an original and special one. Sent from overseas England has yet to offer this nutty, textured ingredient. Its a cross between cous cous and pearl barley but get this health addicts –  its gluten free! But like I said sadly its not available in the UK yet but at least you know which food blog to check out when it does (ahem). This special packet of gold dust for coeliacs arrived for me overseas from a budding provider and I was keen to taste it. Being very versatile I wanted to use it simply and being gentle in taste it can easily handle strong flavours. Simmer for about 30 minutes and drain for a delicious texture and a wonderful flavour.

Available in both wholegrain and normal.

Jess - Sorghum

Jess - Sorghum2Jess - Sorghum3

Serves 4

  • 200g sorghum/pearl barley/giant cous cous/lentils
  • 6 fresh apricots
  • Small bunch thyme, leaves picked
  • 1 tbsp runny honey (I used Odysea’s ‘Wild Thyme and Fragrant Herb Honey‘)
  • 125g soft, goats cheese
  • Handful of rocket
  • 1 lemon
  1. Simmer you grain of choice until tender but with a little bite. Drain and leave to cool until just warm.
  2. Meanwhile, preheat the oven to 200°C.. Slice the apricots in half, de-stone and place on a baking tray. Drizzle over the honey and half the thyme leaves. Season and drizzle over a splash of olive oil and toss together. Roast in the oven for about 20-30 minutes until the apricots are roasted and softened but still hold their shape. Remove from the oven and leave to cool slightly before cutting each half again in half.
  3. When ready to serve, season the grains and combine with the warm roasted apricots, the rest of the thyme and a handful of rocket leaves. Crumble in the goats cheese.
  4. Finally, dress with the juice of the lemon and stir gently to combine and coat in the lemony juices.

WINE: Served with a deliciously fruity glass of California’s ‘Folk Machine Pinot Noir’ available at Armit Wines

Jess - salad

Ricotta Gnudi with Chorizo and Peas

Jess - Gnudi5Jess - Gnudi7

T

hese little gnudi pillows are a lighter take on the chewier gnocchi – a potato based recipe –  and instead use creamy ricotta and very little flour to form a creamy and lovely textured equivalent. Historically they are known in Italy as ‘naked’ ravioli. Use your imagination….these ones however are clothed in a simple buttery lemon sauce. A delicious end to whats been a temperamental June weekend. Glorious sun one minute and torrential rain the next. Since the gardens and parks are in full green bloom with all the nourishing rain, a dinner inspired using fresh summer vegetables here makes them not an addition to the gnudi main event but an equal partner.

This recipe is speedy to knock up especially once you’ve fried the gnudi. Simply toss together the blanched vegetables in some buttery lemon and voila…you have a perfect summers meal!

Feel free to use any range of vegetables. Sliced blanched asparagus would be glorious here when in season perhaps with pancetta instead of chorizo. Or try string in some last minute wild garlic leaves, basil or mint.

Serves 2

Gnudi

  • 250g  ricotta cheese
  • 60g plain flour
  • 1 large egg, beten
  • 20g finely grated parmesan (plus more for garnish)
  • Grated zest 1 lemon
  • Salt and pepper

Sauce

  • 1/2 lemon
  • 100g peas
  • 100g broad beans, podded (or any other summer green veg enough for 2)
  • 100g chorizo, sliced on the diagonal
  • 40g unsalted butter
  • Handful chopped chives
  1. Begin making the gnudi. Combine all ingredients into a bowl and mix until well combined.Jess - Gnudi
  2. Tip out onto a floured surface and roll into a log shape (as thick as you like). Add a little more flour if needed. The texture should come together and not be wet but it will be very soft and pillowy like dough. Quite fragile.
  3. Chop into gnudi pieces (mine were about 2 inch long) and place on a tray until ready to cookJess - Gnudi2
  4. Bring a pan of water to the boil and blanch your vegetables of choice and then drain and set aside.
  5. Using the same pan, season the water and poach the gnudi for a few minutes. They will rise to the surface and float once cooked and ready. When this happens, use a slotted spoon to drain and place on a lined tray. Keep the water for the sauce.
  6. Heat a frying pan and add half the butter and a little oil. Heat on a high heat and then fry the gnudi until golden brown all over. Place on a warm plate and keep warm once golden.
  7. Jess - Gnudi3
  8. In the same pan, add the sliced chorizo and fry just until beginning to crisp.
  9. (You need to now work quickly to prevent the vegetables decolouring). Add the vegetables – peas and beans – to the chorizo in the pan and season.
  10. Next add in the rest of the butter and stir to emulsify the sauce. Add a splash of the gnudi poaching water.
  11. Simmer and then add the gnudi to the mixture and warm through and coat in the buttery juices.
  12. Finally, when all warmed through, squeeze over the lemon juice and the chopped chives.
  13. Serve in deep warm bowls topped with any reserved chopped chives and some more grated parmesan

Jess - Gnudi4


Asparagus Salad with attitude

Asparagus

I

ts May! My favourite month. Not just because its my birthday month but because summer is around the corner and we occasionally get some warm sunny days that are by now longer and greener. Also, its not quite summer yet so any warmth is a bonus and any rain can’t be really argued about….rain in July however….that can be, thats not on.

In addition, asparagus season kicks off! One of my favourite vegetables and one that I adore but religiously only use in season. Peruvian flown asparagus in November isn’t quite the same. My patient (and I mean patient) Dad has slaved over a beautiful allotment for a good few years now and asparagus has to be one of the benefits of these hours. Its a funny vegetable to grow really. Its painfully teasing in its initial stages, taking 3 years to form solid allotment foundations. It needs to grow and die again before you can even reap the benefits of your first harvest – 3 years! So it was on day one, year one when Dad announced he was to plant some that we all cheered then sat back in asaparugus-less silence as we waited. But wait we did and now we have a wonderful patch of these cheeky greens. I say funny as while it takes years to establish, when the season hits, asparagus shoots up and grows in lightening speed. It has been known to grow up to 25cm in 24hours! So we can hardly cut it quick enough. While the weather wasn’t ideal for a BBQ this weekend for Dad’s birthday that didn’t stop us from having my (oven grilled) spatchcocked BBQ chicken and this wonderful salad filled with all my Dad’s favourite salad staples and his well deserved asparagus served alongside crispy roasted new potatoes

This is more of an assembly of elements which are open to modification.

Crispy fried croutons, boiled eggs, smoky bacon lardons, stir fired spiced broccoli, crunchy bitter little gems and of course this seasons asparagus….

Serves 6

  • 2 little gem lettuces
  • 1 large head broccoli, chopped into florets and halved if necessary
  • Large bunch asparagus (about 8 stems)
  • 2 free range eggs
  • 3 slices brown bread, chopped into 2 cm pieces
  • 100g pancetta/diced smoked bacon/smoked lardons (optional)
  • Juice 1 lemon
  • 1/2 tsp each fennel seed, cumin seed, nigella seed, coriander seed.
  • Sunflower oil for frying
  • Extra virgin olive oil
  1. Toast the spices in a dry frying pan for a few minutes until fragrant then tip into a pestle and mortar and grind. Set aside
  2. Asparagus – Snap the asparagus where it naturally breaks so you can discard the woody end. Chop the spear ends into half finger length pieces. Blanche these in simmering water for just 2 minutes until just cooked but al dente and drain immediately. Cool under cold water to retain the green colour then allow to cool and dry.
  3. Eggs – Simmer the eggs in boiling water for about 8 minutes depending on their size. Aim for a hard boiled consistency but not overdone. Reduce the time a little if you like them runnier. Drain and cool in cold water. Peel and discard the shell and chop each egg into 8 pieces. Season with a little black pepper.
  4. Salad – Snap the outer leaves of the little gems into a large salad serving bowl and chop the hearts into pieces. Add the cooled and dried asparagus.
  5. Croutons – Heat a thin layer of oil in a frying pan on a medium high heat. When hot, add the bread cubes and some salt and pepper and fry until you have golden and crispy croutons. Drain on kitchen towel and set aside.
  6. Bacon – Add a little more oil to the pan if needed and fry off the bacon pieces until crispy and golden. Drain on kitchen paper then add to the croutons and set aside.
  7. Broccoli – Do this step last so the florets are still a little warm when added to the salad. Either get a clean pan or wipe out the last of the bacon juices and heat a tbsp of olive oil. Add the broccoli florets and season and fry until beginning to char and turn cripsy in places and the stems start to soften. They will have a nice al dente bite to them. As they begin to stir fry and soften, add the crushed spices and fry for a further minute.
  8. Serve – When ready to serve, add the stir fried broccoli to the salad and asparagus and toss well. Add the croutons and bacon and toss again.
  9. Squeeze over the juice of the lemon and a good drizzle of some good quality extra virgin olive oil and toss to combine.
  10. Finally carefully place the eggs on top!

RP - Asparagus