Posts tagged chocolate

Slow cooked shin of Beef with Cinnamon and Star Anise

image

There’s something about slow cooking which quickly prepared meals (regardless if wholesome and homemade) just cannot replace. Depth of flavour, love and attention and a melt in the mouth texture. Slow cooking allows so much time for the flavours to develop and infuse. I was skeptical at the extent to which just a small star of wooden star anise and a cigar coil of cinnamon could impart but it really is amazing at the subtle but very evident punch a pinwheel of spice can offer. Don’t worry, the chocolate cannot be tasted in an offensive way just a rich silky background to a beautiful sauce. Although I will warn you….don’t think about adding your favourite Cadburys bar. Keep it dark.

Serves 3-4

  • 1kg beef shin (allow a little more if feeding hungry chaps or leftovers)
  • 2 large onions, sliced
  • 1 pint red wine
  • 2 cinnamon sticks
  • 2 star anise
  • 5 black peppercorns
  • 1 bay leaf
  • 1 pint beef stock
  • 25g dark chocolate (85%+)
  • Flat leaf parsley
  • To serve – roasted cumin carrots, savoy cabbage, creamy mash
  1. If you can, soak the cuts of beef in the red wine with the cinnamon and star anise over night.
  2. When ready to cook preheat the oven to 120°C. Heat a large heavy bottomed casserole dish with a splash of light oil, pat dry the beef and season well. Brown in the oil on all sides until golden and then set aside.
  3. Add the chopped onion and gently cook until soft for about 15 minutes making sure they don’t catch on the bottom.
  4. Add the beef back to the pan and turn up the heat. Add the wine, the cinnamon, star anise, pepper and bay leaf.
  5. Bring to a simmer and simmer gently for a few minutes until the wine has reduced a little. Top up the pan with enough beef stock to cover the meat and prevent it from drying out on cooking.
  6. Place in the oven and cook for 3 hours with the lid on by which time it should be deliciously tender and falling apart.
  7. After 3 hours, remove from the oven and take out the beef and as many onions as you can and set aside.
  8. Drain the sauce (adding a little more stock if it has reduced too much) and discard the spices. Place the sauce in a saucepan and simmer gently to thicken slightly spooning off any fat. Season to taste.
  9. Add the chocolate and stir in until melted.
  10. Return the beef to the pan and heat through.

Serve with a sprinkling of chopped parsley with some deliciously creamy mash potato. Soften some chopped garlic in a knob of butter before adding some shredded savoy cabbage and braising until soft. Cumin roasted carrots with a charred edge are also a delicious pairing.

image

Marsala soaked Prune and Chocolate Brownies

image

image

The weather recently (with the odd exception) has been quite frankly horrendous that even the wine samples I bought home from work last week have resorted to their own wetsuits. (Some new Armit wine carriers which were enthusiastically handed out at work). If new to Armit Wines see here….we have a healthy collection of vino.

After a long week, some juicy samples were a welcome bounty to whisk home accompanied with the new sly advertising to an unshameful Friday evening in. Yes, I stayed in. It was bliss.

The wine. This Seresin Estate (Organic) Sauvignon Blanc is a definite crowd pleaser for those who love this NZ favourite. Flawlessly zesty with fresh, acidic and noteworthy mouthwatering and sharp gooseberry flavours. I immediately knew it would please my mum’s taste so off home I went the following day with sample and an extra shiny halo. Its a nice punchy wine but confirms my appreciation for more classic French wines which I’m growing to love more….

In addition to this white I also bought home a downright delicious and luxurious Marsala. My mind instantly went to my favourite wild mushroom, pancetta and marsala baked chicken recipe but I felt the harvest of my kitchen creations should be shared with the office so a baked creation was in order. Rich, moist and deep dark chocolate brownies with plump sweet prunes drunk and bloated on this boozy Marsala…

image

image

image

image

It is also ‘Fairtrade’ week so as a nod to the chaps at Green & Blacks and a toast to the founding of the Fairtrade Foundation I urge you to use their Fairtrade chocolate here or another equally good natured product. This basic brownie recipe (minus the prunes) is courtesy of Bill Granger and is one I’ve been meaning to attempt. Warming – they are very rich!

Marsala soaked Prune and Chocolate Chunk Brownies

Makes about 18-20 large ones

  • 350g caster sugar
  • 80g Green & Blacks Cocoa powder
  • 60g plain flour
  • 1 tsp baking powder
  • 4 eggs
  • 2 tsp vanilla
  • 200g unsalted butter, melted
  • 200g Green & Blacks dark cooking chocolate, chopped
  • 140g pitted prunes
  • 4 tbsp marsala
  1. Begin by soaking the prunes in the marsala for about 6 hours of overnight – the longer you do this the more they will absorb the booze so the less you will have to waste!
  2. Preheat the oven to 160°C and grease and line a brownie tin (mine was)
  3. Sieve the flour, baking powder and cocoa and mix with the sugar.
  4. Add the melted butter, eggs, vanilla and stir to combine.
  5. Chop the prunes into big chunks and add with the chopped chocolate and mix.
  6. Spoon into the lined brownie tin and bake for 40 minutes or less for an molten centre.
  7. Leave to cool in the tin before removing to a wire rack and slicing into decadent chunks.

Chocolate-torte-mousse-fudge-stlye-brownie-cake


This is an original Green & Blacks recipe with original G&B chocolate from my thumbed and chocolate covered copy of their first recipe book. I cannot take the credit for this decadent creation so I hail the writer of the book and the creator of the recipe….if I ever meet you, you deserve a big kiss….assuming you’re male, tall, dark and handsome that is….

In the original recipe, this ‘cake’ has been royally dusted in a shimmering sheen of gold dust. I didn’t get hold of any in time but to make it as glamorous and irresistible as the famous bond girl then go for it. I also chose to flavour mine with 1/3 ‘Maya Gold’ chocolate as suggested- an orange and spice flavoured bar. However, an orange, lemon or even salted bar (I’m dying to try that as I write) would be amazing too. Served with my marmalade and cocoa nib ice cream, the festive orange was a soothing addition.

image

image

image

Serves about 12

  • 200g dark chocolate, broken into chunks
  • 100g Maya Gold chocolate (or orange, lemon, salt, etc…)
  • 275g caster sugar
  • 165g unsalted butter, cubed
  • 5 eggs
  • 1 tbsp ground almonds
  • Icing sugar to dust
  1. Grease and line a springform cake tin (20-23cm wide). Preheat the oven to 180°C.
  2. Place the butter, sugar and chocolate with a pinch of salt in a heatproof bowl and place it over a pan of barely simmering water and heat gently until all melted and combined. Set aside to cool a little.
  3. Whisk the eggs with the almonds. When the chocolate has cooled slightly, fold the eggs in and mix well to combine. It will look like it won’t combine at first but pursue it until smooth and creamy.
  4. Pour the mixture into the tin and level off. Bake for 35-45 minutes until set but with a small amount of give when touched in the middle.
  5. Leave to cool completely in the tin before removing and serving at room temperature. Scatter with a generous snowy blanket of icing sugar or a bond-girl-style sheen of gold dust and serve voraciously with cream or ice cream.

image

image

Marmalade and Cocoa Nib Ice cream (and a new ice cream scoop)

image

Boxing day- a day to relax with the pressure and expectations of Christmas faded comfortably into the crevices of your cosy sofa. Or in my case, a free kitchen to russell up more delicious and decadent creations. A gloriously sunny and biblically beautiful walk in the crisp Wiltshire morning air to begin the day. Overlooking my precious village covered in a blanket of drifting cloud, it was all I could do not to take off into this pillow-like sea. Back home to the warmth of the kitchen I spent the afternoon in my own sheer bliss. Blogging contently in the sunshine which cast lovely welcome rays over the days creations.

This ice cream goes beautifully with Christmas pudding with its citrusy festive flavours. However, for Christmas 2013 dessert it was paired loyally with a dense, rich slice of chocolatey heaven which can only be described as a chocolate-torte-mousse-fudge-style-brownie-cake (see here for the full recipe). Decadently delicious!

This recipe has been adapted from a Nigel Slater version I have in a recent book. As an extreme dark chocolate fan (90%+ I am religiously found munching at about 9pm most evenings) I love the bitter and pure taste that it offers. Enter cocoa nibs, chocolate’s purest and most wholesome form. On a recent quest to find my similarly dark chocolate appreciating Pa a tasty Christmas treat, I stumbled upon the Rabot 1745 estate collection , a cocoa plantation in Saint Lucia and a branch of Hotel Chocolat. While Hotel Chocolat congers up thoughts of sugary praline and liquer filled chocolates, this range is pure bliss and original. Chocolate shopping by region- from Vietnam to Venezuela I lost blissful hours perusing the shelves only to be helped knowledgably by an enthusiastic assistant who allowed me to try the raw form of the bean used in the shop cafe.

The beans,in their shelled form, are ground like coffee beans in a conching machine until silky, fine and smooth. Little is added for the super dark stuff especially no sugar like your standard Cadbury’s bar which couldn’t taste further from the real thing. I cheekily asked for a couple of bags of the raw beans which I was kindly granted with. One for dad and one for my own personal experiments….

image

image

Marmalade and Cocoa Nib Ice Cream

  • 500ml single cream
  • 4 eggs yolks
  • 2 large tbsp caster sugar
  • 300-400g marmalade (depending on how strong it is. I used half thick cut peel and half thin….this is optional)
  • A handful or cocoa beans/cocoa nibs – available from Hotel Chocolat or some super dark chocolate chopped.
  1. Heat the cream in a saucepan until just below the boil and remove from the heat.
  2. Whisk the sugar and egg yolks together in a shallow bowl and sit it on a tea towel to stop it slipping. Whisking constantly, pour the hot cream over the yolks in a steady stream and whisk until smooth.
  3. Return to the pan and continue to whisk or stir on a low heat to allow it to thicken a little. It will thicken a little, enough to coat the back of a spoon.
  4. Chill thoroughly before stirring in the marmalade.
  5. Churn in an ice cream maker for about 30 minutes until thick and beginning to set. Before decanting into a box, rumble in your cocoa beans/nibs or your chopped dark chocolate.
  6. Alternatively, freeze in a container and whisk every hour or so until set to break up the ice crystals. Once nearly set, stir in the chocolate.

Served with my ‘chocolate-torte-mousse-fudge-style-brownie-cake’ it went down a treat!

image

Chestnut Bourbon Biscuits


image

image

image

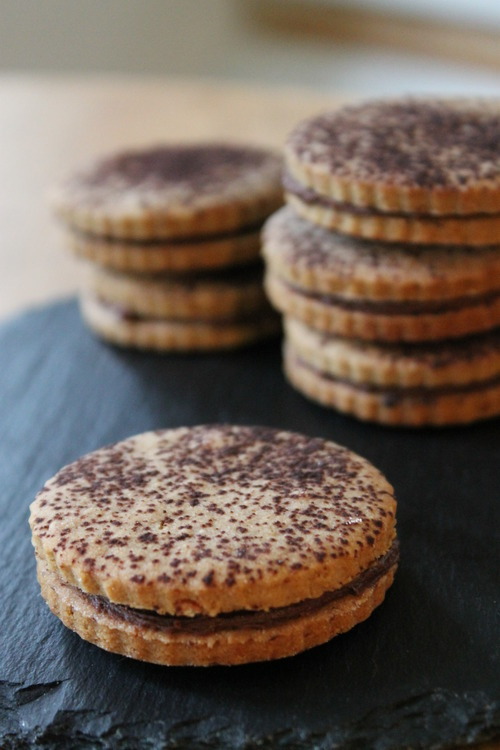
People often ask me where I get inspiration from for the recipes I blog. This one was unusually the Costa Coffee queue. Whilst waiting for my coffee at the counter I saw a giant bourbon and custard cream for sale. It seems these are the latest fad- giant confectionery which had me pondering that surely they are just the same as 5 normal biccies…? Anyway, its Autumn…chestnuts are littering my parents Wiltshire lawn like an unkept golf course so I thought I’d tackle not only the challenge of making something with them but with the challenge of making something sweet that wouldn’t get my mum rolling her eyes…

FYI. If I’d had a willing bottle of bourbon to hand I definitely would have added a splash to the filling instead of milk!

Makes about 15

Chestnut Biscuit

  • 75g raw chestnuts (of precooked vac-packed)
  • 85g dark soft brown sugar
  • 75g softened unsalted butter
  • 110g plain flour
  • 1/8 tsp baking powder
  • Cocoa to dust

Filling

  • 100g butter, softened
  • 85g icing sugar
  • 20g cocoa powder
  • 1 tsp milk
  1. Start by cooking the chestnuts. Score a large cross on the base of each with a knife. Place in a saucepan of water and bring to the boil and boil fast for 3 minutes. Remove from the heat. Drain and you should find the skin is easy to peel off.image
  2. Place in a food processor and blend to a paste with the sugar. Add the butter and puree. Add the flour and baking powder and blend to form a smooth ball of dough.
  3. Form into a disc shape, wrap in cling film and chill in the fridge for 30 minutes.
  4. Preheat the oven to 150°C . Roll out the dough on a floured surface and cut into whatever shape you like, just short of 1cm thick. Place on a lined baking tray and sieve over a sprinkling of cocoa powder.image
  5. Bake for 30-35 minutes until cooked and golden. Remove from the oven and leave to cool.
  6. Next, place the butter, icing sugar and cocoa in a food processor and blend. Add the milk and blend until you have a thick buttercream adding more milk for a thinner consistency.
  7. When the biscuits are cooled, spoon a teaspoon of the chocolate filling onto one biscuit half and sandwich with another.

image

Chocolate Orange Polenta Tarts


image

So I’m not going to lie, this was an experiment that I’ve been meaning to try since I wrote it down on my ‘to cook’ dissertation-style list/essay. It was successful but only after much cursing, trial and error and some kitchen instinct. So…tackle as you may but be prepared to get cross. I essentially used an orange polenta cookie recipe (see here) that I have previously made which is crumbly and delicious, as the ‘tart case’ instead of pastry. Sounds simple, you’re right. then fill with chocolate orange ganache….! I lined some mini greased tart tins with the mixture and baked. However, there was a tendency for it to melt into a big pool….I used the bottom of a ramekin to push the mixture down but baking beans and parchment may have been a good shout. The mixture type does have the tendency to crisp up and harden when it cools so keep hope.

 Makes 9 mini tarts.

  • 85g unsalted butter, cubed
  • 85g caster sugar
  • 130g polenta
  • 50g plain flour
  • Zest 1 orange
  • 1 egg
  • 150ml cream
  • 150g Green & Blacks orange chocolate
  1.  


    Firstly, read above for technical details before starting. Preheat the oven to 190°C and grease about 9 small tart cases

  2. Rub the butter into the polenta, flour and sugar until combined. Add the orange zest.
  3. Mix in the egg thoroughly and chill for 1 hour, covered, in the fridge.
  4. Now, use handfuls or the mixture to press and line the well-greased tart tins to form a nice case up the sides and over the base. The mixture is fairly greasy too so it shouldn’t stick on baking. I didn’t, but line with parchment and baking beans and bake from anywhere between 20-30 minutes (helpful, sorry)- the mixture may melt down the sides but press it up to create a case. Remove the beans once the edges have begun to turn light gold and crisp and bake for a few more minutes until the cases are set.
  5. Remove from the oven and leave to cool on a wire rack until really cold.
  6. While cooling, make the ganache. Simply bring the cream to near boil in a pan and then stir in the chopped chocolate and mix until melted.
  7. Leave to cool a little before spooning generously into the tart cases. Cover and chill for about 4 hours until set.
  8. Enjoy with a large dollop of cleansing creme fraiche and a grimace if this was a pain to make. Like I said it was an experiment!

NOTE: If the polenta casing was not for you, feel free to use a normal shortcrust pastry, spiked with orange zest or add a little polenta for crispness. You can also add marmalade or an orange curd to the base before pouring over the ganache which would be interesting…!?

image

Raspberry and Lemon Goo Brownies


image

image

Coma inducing, artery cloying, heart attack provoking…I could go on. But once in a while a little ‘indulgence’ is necessary. These are best left to be made for you by someone else. Not only for the pure reason that, this way, you won’t be exposed to their contents but because if I’m honest I had rather lost my appetite for all things sweet by the end of this weekends baking session and wasn’t able to enjoy them to their true potential. I am however, one step further away from conducting diabetes…However, if ever there was a gooey brownie recipe then this is it. I thought I’d try a little quirky take on the usual suspects by adding some lemon flavour in the form of the new Green & Black’s lemon bar which, thanks to them, I have generously stashed on the pantry shelf, teasing the rest of my ingredients with its youthful shiny complexion and style. It adds the tiniest of freshness to an otherwise rich brownie and is a nice tang with the rapsberries.

Although these brownies posed extremely sluttily and temptingly in their photo shoot when it came to sampling we actually all ended up cutting them into at least half as they are very rich. Therefore, when attempting this recipe, don’t hesitate to half the quantities used. Its obviously ridiculous but handling smaller quantities does make you feel like they are that little bit less unhealthy…!

Makes…more than enough (about 20)

  • 200g Green & Blacks Lemon chocolate
  • 100g Green & Blacks milk cooking chocolate
  • 250g unsalted butter
  • 400g soft brown muscavado sugar
  • 4 eggs
  • 140g plain flour
  • 50g Green & Blacks cocoa powder
  • 150g raspberries (or blueberries/blackberries/cherries etc)
  • Feel free to add nuts also if you like
  1. Preheat the oven to 180°C and line a 20 x 30cm brownie tin with parchment.
  2. In a large saucepan, combine the butter, chocolate and sugar and melt gently over a medium-low heat until all is melted and combined, stirring from time to time. Set aside to cool slightly.
  3. Making sure the chocolate is not too hot, beat the eggs in, one at a time, stirring vigorously. The mixture will thicken and turn smooth.
  4. Sieve in the flour and cocoa and fold in until well combined (add nuts here if using)
  5. Pour half the mixture into the lined tin, scatter with the fruits and then top with the remaining mixture. Alternatively add the fruit to the batter all at once.
  6. Bake for 30 (for really gooey) or 35 minutes until still soft in the middle. Don’t be tempted to leave them in longer if you think they are not done. They will set a little in the tray on cooling.
  7. Leave to cool in the tin before turning out and cutting indulgently. Serve proudly with a gym membership and a tangy topping of creme fraiche to your adoring, and now loyal, guests!

Delicious with the addition of chopped roasted nuts or different fruits. Serve with a lovely tangy creme fraiche, warm from the oven for extra (excuse the pun) brownie points with your guests.

image

Coffee and Olive Oil Truffles

image

image

Oh boy, these are dangerous. My mum’s friend recently provided me with a small, harmless and innocent looking bottle of ‘Coffee Extra Virgin Olive Oil’ (strange I know) with the challenge of making something with it!? On smelling it, my mind went to truffles. After a recent visit to William Curley’s chocolate sanctuary in Belgravia I felt inspired to use some of his sensational ingredient combinations. After trying his rosemary and olive oil chocolates I attempted my own version. With a packet of espresso flavoured Green & Blacks sitting on the shelf too, I thought this would add that extra kick of coffee flavour.

The oil in these, as opposed to the traditional cream, really does make  the truffles feel so much smoother without coating and cloying your mouth….they simply melt away.

Makes about 26

  • 80ml coffee olive oil OR plain Extra virgin olive oil
  • 100g Green & Blacks Espresso Chocolate, chopped
  • 125g Green & Blacks dark chocolate, chopped
  • 60g butter, cubed
  • Pinch salt
  • Cocoa for dusting/ chopped hazelnuts or mixed nuts/desiccated coconut
  1. Place the chopped chocolate, butter, oil and a pinch of salt into a heat proof bowl.
  2. Suspend over a pan of barely simmering water (do not let it touch) and heat gently until melted, stirring often.
  3. Once smooth and emulsified, pour into a clean bowl, cover and chill for at least 3 hours or overnight.
  4. Remove from the fridge. Use a spoon or a melon baller to mould out your truffles. Coat them in cocoa powder, chopped nuts or coconut or whatever else you like. Keep somewhere chilled but cover tightly if you are keeping them in the fridge as chocolate absorbs fridge smells….the last thing you want is a cheesy truffle?

imageimageimage

After Eight Macaroons

image


image

I don’t think I’ve ever met anyone who doesn’t like After Eights….or macaroons for that matter. These are, in my opinion, better than the real thing. The only unfortunate thing here is that they don’t come in those tiny little delicately folded envelopes…..oh and that you can’t play the ‘After Eight Game’! (If this is new to you check out this link. Hilarious game, especially after a few bevvies)

Makes about 12

Macaroons

  • 60g egg whites (about 2)
  • 40g caster sugar
  • 50g ground almonds
  • 110g icing sugar (minus 2 tbsp)
  • 12g Green & Blacks cocoa powder

Filing

  • 80g unsalted, softened butter
  • 100g sieved icing sugar
  • 1 tsp peppermint essence
  • Splash green food colouring
  1. Preheat the oven to 170°C and line a baking tray with parchment
  2. Blend the ground almonds, icing sugar and cocoa together in a food processor until fine and then sieve.
  3. In another bowl, whisk the egg whites until soft peaks form, then add the caster sugar a spoon at a time until glossy stiff peaks form.
  4. Fold in 1/3 of the almond mixture to loosen it. Then fold in the rest, being gentle not to knock the air out.
  5. Spoon into a pipping bag with a round ended nozzle and pipe consistent circles of the macaroon mixture evenly. Give the tray a sharp slap on the surface a few times to level them and leave for 25 minutes, uncovered to form a skin before baking.
  6. Bake for about 12-15 minutes. They are ready when they come away easily from the tray. Leave to cool.
  7. Make the buttercream filling by combining the ingredients in a processor and then spooning into a smaller piping bag.
  8. When cool, pipe small amounts onto macaroon halves and sandwich together!

imageimageimage

Dark and Stormy Cupcakes


image

image

Cupcake versions of cocktails are always a crowd pleaser that receive oooo’s and ahhhh’s from those greedy alcoholic denying guests we all have. A Green & Blacks ginger bar packs a strong ginger punch so works perfectly. A modest bottle of honey rum (from an adventure abroad- use dark rum if not) has been tentatively perched on the pantry shelf awaiting its calling and was eying up the ginger like a beautiful model in a bar, so was ready to be called into action as well. Lime frosting for a final characteristic flavour with the chocolate addition makes me wonder why the famous cocktail- ‘Dark and Stormy’ doesn’t contain chocolate already…..happy eating….it will be!

Cupcakes (Makes 12)

  • 100g Green & Blacks Ginger Chocolate
  • 115g unsalted butter
  • 115g caster sugar
  • 2 eggs
  • 2 tbsp ground almonds
  • 150g self raising flour
  • 1 tbsp Green & Blacks cocoa powder
  • 2 tbsp golden (honey) rum
  • Pinch ground ginger

Icing

  • 200g cream cheese/mascarpone
  • 60g sieved icing sugar
  • 2 limes, zest
  • Juice ½ lime
  1. Preheat the oven to 180°C and line a muffin or cupcake tray with cases.
  2. Melt the chocolate in a glass bowl over a pan of simmering water (make sure it does not touch the water) and melt slowly then set aside to cool a little.
  3. Cream the butter and caster sugar in a large bowl then beat in the eggs one by one.
  4. Add the ground almonds and then sieve in the flour, cocoa and a pinch of ginger and fold in. Add the rum and melted chocolate and mix until combined.
  5. Spoon the mixture into the cases and bake for about 20 minutes.
  6. Meanwhile, mix the icing ingredients and spoon into a piping bag and chill in the fridge until needed.
  7. When the cupcakes are cooked and cool, ice with the lime icing and add a grating of lime zest if you like! Serve…..perhaps with a ‘Dark and Stormy’ if you’re still feeling the need!

image

image