Category Poultry

Spiced Spatchcocked Quail and Beetroot Barely Risotto

Pearl barely has become my new favourite alternative to Aborio rice for use in a risotto. Ok its not ‘authentic’ Italian but it has a delicious nutty taste, a beautiful texture that goes deliciously with earthy beetroot and is packed full or nutrients. This dish is delicious served with lemony dressed rocket, some tender spice roasted poussin and a gooey quail egg. But remove the meat and its a vegetarians dream. Serve this to your meat hating buddies in place of the stereotyped mushroom risotto or quiche and you’ll be in their good books.

Serves 2

  • 1 x spatchcocked poussin or 2 small quail. Alternatively use chicken legs or breast
  • 1 tsp ground cumin
  • 1 tsp ground coriander
  • 1 tsp spice mix (see here)
  • 120g pearl barely
  • 1 pint hot chicken stock
  • 125ml red wine
  • 1 small red onion, chopped finely
  • 1 garlic clove, chopped finely
  • 1 sprig thyme, leaves picked
  • 200g cooked beetroot, pureed in a food processor (save a piece and cut into cubes for texture if you like)
  • Handful finely grated parmesan
  • 1 knob butter
  • ½ lemon
  • Rocket leaves to serve
  • 2-4 quail eggs
  1. Preheat the oven to 190°C. Season the bird. Coat in the dry spices and 1 tbsp olive oil and use your hands to rub the mixture into the meat.
  2. Place on a lined baking tray and roast at a high heat for about 40 minutes for a spatchcocked poussin/quail. Baste with the juice twice during cooking. Once ready, remove from the oven and let it rest for a few minutes before carving to serve.
  3. Meanwhile while the meat is cooking, make the risotto. Heat half a knob of butter with a small splash of oil in a saucepan. Very gently sweat the red onion in the butter for about 10 minutes until soft and translucent. Add the garlic and thyme and cook for a few more minutes. Season
  4. Turn the heat up to medium high and add the pearl barely. Toast in the pan with the onion stirring all the time. Next add the wine and simmer off until reduced.
  5. Turn the heat down to a gentle simmer and add the hot stock, ladle by ladle, adding more only after each addition has been absorbed. Continue for about 25minutes or so until the pearl barley is tender. Keep adding stock until the barley is cooked but don’t drown the mixture especially towards the end of the cooking time or it will be too runny.
  6. When the barley is cooked, stir through the beetroot puree and cubed beetroot and taste and season again. Bring back up to the heat to warm through.
  7. Add the grated cheese, another knob of butter and a generous squeeze of lemon juice and remove form the heat. Place the lid on top and leave it sit and rest while you see to the quail eggs.
  8. To cook the quails eggs to a soft boil, simmer them in a briskly boiling pan of water for 2 minutes. Remove from the heat and then plunge into cold water. When cool enough to handle, remove the shells.
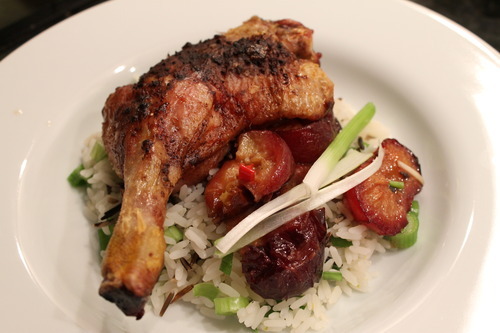
  9. To serve, spoon a generous spoonful of risotto into a warmed bowl. Top with a handful of rocket dressed with plenty of lemon juice and seasoning.
  10. Carve the bird as required removing the legs and the breast meat. Place on top of the rocket. Slice your eggs in half at the last moment and finish the dish with their runny yolk centres and a good grinding of fresh black pepper.
image

Hoisin Chicken


Bill Granger has inspired yet another comfortingly Asian and finger licking dish for this weekends menu. Perhaps its the chilly and wintery weather that has blanketed London recently? The defeated gloom and pessimism only English winter can bring to the weather beaten faces of a us resentful Brits caused me to find myself reaching again for my colourful sunny copy of Bill Granger’s ‘Everyday Asian’. Cooked to inspire some colour and sunshine into the tail end of January. Today the weather was mediocre and after a day of chilly London adventure, I returned home to a warm tasty and sticky bowl of hoisin chicken and rice.

Serves 4

Hoisin Chicken

  • At least 8 piece of chicken (a mix between thighs and drumsticks)
  • 100ml hoisin sauce
  • 1 tbsp chilli sauce
  • 2 garlic cloves, crushed
  • 2 tsp grated fresh ginger
  • 2 tbsp soy sauce
  • 2 tbsp lemon juice
  • ½ tsp five spice powder
  • Garnish – sesame seeds, sliced spring onions, lime wedges, chopped fresh coriander

Broccoli

  • 1 large broccoli
  • 2 tsp soy sauce
  • ½ tsp sesame oil
  • 2 tsp rice vinegar
  • 2 tsp runny honey
  1. Start with the chicken. Mix the marinade ingredients in a large baking dish and add the chicken pieces. Coat well. Leave to marinade for at least 20 minutes.
  2. Preheat the oven to 200°C. Roast the chicken for 35 minutes until cooked and glazed.
  3. Meanwhile, cook your rice if you are having this as a side dish.
  4. Mix together the dressing ingredients and lightly boil the broccoli just before the chicken is ready. Drain and leave to dry out a little. While still warm, toss with the dressing.
  5. Serve the chicken with rice (if you wish) and the broccoli. Scatter over sesame seeds, sliced spring onions and chopped coriander and any extra sticky glaze if you like!

image

Chicken Gyozas


image

image

image

These bitesized morsels are one of my boyfriends favourites. But how could I possibly be outdone and beaten by Wagamamas on any culinary level!? As a passionate cook and foodie how could I let it rest that there was a dish out there he’d rather order in over cooking! Challenge raised and accepted, out came my surface level competitve and perfectionists nature. So, this weekend I attempted to make my first chicken gyozas – aka Japanese dumplings if you’re a Japanese or Wagamama newbie. I’d never really had these before so the idea seemed daunting, with thoughts of specialised steamers or equipment. But I can’t lie….these could not have been easier to recreate at home! I’ll admit they are a little fiddly to assemble but with 2 or 3 under your belt they’re easy. The only draw back is the time consuming assembly as after the first 5 or 6 you begin to get bored with the repetitive nature. With my boyfriend away this weekend I thought I’d practice them alone – a wise move if I had any hope of winning (my own?) challenge. However, now I know they are a success an extra pair of hands for the assembly wouldn’t go amiss! But I stress now that once made the cooking couldn’t be easier. Fried then steamed in a matter of minutes! Fast food that is totally fresh, hot and steamed to order. You can even make them in advance and cook within 10 minutes for any hungry guests.

Recipe adapted (with good reason) from ‘The Hairy Bikers’. (Makes about 30!?)

Gyoza Skin

  • 150g plain flour
  • 150g strong bread flour
  • ½ tsp salt
  • 200ml boiling water

Chicken Filling

  • 500g minced chicken
  • 1/3 white cabbage, shredded
  • Large knob ginger, grated
  • 3 cloves garlic, grated
  • ½ tsp salt and pepper
  • 1 tbsp chopped spring onions (green parts)
  • ½ tsp chilli flakes
  • 1 tbsp sesame oil
  • 1 tbsp oyster sauce
  • Pinch sugar
  • Sunflower oil for frying

Dipping sauce

  • 6 tbsp soya sauce
  • 3 tbsp rice wine vinegar
  • Squeeze lime juice
  • Dash chilli oil
  1. Combine and taste. Adjust as necessary

Assembly

  1. Start with the dough. Mix the flour and salt in a large bowl and then gradually pour in the water using a knife to mix it. Keep mixing until it comes together to form a dough.
  2. Form the dough into a ball using your hands then wrap in clng film and rest and cool in the fridge for 1 hour.
  3. Meanwhile, combine all the ingredients for the filling in a large bowl and use your hands to squeeze the ingredients together.
  4. When ready to assemble remove the dough from the fridge. Chop in half to make it easier to handle and roll the dough as thinly as you can on a flowered surface. Use a 10cm cutter to cut rounds of the dough.
  5. Place a tsp of chicken mixture into the middle then use a dash of water to wet the circumference of the dough circle with your finger.
  6. Make the next bit as professional as you like. I made mine look more like mini pasties but as long as the filling remains locked in, it doesnt matter what they look like!
  7. Start by folding the dough over the filling so you form a half moon shape like a mini cornish pasty. Pinch together the middle so it sticks and do the same with the other sides. Pleat the edges however you like so it is tightly sealed. Place on a flowered tray while you make the rest.
  8. Repeat this with the remaining mixture until you have a tray of gyozas (about 30 depending on size).

Cooking

  1. When ready to cook, heat a large frying pan that can hold a fitted lid or a shallow saucepan with a tbsp or two of sunflower oil until hot.
  2. Fill the pan with as many gyozas as will fit in one layer placing them on thier flat base side for about 2 minutes until golden brown and a crust has formed. Make sure they don’t stick by giving them a shake now and again.
  3. Once a crusty golden base has formed, add 200ml of water to the pan and immediately fit with a lid. This will bubble up and steam up nicely so turn the heat down to a medium high or healthy simmer. Give them a shake to release any that are in danger of getting stuck to the bottom and then steam for 2 minutes.
  4. Remove the lid and cook for another 2 minutes.
  5. Serve immediately once removed from the pan and scatter with fresh chopped coriander and the dipping suace.
  6. Chopsticks for the experienced…..

imageimageimage

BBQ Chicken, Lime Slaw, Cheesy Polenta Chips


image

I love American food but it can be pretty big and diabetes inducing at times. But it can be done in a more refined way. Who doesn’t love the taste of spicy, sticky BBQ sauce lathered chicken. And as if not enough, a cooling, creamy and sharp tangy lime slaw is as welcome here as an ice cream in the Sahara.Tempted by spicy sweet potato chips I went for an alternative (like my demeanour) and a more health conscious unbeatable crunchy cheesy polenta chip. They were awesome. Girls, this is not date food mind (well first date food) I think there was more sauce on my face, hands, table and elbows (yes elbows…!) than on the chicken. Made to be devoured in the most unclassy fashion with a beer on a windy rainy October.

NOTE: This BBQ sauce recipe is very much like this one here. Use either!

Serves 2

Chicken

  • 2 chicken legs, jointed into thigh and drumstick is you like
  • ½ tsp cumin seed
  • ½ tsp fennel seed
  • 2 cloves garlic, crushed
  • 1 ½ tsp smoked paprika
  • Zest and juice of ½ orange
  • 3 tbsp balsamic vinegar
  • 75ml ketchup
  • Sprig of thyme and rosemary
  1. Crush the cumin and fennel together in a pestle and morta with the rosemary and thyme.
  2. Add to a bowl with the rest of the marinade ingredients and add the chicken.
  3. Leave in the fridge to marinade for about 1 hour.
  4. Preheat the oven to 200°C. Place the chicken in a dish and cover with foil. Bake for 30 minutes.
  5. After this time, turn the heat up and remove the foil. Cook for about 10 more minutes until the skin and topping is crispy and the chicken is cook through. I popped mine under the grill at this point too to get a really sticky crispy coating.

image

Slaw (pretty much open to any crunchy raw vegetables. I used a mix of the below)

  • 1 red pepper, sliced thinly
  • Handful of sugar snap peas, sliced thinly
  • ½ small cabbage
  • 1 small carrot, sliced thinly, grated or julienned
  • Bunch mint, chopped
  • Bunch coriander, chopped
  • 3-4 tbsp natural yoghurt
  • 1 tsp mayonnaise
  • Salt and pepper
  • Zest of 1 lime, juice of half
  1. Mix the vegetable together in a bowl
  2. Add the herbs and the lime zest
  3. Add the mayo, yoghurt some good seasoning and the lime juice together in a mug and stir well.
  4. Use as much as necessary to coat the vegetables.

image

Polenta Chips

  • 100g fast cook polenta, plus a little extra for dusting
  • 400ml (half water half milk)
  • ½ small chilli, chopped
  • Handful coriander, chopped
  • Large handful grated parmesan
  • Salt and pepper
  1. Oil/line a shallow soup bowl or baking tray that will hold the polenta and create about 2cm thickness.
  2. Heat the milk and water in a saucepan until it just comes to the simmer.
  3. Season the polenta well and add to the hot liquid in a thin stress stirring all the time. Keep stirring and it should begin to thicken very quickly and bubble. Keep stirring for a few minutes before adding the cheese, coriander and chilli. Keep stirring until it is thick like custard or porridge. Remove from the heat.
  4. Pour into the greased bowl.tray and smooth out to the thickness of 2cm. Chill quickly and leave to set for about 20 minutes.
  5. When cooled and set, turn onto a chopping board and cut into chip sized chunks. Dust with excess polenta
  6. Fry in a hot pan in a little oil until golden brown and crispy. Drain on kitchen paper and sprinkle with flaky maldon salt.

image

image

Sticky Soy Chicken with Baby Chilli Courgettes


image

image

A sticky ‘packs-a-punch’ glaze for some succulent chicken pieces courtesy of Bill Granger. I’ve managed to make it through my growing culinary life without (shamefully) having had Bill’s influence on any of my dishes? It could be his Australian roots that have kept his foodie inspiration at bay or perhaps (more likely) the Jamie Oliver shaped blinkers strapped to my head that had maintained my tunnel vision since discovering cooking? Who knows? However, with ‘Granger’s & Co’ round the corner from work and a growing love for Asian/Fusion cooking I have been sampling some of his culinary delights from Bills Asian Cookbook which is where this chicken marinade comes in. Baby courgettes courtesy of Portobello Market but normal ones work fine too!

Serves 2

Roasted Courgettes

  • 6 baby courgettes
  • 1 small red chilli, finely chopped
  • Bunch coriander, finely chopped
  • Juice ½ lime

Chicken

  • 4 chicken thighs/chicken pieces
  • 30ml dark soy sauce
  • 25ml Fish sauce
  • 55g brown sugar
  • 2 garlic cloves
  • Light Olive oil

To Serve: Coconut rice (I made mine with red Camargue rice here)

  1. Preheat the oven to 190°C. Heat a frying pan until hot with a little oil and brown the chicken all over until golden. Transfer to a baking dish and bake for about 15 minutes until cooked through.
  2. At the same time, roast the courgettes. Slice in half if using baby courgettes or into chunks if using large ones. Drizzle with oil and place in a roasting tray. Roast with the chicken for about 20 minutes. This can keep roasting until tender while you finish the chicken on the hob. (The courgettes also work amazingly grilled or charred on a griddle pan or BBQ)
  3. To finish the chicken, heat a little oil in a saucepan and fry the garlic lightly. Add the cooked chicken and the soy sauce and cover with a lid. Leave to simmer on a low heat for about 6-7 minutes making sure the pan doesn’t cook dry.
  4. Turn up the heat and add the sugar and fish sauce and stir to dissolve and combine. Heat for just a few minutes until the sauce goes syrupy and glazes the chicken.image
  5. Remove the courgettes from the oven and toss with the chopped coriander and red chilli. Squeeze over a little lime juice.
  6. Serve the chicken on creamy coconut rice with the chilli courgettes and coated liberally in any excess glaze.

imageimage

Mexican Roast Chicken Feast


image

image

Sometimes an English roast can be boring (shoot me now)…especially in summer. I’ve experimented with a Spanish roast (see here) but it was time for a Mexican Roast chicken over the weekend as my craving for dark creamy black beans took over. This chicken recipe is a great BBQ favourite of mine…and Jamie’s. You know a good marinade when you make it in the morning, refrain from eating there and then and think about it all day until that charcoal is ready! The sweetcorn puree adds a lovely sweetness to this to counteract the savoury beans and spicy chicken and greens.

Mexican Roast Chicken Feast – Serves 4

BBQ Chicken

  1. Marinade the chicken the night before if you can. Massage over the chicken making sure you get it into all the cracks.
  2. When ready to cook, preheat the oven to 180°C.
  3. Line a roasting tray with foil and place the chicken on top with the excess marinade. Wrap in foil and roast for about 1hr and 20 minutes depending on the size. For the final 15 minutes or so, turn up the heat to 200°C and remove the foil to allow the skin to crisp up and brown. (This recipe is actually best cooked in the oven first to keep it moist and then finished on the BBQ so you get that charred outer crust and moist meat).
  4. When cooked remove from the oven and leave to rest for at least 15 minutes wrapped in foil while you finish the side dishes.
  5. When ready to serve, carve rustically, scatter with fresh mint and give everyone a wedge of lime for squeezing over.

Black beans

  • 2 x tins black beans, drained (retain the juice only if not salted)
  • 2 large spring onions, chopped
  • 1 garlic clove, chopped
  • ½ red chilli
  • Bunch coriander chopped
  • Lime juice
  1. Fry the spring onion in a little oil to soften for a few minutes then add the garlic and chilli and soften for a few minutes.
  2. Add the beans and top up with a little hot water or the bean can juice (as long as it is not salted). Add enough to cover them gently and allow to simmer.
  3. Simmer gently for about 15 minutes until the sauce has thickened slightly. The consistency you want will depend on how you like them so simmer longer for a thicker texture. I like mine to be quite loose but still sit on the plate.
  4. Use a masher to lightly crush and mash some of the beans. This will help thicken the mixture and add texture but leave most of the beans whole.
  5. Taste and season. Add the coriander and a squeeze of fresh lime before serving.

image

Sweetcorn Puree

  • 1 x tin sweetcorn, drained.
  • Milk to cover
  • 1 knob butter
  • Salt and pepper
  1. Drain the sweetcorn and add to a saucepan. Add enough milk to just cover and bring to the simmer making sure the milk doesn’t boil over (not speaking from experience at all…..).
  2. Simmer for about 5 minutes then drain reserving the cooking milk.
  3. Add to a food processor with some salt and pepper and a large knob of butter. Puree for a good few minutes until really soft and creamy. Add a few tablespoons of the reserved milk as it blends to thin it out until you have the consistency you’re after.
  4. Sieve the mixture into the pan to remove the tough shells and produce a really creamy velvety puree (this is optional, just as good left non sieved). Set aside to keep warm.

Garlic-Chilli Broccoli

  • ½ red chilli, sliced thinly
  • 2 large cloves garlic, sliced very thinly
  • Sunflower oil for frying
  • Broccoli
  1. Heat a good glug of oil in a frying pan until hot. Fry the chilli and garlic for a few minutes until beginning to turn golden and crispy but make sure you don’t burn it. It can turn very quickly so remove from the heat and pour into a serving dish just before it looks ready, as it just turns golden as it will keep cooking a little after.
  2. Cook the broccoli al dente and drain well. While still warm, toss in the garlic-chilli infused oil and serve.

image

image

Plum and Five Spice Duck


An archived recipe I should have posted back in Autumn…pretend its Autumn and read on…

Slow cooked to perfection – plums are fashionably in season at the moment and duck is frankly deliciously tasty. It was a cold Autumnal evening. Need I say more….?

(Adapted from Jamie O)

Serves 4

  • 4 duck legs
  • 4 tbsp soy sauce
  • 3 tsp five spice
  • 2-3 star anise
  • 1 cinnamon stick
  • 1 tbsp olive oil
  • 1 red chilli, chopped
  • 16 plums, halved and stoned
  • 1 tbsp demerara sugar
  • 2 spring onions, sliced
  • Handful coriander, chopped
  • 8 oz wild/brown rice
  • 1 lime
  1. Marinade the duck legs in the soy, five spice, oil, star anise and cinnamon for as long as you can.
  2. Preheat the oven to 200°C and get a roasting tray ready.
  3. Place the chopped chillis, plums and sugar in the tray and drizzle over the marinade and mix well. Top with the duck legs, skin side up.
  4. Roast for 1-½ hours, turning the heat down after about 20-30 minutes once the skin is crisp and the fat has rendered a little. Alternatively, roast at a low 160-170°C for about 2 hours until the meat comes away from the bone and is tender.
  5. Meanwhile cook the rice. This is also lovely made with coconut milk (see here).
  6. Once the duck is ready, taste the sauce and adjust with soy to season and remove the cinnamon and star anise. Serve the rice topped with a duck leg and the roasted plums. Scatter with the sliced spring onions and coriander and a generous squeeze of lime.

image

Roasted Duck, Carrot and Orange Puree, Red Wine Sauce

This week I christened the kitchen of my new London flat. I bagged myself a feathery topped bunch of bargain carrots from Portobello Road market in my fleeting lunch break; a seasonal orange for companionship and festivity; a couple of fatty winter warming duck legs and some obliging red wine (of which I am not short of these days…). Flat hunting had evoked far too many saddened hours separated from my apron and camera so a free evening midweek was the perfect time to be reunited. Whilst it tasted delicious, I’m still to work on the lighting in my new environment….

Serves 2

  • 2 duck legs
  • Bunch carrots (About 4 large carrots), peeled and chopped
  • 25g butter
  • 1 orange
  • 250ml red wine
  • 250ml beef stock
  • ½ onion, diced finely
  • 1 small carrot, diced finely
  • 2 garlic cloves
  • Bunch of thyme
  • 1 knob butter
  • 1tbsp flour
  • Handful of greens to serve
  1. Preheat the oven to 200°C. Season the duck legs generously on the skin side and roast for about 45 minutes to 1 hour until crisp and tender. Turn the heat down to 190°C after about 30 minutes.
  2. Meanwhile, in a saucepan, fry the diced onion and carrot in a little oil until soft. Add one of the garlic cloves finely chopped and the thyme leaves and fry for a further few minutes.
  3. Turn up the heat and add the red wine and simmer for a few minutes. Add the stock and simmer briskly for about 20 minutes until the sauce has reduced by half.
  4. Once reduced by half, sieve and discard the vegetables and return to sauce to the clean pan. Season to taste and simmer very gently while you do the puree.
  5. Heat half the butter in another saucepan and add the chopped carrots. Add a whole clove of garlic (in skin) and 2 big strips of orange peel. Add enough water to just cover the carrots and simmer for about 10-15 minutes until really soft and almost all the liquid has been reduced.
  6. Puree the drained carrots in a food processor with the remaining knob of butter and some seasoning. Add a splash of the reserved liquid if you like to thin it out and then keep warm.
  7. Return to the red wine sauce. Mix together the knob of butter and the flour to form a paste in a small bowl. Whisk this, bit by bit (as you may not need all of it) into your simmering sauce which will thicken and turn glossy. Simmer until thick enough and ready to serve,
  8. Serve the puree topped with the roasted duck legs and a liberal drizzle of your red wine sauce. Serve with some cooked greens.

image

Green Chicken Curry


image

Its been a busy few weeks and the pantry has been in shameful neglect and I miss it badly. No work on a Sunday so it cannot possibly steal me from my apron and wooden spoon. I love this dish and these flavours. I hate the fact that amongst my travels, I haven’t ventured anywhere where I have been able to master and learn the art and recipe for an authentic Thai green curry paste that would put the salty and sugary rubbish you can buy in a supermarket jar to shame. Therefore with a little research, my (hopefully) good instinct and palate and a huge bomb proof granite pestle and motar this can be appreciated as a good English alternative. Feel free to use different vegetables, more herbs and it is absolutely open to adding a splash of whatever you think it needs. This recipe worked for me (this time) but I find it changes everytime depending on the strength and type of coconut milk, chilli or even the chicken. In this recipe, its important to taste as you go along!

Serves 4

Paste

  • Large knob ginger, peeled and sliced roughly
  • 2 red chillis, deseeded
  • 2 kaffir lime leaves
  • 4 garlic cloves, peeled
  • 1 stick lemongrass
  • 4 spring onions, chopped
  • Bunch of coriander

Sauce

  • 400ml thick coconut milk
  • 200ml chicken stock
  • 1tsp fish sauce
  • 1tbsp soy sauce
  • 50g desiccated coconut
  • 200g sugar snap peas/green beans/mini baby corn
  • 8 chicken thighs, boned (optional)
  • 1 tsp sesame oil
  • Handful of basil, coriander,and 2 spring onions to garnish
  • 2 limes (1 for serving)
  • 6oz wild/brown rice
  • 4 cardamon pods
  • Popadoms to serve
  1. Preheat the oven to 190°C.
  2. Start with the paste. Using a pestle and mortar, firmly pound together the ginger and the chilli. Add the lime leaves and repeat.
  3. Add the garlic, the lemon grass and the spring onions and pound everything together firmly until you form a really mashed and blended paste. Add the coriander leaves and pound in. Reserve your paste to a bowl.
  4. Heat a heavy based pan or casserole dish with a splash of sunflower oil over a high heat. Season the chicken thighs and fry skin side down until a really crisp skin forms.
  5. Add the sesame oil and remove them from the heat. Remove from the pan and reserve to a plate
  6. Over a medium low heat now, add the curry paste and fry for a few minutes until fragrant. Add 2-3 tbsp of the coconut milk and mix. Add a splash more coconut milk and mix in before adding the rest. Add the fish sauce and soy sauce and stir together. Bring to the boil and add about 200ml of hot chicken stock to form a thickish sauce.
  7. Return the chicken to the pan, try to keep the skin above the liquid to retain the crispy skin but don’t panic if not it can be crisped up later.
  8. Cook for 25 minutes in the oven, uncovered. While cooking, cook your rice with the cardamon pods thrown in or a cinnamon stick if preferred.
  9. Once the chicken is cooked and tender, remove from the dish from the oven. Remove the chicken from the pan and, if the skin isn’t crisp, place on a baking tray under a hot grill and crisp it up while you deal with the sauce. Alternatively, remove to a warm place to rest.
  10. Place the sauce over a medium high heat on the hob and bring to a simmer. Add the sugar snaps (or vegetables being used) and the coconut and simmer for a few minutes. Add the juice from ½ lime and taste. Adjust the taste as needed, adding soy for seasoning.
  11. Return the chicken to the pan. Scatter with chopped basil, coriander and thin slices of spring onions. Squeeze over the juice from the other half of the lime and bring to the table to serve with the rice.

NOTE: This can be adapted in many ways. Try topping with toasted coconut for texture of chopped salted peanuts.

Quadruple Tapas

I know the concept behind tapas is to eat each dish as it is ready- picking at little morsels of delicious oily, salty and punchy delights to give all your taste buds a go on the flavour dodgems. A long evening should be spent savouring tapas with no where to be and sipping delicious wine in the summer sun. However, I decided to make a selection for dinner and couldn’t find the relaxing side of constantly running back and forth to the kitchen to fry a croquetas or bake some fresh bread or turn off one of 100 timers. So I made a selection all to be eaten and enjoyed together with some delicious wine. I won’t lie, my way took a strong organisation and a large accommodating hob but I managed it. In addition, I have a new found respect for tapas bars….the amount of work that goes into the prep to bring together all the aspects and flavours of just one small dish is huge,-all requiring those little details to make them perfect. I won’t be opening a tapas bar in the near future but what can be gained from this experiment is that 1) I LOVE tapas but will leave it to the experts and 2) I won’t be so horrified at the staggering prices of a few small tapas dish from now on as I venture out to dine thinking that ‘tapas is just a cheap meal right?’.

image

image

Croquetas (Makes about 9 large croquetas)

I first saw a recipe for these in a Jamie Oliver book which this recipe is based on but they are a common little tapas dish and various flavours and recipe derivatives can be found elsewhere. They are essentially a cheesy flavoured bechamel sauce that is cooled and set and rolled in breadcrumbs and fried so that the inside in a hot molten cheesy mixture hugged lovingly in a crispy coat. You can actually use anything to add flavour to the sauce such as different cheeses, smoked fish, anchovies, different herbs or spices. Go wild!

  • 50g butter
  • 2 tbsp extra virgin olive oil
  • 75g plain flour ( and extra for coating)
  • 300ml milk
  • ¼ tsp ground nutmeg
  • 50g hard cheese- Cheddar/Manchego, grated finely
  • 3 slices of cooked smoked bacon/parma ham, chopped finely
  • Handful of chives, chopped
  • 1 egg, beaten
  • 100g breadcrumbs
  1. Melt the butter and the oil in a pan over a low heat until liquid. Spoon by spoon, incorporate the flour and stir in until you have a thick paste.
  2. Add the milk, splash by splash stirring in vigourously until smooth and lump free. Once all the milk is added, keep on the heat and keep mixing to prevent lumps but to really thicken the sauce.
  3. Once thick, remove from the heat and stir in the nutmeg, lots of seasoning, the bacon, cheese and finally the chives.
  4. Place into a chilled bowl and pop int he fridge until set. (NOTE: Mine was a little loose for moulding into croquetas so I popped it in the freezer about 30 mins before using to make it easier to handle)
  5. Get 3 plates and add the beaten egg, flour and breadcrumbs to each.
  6. Use a spoon to scoop and roll croquetas of your cooled mixture. Coat in first the flour, then the egg and finally the breadcrumbs. Continue you have done all and then cover and chill.
  7. Heat some oil in a pan, or use a deep fryer. When hot enough, fry the croquetas until golden and crisp on the outside. Make sure it is not too hot or the outside will colour before the inside is warm.
  8. Drain on kitchen paper and scatter with flaky salt and serve immediately.

image

Morcilla Broad Beans

This recipe is open to quantities so as long as there is a nice balance it will taste great. Don’t skimp on the morcilla however as it adds bags of flavour and depth and feel free to use black pudding which works just as well.

  • Morcilla, sliced
  • Broad beans, boiled and podded
  • Peas
  • 1 small red onion, finely diced
  1. Heat a little oil in a frying pan and gently fry the red onion until soft
  2. Add the morcilla/black pudding slices and fry until cooked on each side.
  3. Tip in the broad beans and peas and stir to combine, breaking up the morcilla as you stir to distribute evenly. Season and then serve.

image

Crisp Cod and Smoky Aioli

  • 2 cod fillets or any other firm fish
  • Plateful of polenta (seasoned with salt and pepper)
  • 1 egg, beaten
  • Flour for coating
  • 2 egg yolks
  • 1 garlic clove, grated finely
  • 2 tbsp lemon juice
  • ½ lemon, zest
  • 1tsp sweet smoked paprika
  • About 250ml sunflower oil
  • Flat leaf parsley for garnish
  1. Begin with the polenta coated cod which benefits from some time resting once coated. Skin the fish fillets and cut the fillets into chunky strips cutting with the ‘grain’/flakes.
  2. Get 3 plates and place the beaten egg, flour and seasoned polenta onto each.
  3. Coat the fish fillets in the flour, egg and then a good coating of polenta and then place the fillets on a polenta coated plate while you do the rest. Cover and place in the fridge for a few hours once done to allow the polenta to swell a bit and form a good crust.
  4. For the aioli, place the egg yolks, lemon and garlic in the bowl of a food processor and turn it on to blend together. With the motor running slowly and constantly add the oil in a thin stream to allow the yolks and oil to emulsify.
  5. As it starts to thicken, add the paprika and some good seasoning and have a taste. Continue to add as much oil as you like to obtain a thin/thicker texture.
  6. When ready to serve, fry the fillets in a little hot oil with a knob of butter for a few minutes on each side until cooked with a golden crust. Serve immediately garnished with parsley and dipped indulgently into the aioli.

Chorizo

This is now my new favourite way to enjoy chorizo, partly due to this sweet tangy glaze that coats it here. The sauce is wonderful when used a dipping sauce for the olive pittas or some qwilling bread to mop up the juices like an edible sponge.

  • 150g chorizo- raw or cooked
  • 1 ½ tbsp sherry vinegar
  • 1 tsp runny honey
  • Large sprig of rosemary
  • 3 large garlic cloves
  1. Cut the chorizo into chunky horizontal slices and fry in a hot pan (you can add a tiny drop of oil to get it going is needed).
  2. Peel and crush the garlic cloves coarsely with the back of a knife. If using cooking (raw) chorizo, make sure it is nearly cooked but if using cured chorizo, as it starts to colour and crisp add the garlic to the pan in the oily juices and fry for a few minutes.
  3. Add the picked rosemary leaves and fry for a few more minutes.
  4. Remove from the heat and add the sherry vinegar and the honey and stir to coat the chorizo.
  5. Return to the heat and very gently simmer the sauce until a little more syrupy and thick but not too reduced. Remove from the heat, cover and keep warm while you do the rest of your dishes as this one will keep.
  6. Serve with the olive pittas or some fluffy bread dipped into the beautiful oily juices

image

Olive Pitta

  • See here for pittas recipe– Don’t add the nigella seeds but instead, add a good pinch of sweet smoked paprika.
  • Once the dough has risen, add in a small handful of both chopped black olives and sun dried tomatoes.

image